
How to write a Winning Proposal in Word 2013?
Introduction
Quite often you need to produce documents that should appeal to others. You might be sending a sales proposal to a customer or share a business plan with potential investors. In this video, I’ll show you how to write a winning proposal with an attractive cover page and live videos.
How to create a cover page in Word?
Here I have a proposal that I’m working on for a customer. I want to add a more attractive cover page to make the proposal stand out a bit more. There are a number of built-in cover pages that you can try in Word 2013. To insert a cover page, click “INSERT” and then “Cover Page”.
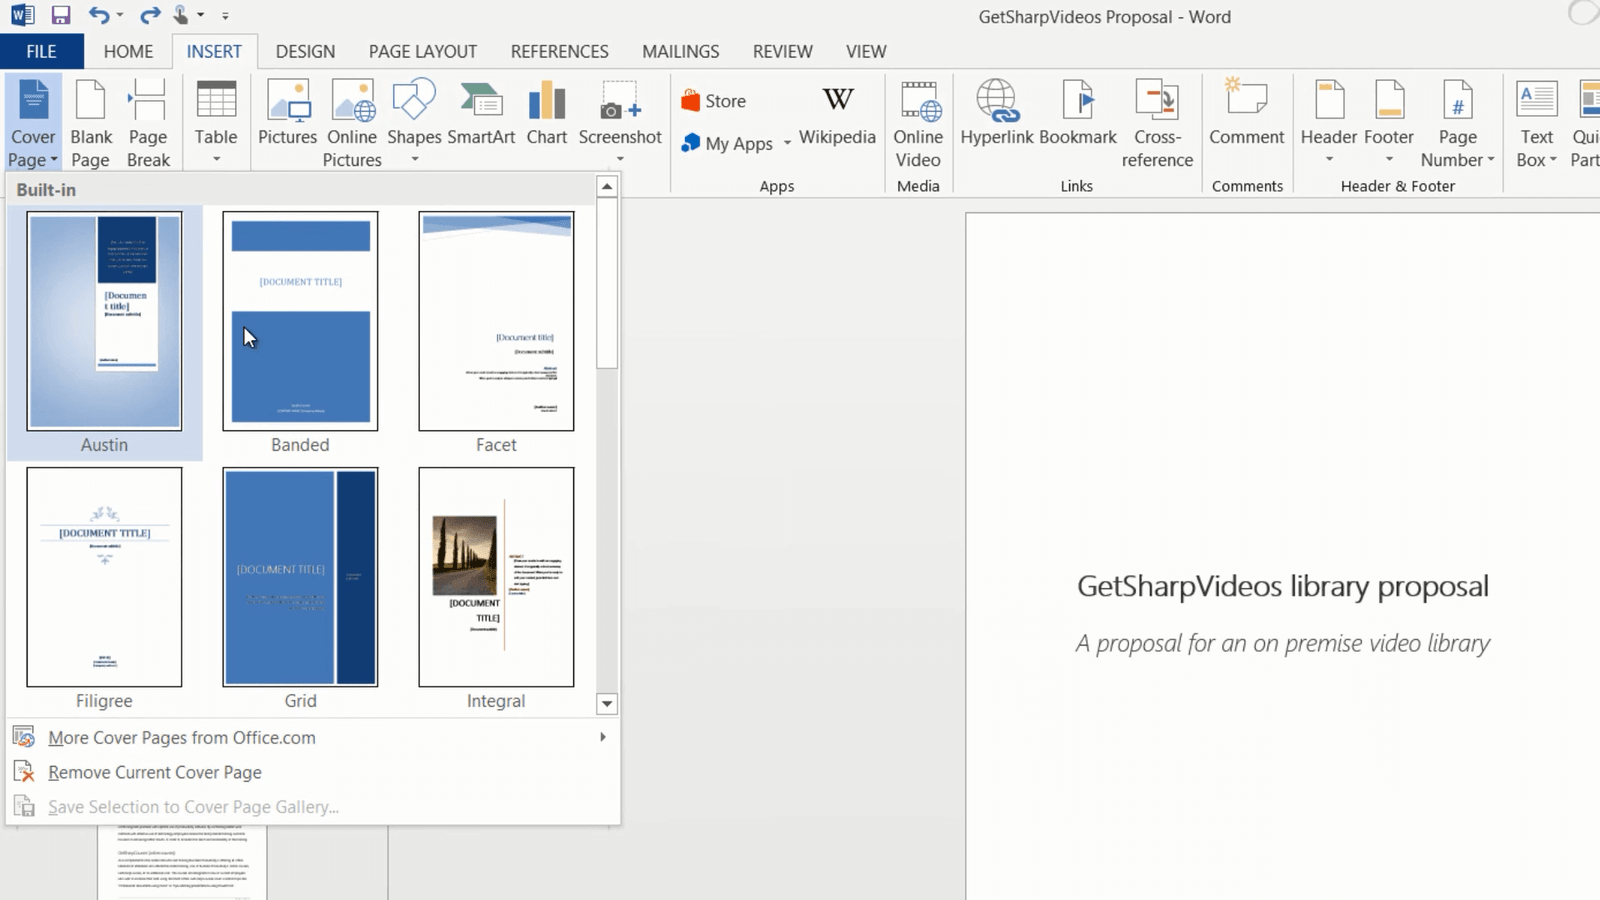
You can try out a number of different styles to get inspiration for your cover page. In this case, I’ll create a cover page from scratch so I’ll just click “Undo”.
First I’ll insert our logo by clicking “INSERT”, “Pictures” and then select our logo. I’ll click the “LAYOUT OPTIONS” button and select to wrap it with text and place it in front of the text. This way I can position it exactly where I want it.

Next, I’ll insert a shape to the right. I’ll click “INSERT”, “Shapes” and then select a rectangle. I’ll draw the rectangle along the right side of my document. I won’t draw it all the way to the edge because if I do my document will just scroll down, so I’ll use the size measurement to extend the rectangle all the way to the bottom of the page.
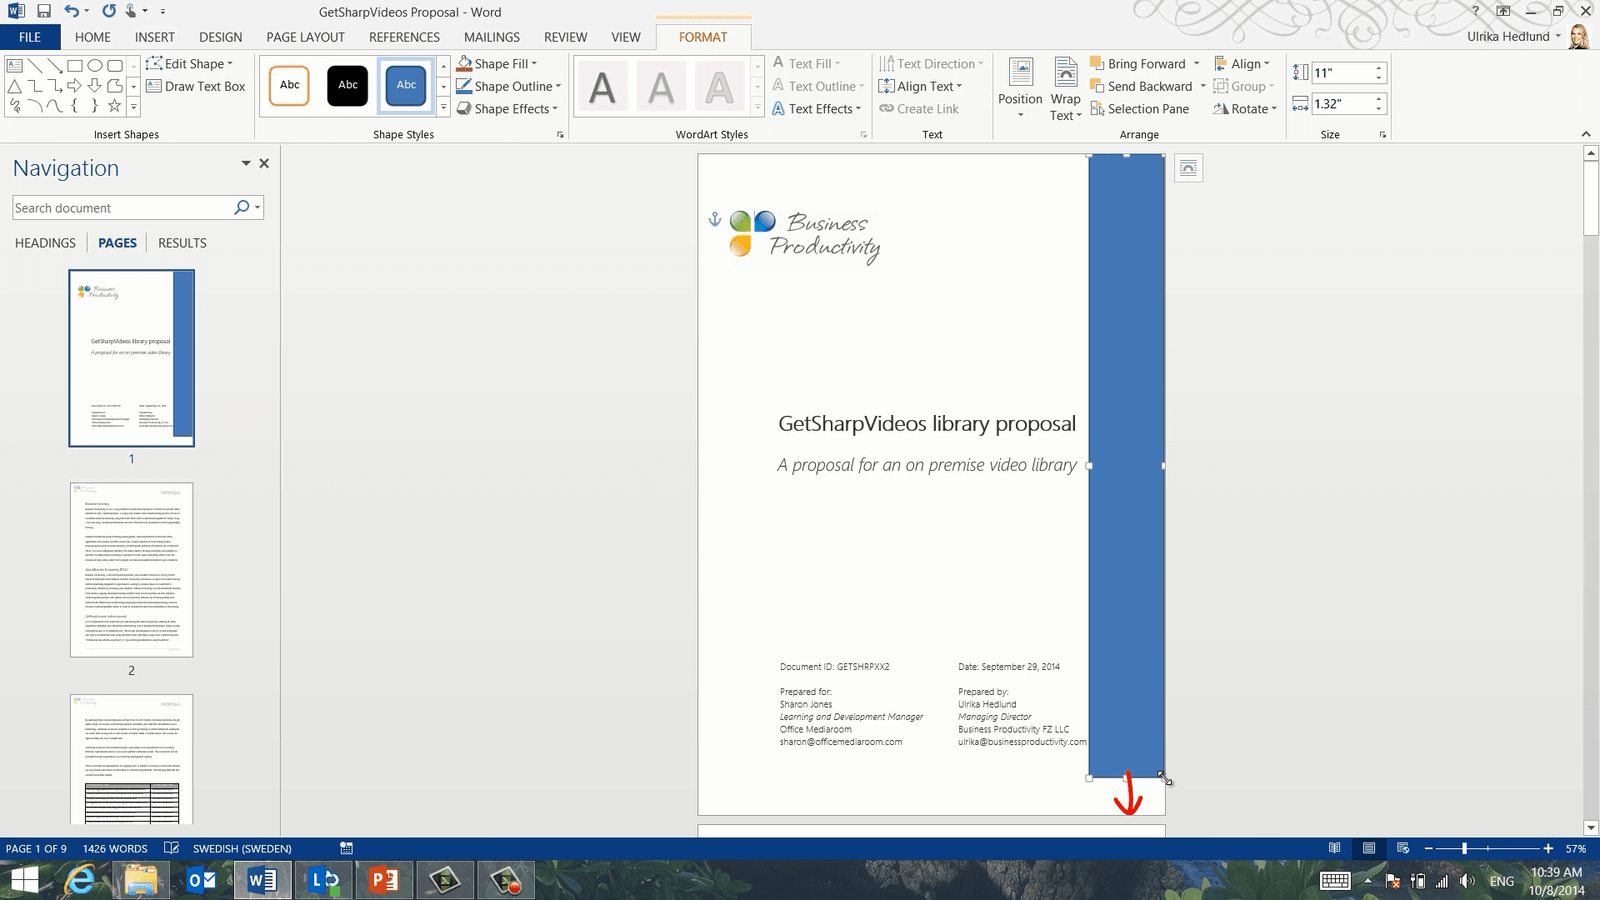
I’ll change the design and select a color that goes better with our logo. I’m not thrilled about the color of the shape, so I’ll open up the formatting panel by right-clicking the shape and selecting “Format Shape”. I’ll open up the “FILL” section and look at the Fill settings, here I’ll remove one of the “Gradient stops”.
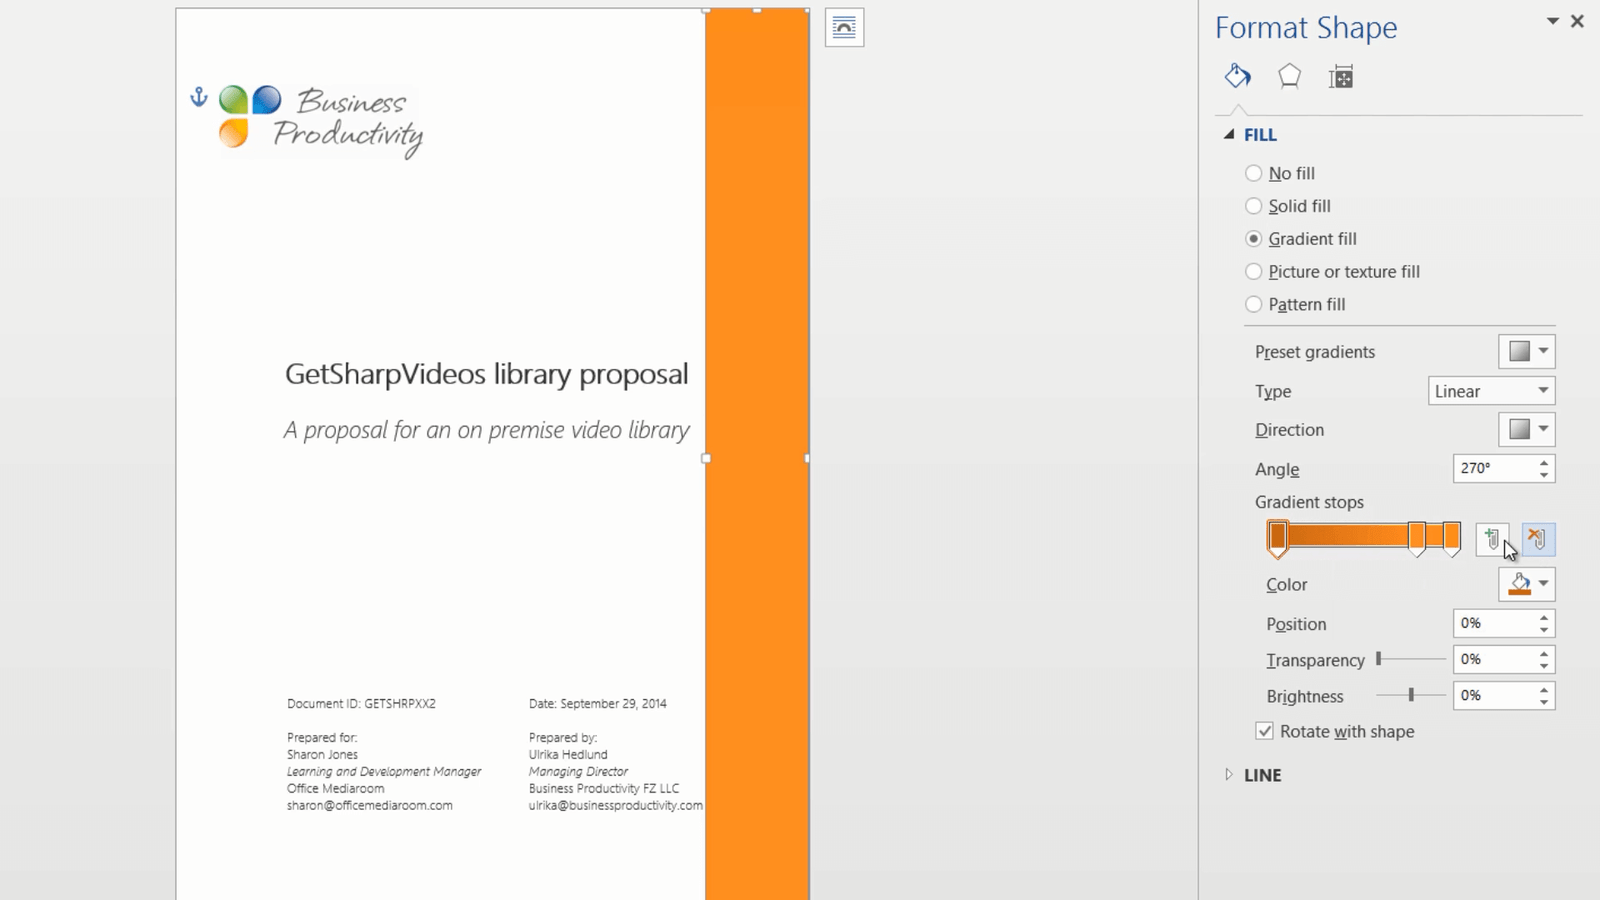
I want the remaining gradient stops to pick up colors from our logotype, but it can be quite difficult to pick these exact colors by just looking at the color chart. If you want to format your shape with the exact colors as your logo, you can use the Eyedropper tool in PowerPoint. Copy your logo and shape into PowerPoint. Select color for your gradient stop, and in the color drop down select the “Eyedropper”.
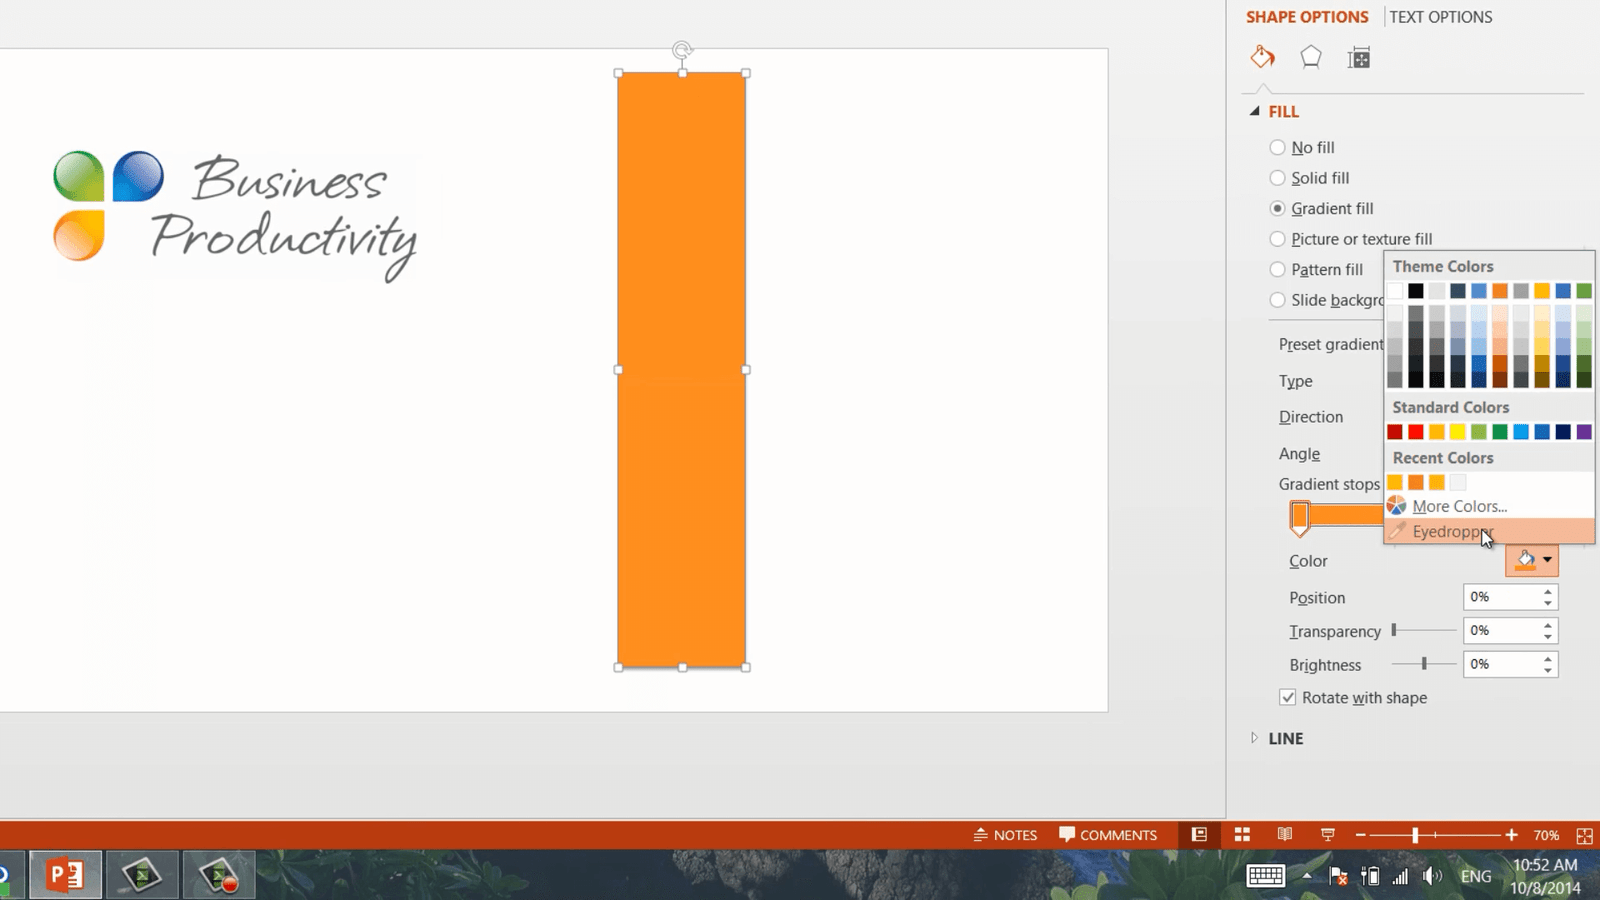
Now place the Eyedropper above the color you want to choose. You will see the exact RGB color combination for the color.

Note down the exact color combination you want for your shape and then enter them manually into the color settings for your two gradient stops in Word.

This way you get the exact colors you are looking for. Finally, I’ll open up the “LINE” section and select “No line”. There, now the cover page looks much more attractive.
How to insert online videos in a Word document?
On the first page of the proposal, I’d like to add a richer introduction to our company by inserting a corporate video that we have on YouTube. To insert an online video into your document in Word 2013, go to the “INSERT” tab and click “Online Video”. Here you can search various video services.

I’ll search for our video on YouTube. Select the video and click “Insert”. A thumbnail of the video is inserted into the document. I’ll change the layout options to wrap the image with text and position the video thumbnail where I want it in the paragraph. If the reader is online while reading the document he or she can play the video by just clicking the thumbnail image. By inserting a video into the document itself you don’t risk losing the reader’s attention by opening up another website.
How to keep headings with the paragraph in Word?
Now that I’ve inserted the video into my document I can see that the heading of the next paragraph is separated from the text itself. To keep all headings in your document with the paragraph, right-click the heading style and select “Modify”. Click “Format” and then “Paragraph”.
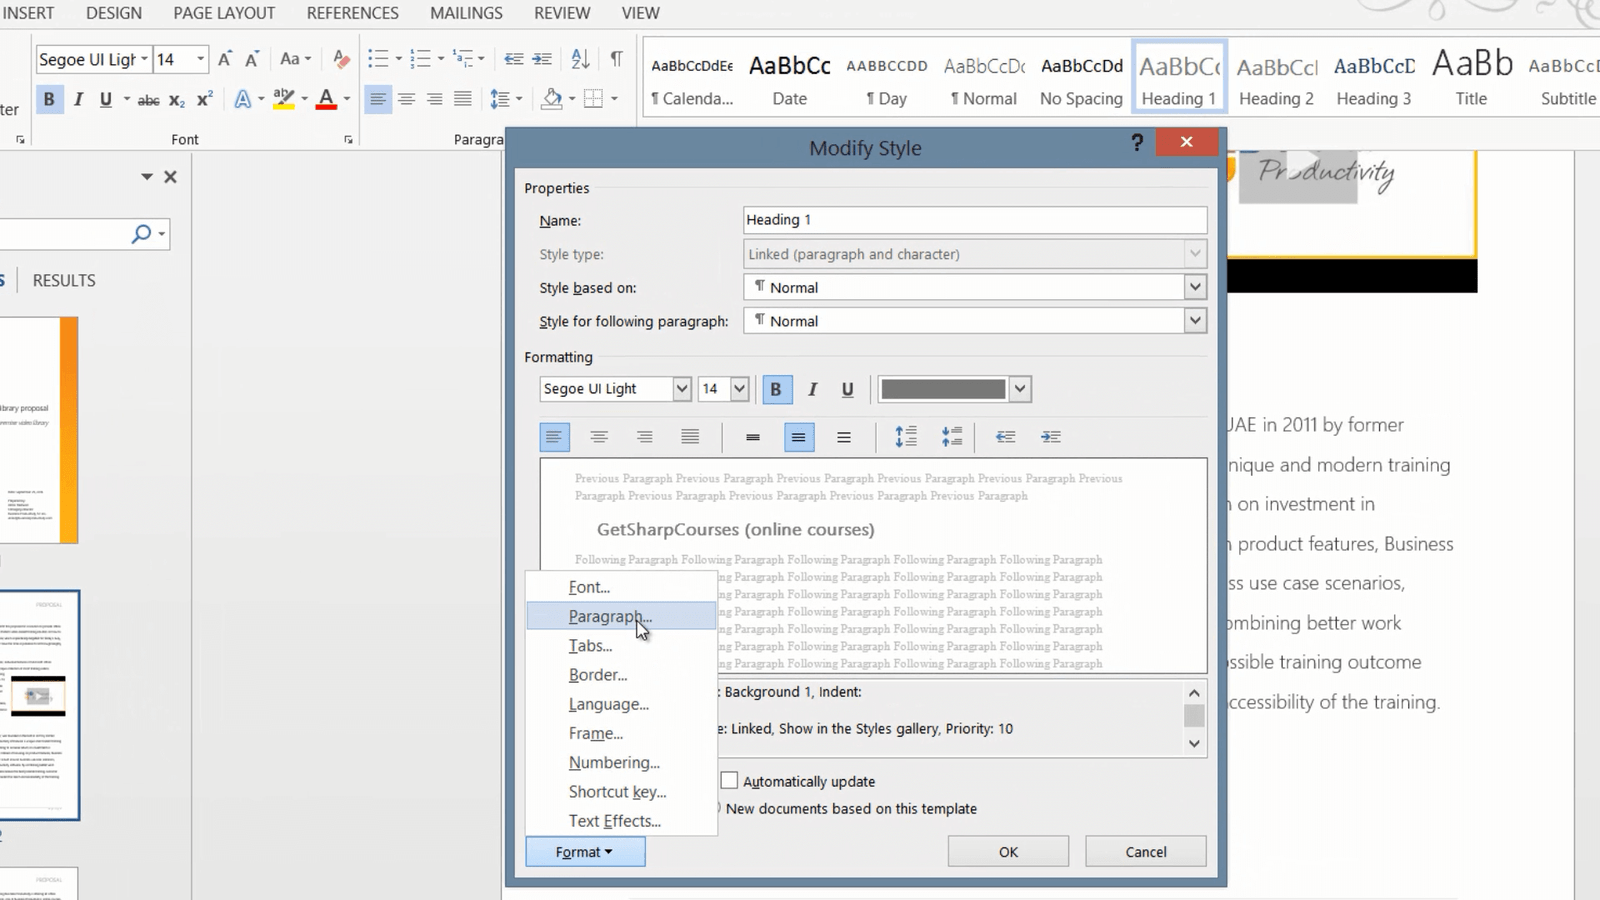
Go to the second tab called “Line and Page Breaks” and mark the option “Keep with next”. Click “OK” and then “OK” to apply the changes. As you can see, the headings are now kept together with the paragraph text.
How to keep tables on one page in Word?
Further down in my document I have a table that’s been split into two pages. Since this is a quite short table I want to make sure that the entire table stays on the same page. To keep all rows of a table on the same page, mark the table and open up the Paragraph settings by clicking the little arrow in the “Paragraph” section on the “HOME” tab.
Open up the second tab called “Line and Page Breaks”. In Word, each row of a table is considered a separate paragraph, so by marking the option “Keep with next” you will keep the rows together on one page. Click “OK” and the table is moved to the next page.
How to insert tables in Word 2013?
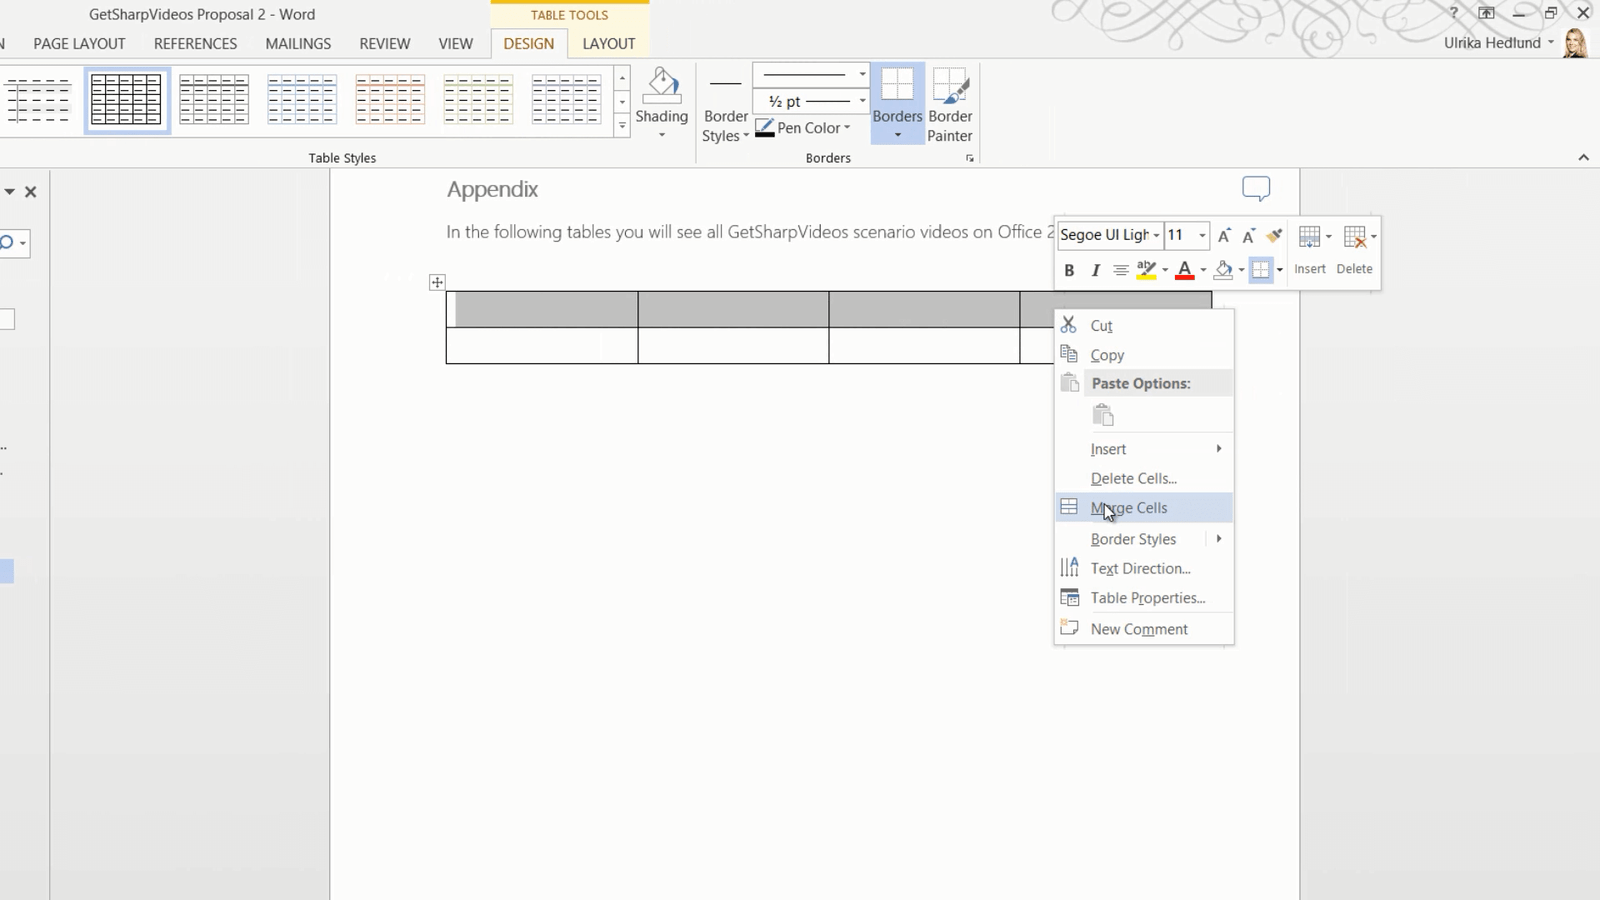
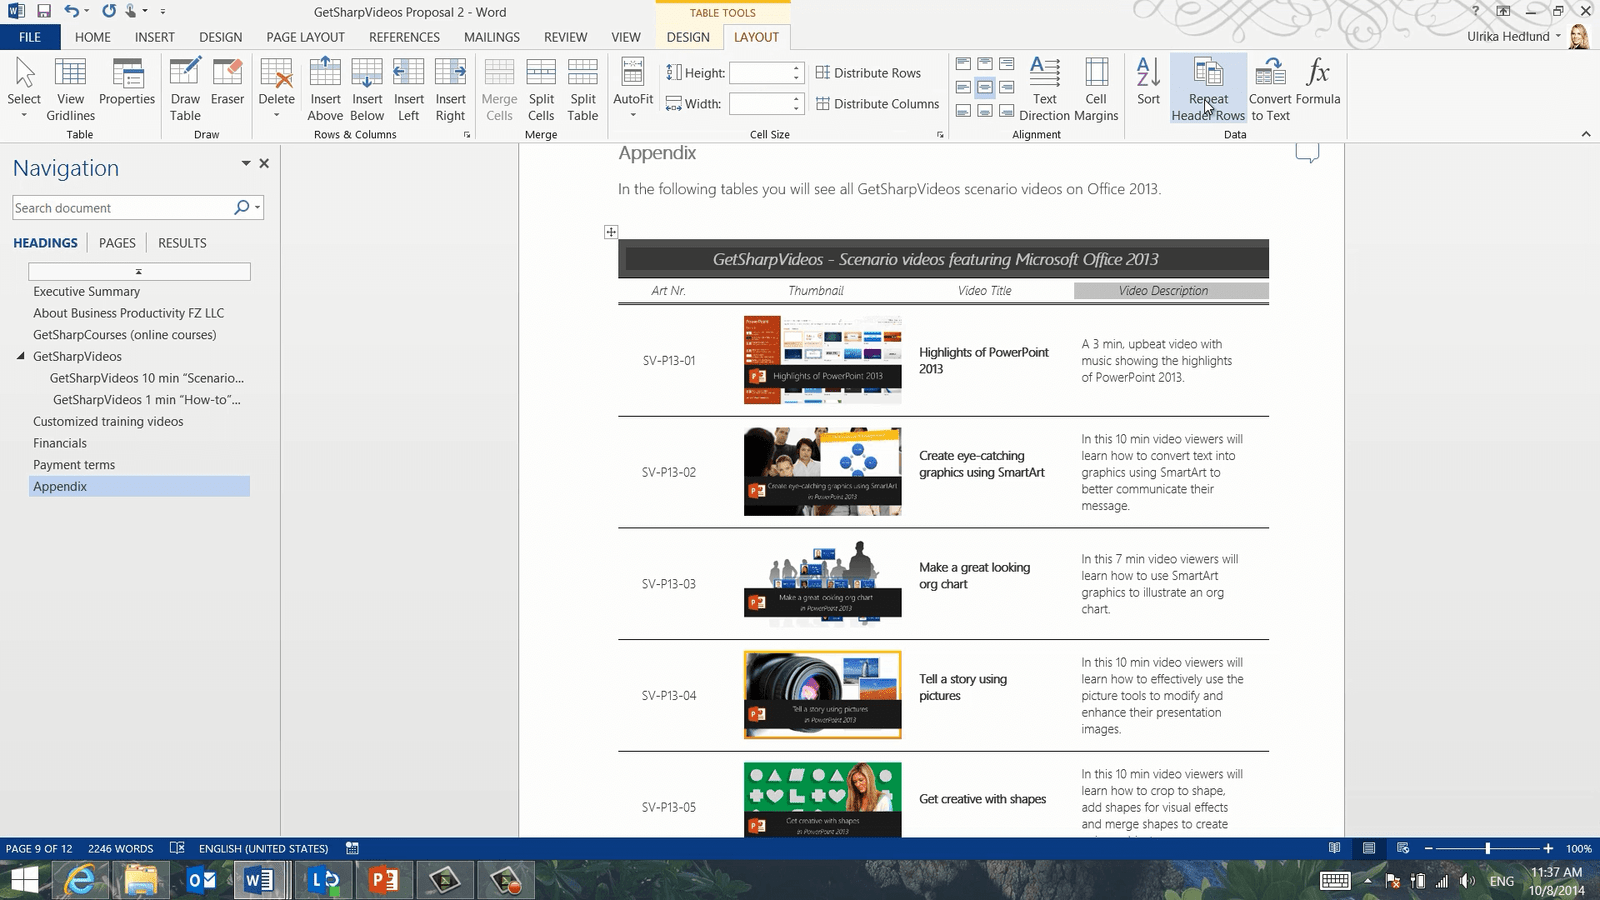
I want to insert one more table in the Appendix. I’ll click “HEADINGS” in the “Navigation” pane and click on the “Appendix” heading to go there. I want to insert a table that looks like this, with a title at the top and then four columns with information.

To insert a table in Word, click “INSERT” and then “Table”. Here I’ll select four columns and two rows. The first row should contain the title so I’ll mark all cells, right-click and select “Merge Cells.”
Next, I’ll write the table heading and then change the formatting. I’ll click “Shading” and change the color to grey, and then I’ll use the mini-toolbar to format the text. After that, I’ll add the column headings.
Working with tables in Word 2013 is much easier than before. I can easily add a row anywhere by just hovering to the left of the row and clicking the plus sign.
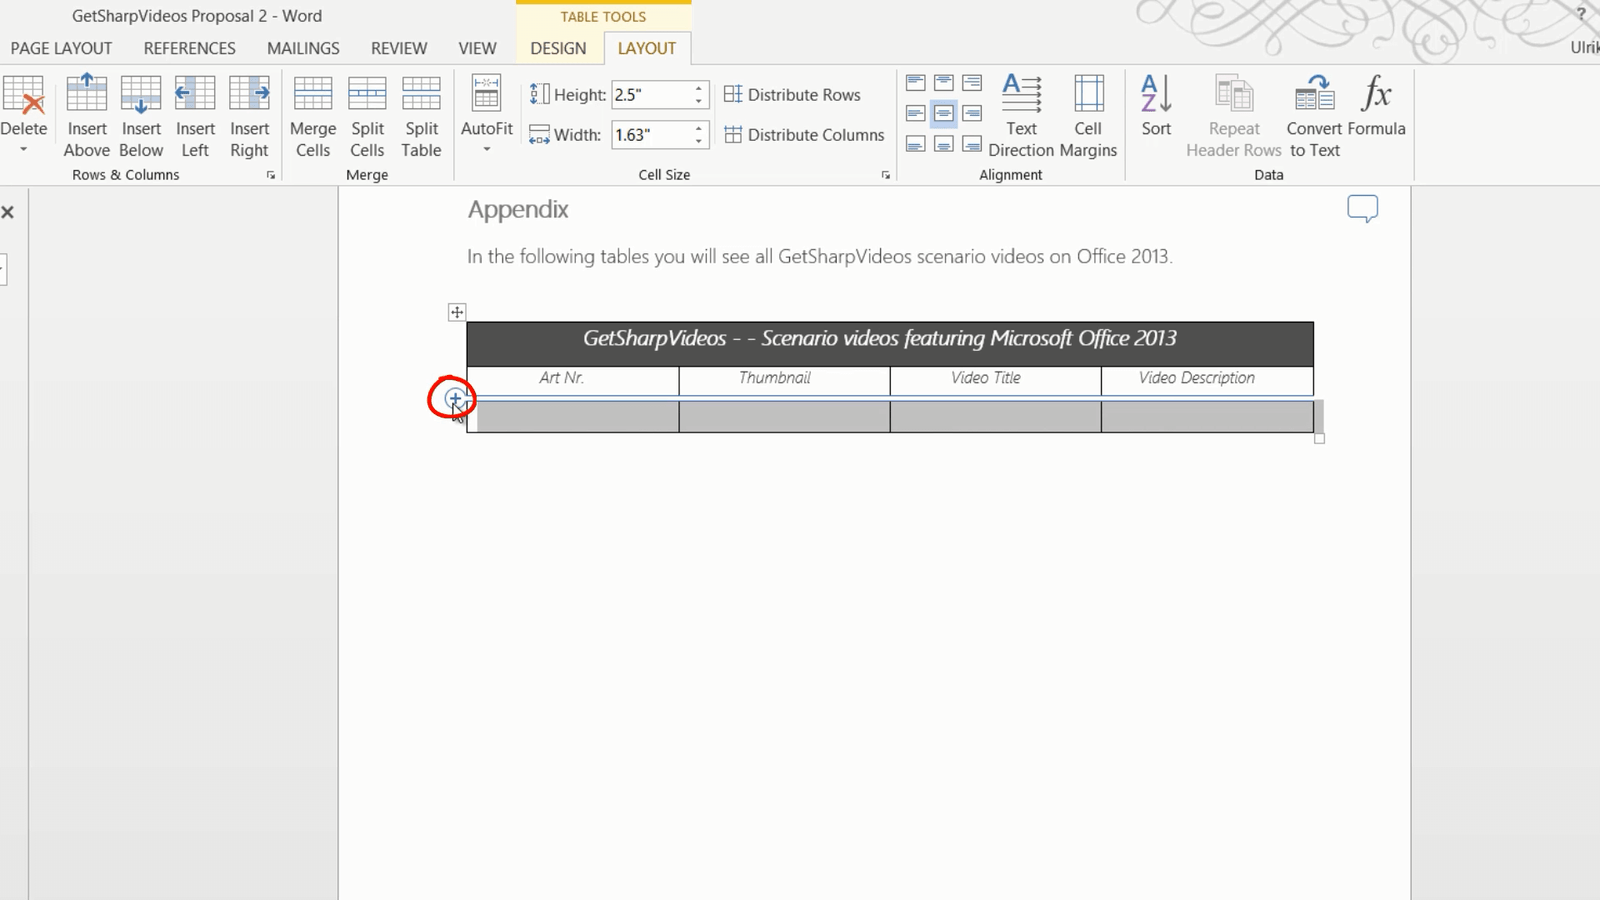
In the same way, I can easily add more columns by placing my marker to the right of a column and pressing the plus sign. I’ll populate the entire table with my information.
How to change the table borders in Word?
Now I want to change the table borders. I’ll mark the entire table and click “Borders” and select “No Border”.
I’ll click “Borders” again and select “Inside Horizontal Border”. I want to add borders at the bottom of the table as well, so I’ll click “Borders” again and select, “Bottom Border”. Now I want to have a double border at the top, so I’ll click the “Border Styles” and select a double line. My mouse cursor turns into a little paint brush. Now I’ll paint the border I want to change. Perfect. I’ll click the “Border Painter” again to turn it off.
Repeating table headers on multiple pages
Since this table is quite long it splits between multiple pages. To repeat the table and column headers on each new page, mark the rows you want to repeat, here I’ll mark the first and second row. Go to the “TABLE TOOLS” and select the “LAYOUT” tab. Click “Repeat Header Rows”.
Now the two rows are repeated on each new page making the table much easier to read.
Inserting a page in landscape layout
In the Financial section, I want to add a table I have in Excel. I’ll select the entire table in Excel, right-click and select “Copy”, I’ll paste it into my Word document by right-clicking and selecting paste as an image. In order to see the numbers properly, I want this page to have a landscape layout.
To insert a single page in landscape mode, position your cursor where you want the landscape page to begin. I’ll place my marker at the start of the financial section. Click the “PAGE LAYOUT” tab, “Breaks” and then select a “Next Page” section break.

Insert one more page break where you want the page to end, I’ll place my marker at the end of the image.
If you want to see the page breaks you just inserted click the “VIEW” tab, and then select “Outline” view, in this view the “Section Breaks” are visible.
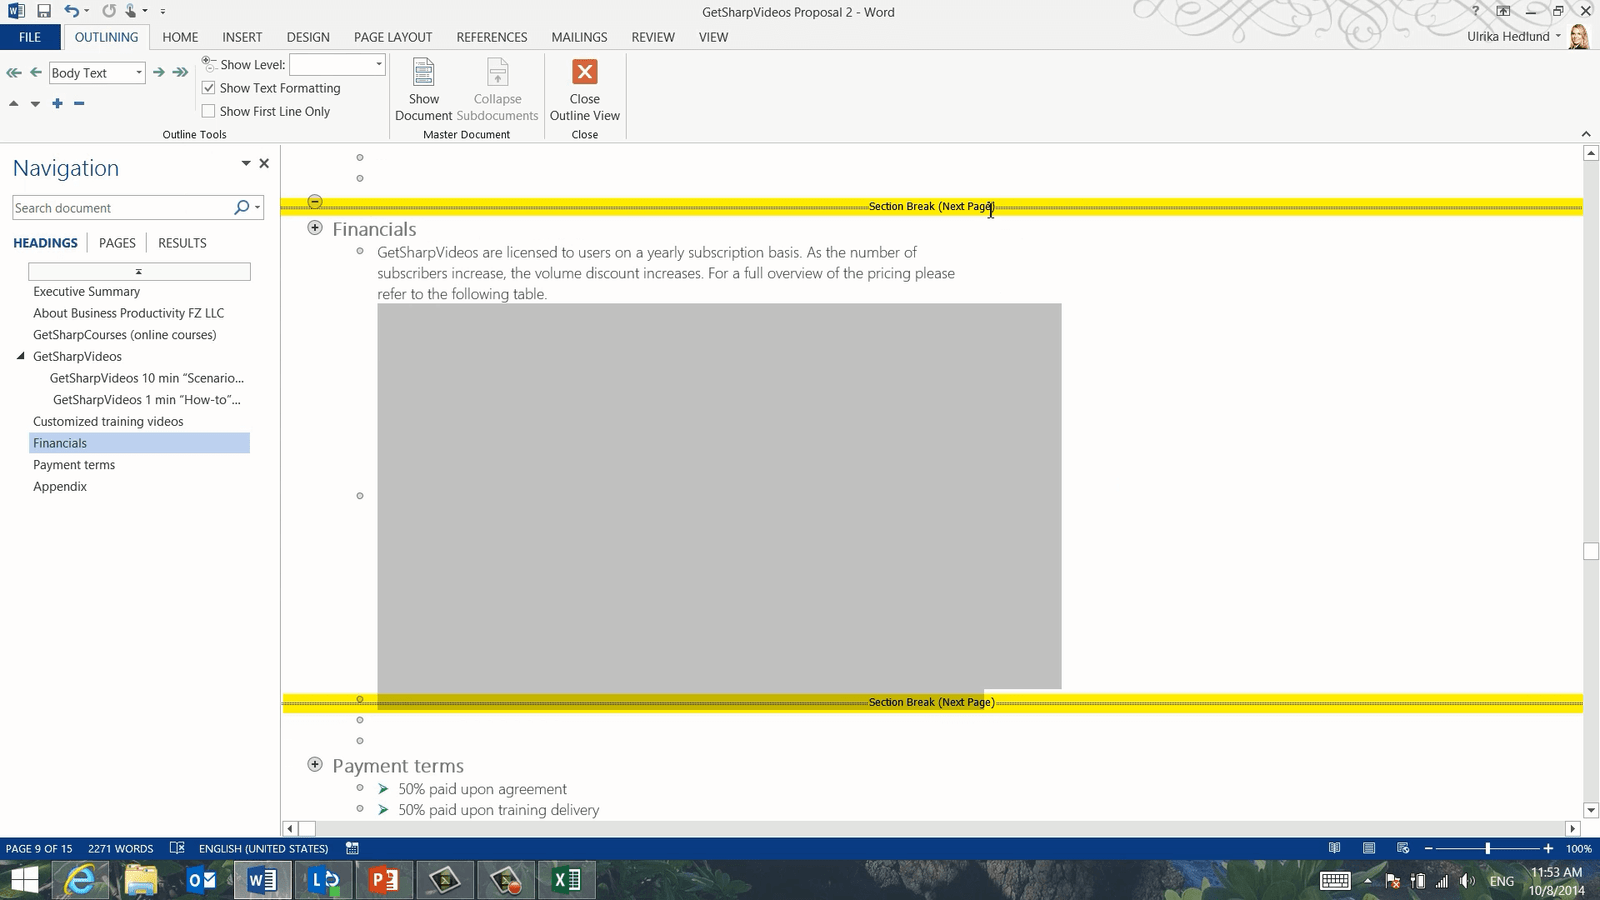
I’ll close down this view and go back to the “Print Layout” view. To change the orientation of this page to Landscape, on the “PAGE LAYOUT” tab under “Orientation” click “Landscape”. As you can see this page has now been changed to landscape mode, while the others are still in portrait. Now I can resize the image making it easier to read.
Inspect your document for hidden data
After some final fine-tuning of my document, I’m ready to share it with my customer. Before you share a document with your customer it’s highly recommended that you remove any unwanted data. If you click the “FILE” tab you can see that there are a number of properties associated with this document that you might not want your customer to see.

You might also have some revision data, like comments or markups. To inspect a document go to the “FILE” tab and click “Check for Issues” and then “Inspect Document”.
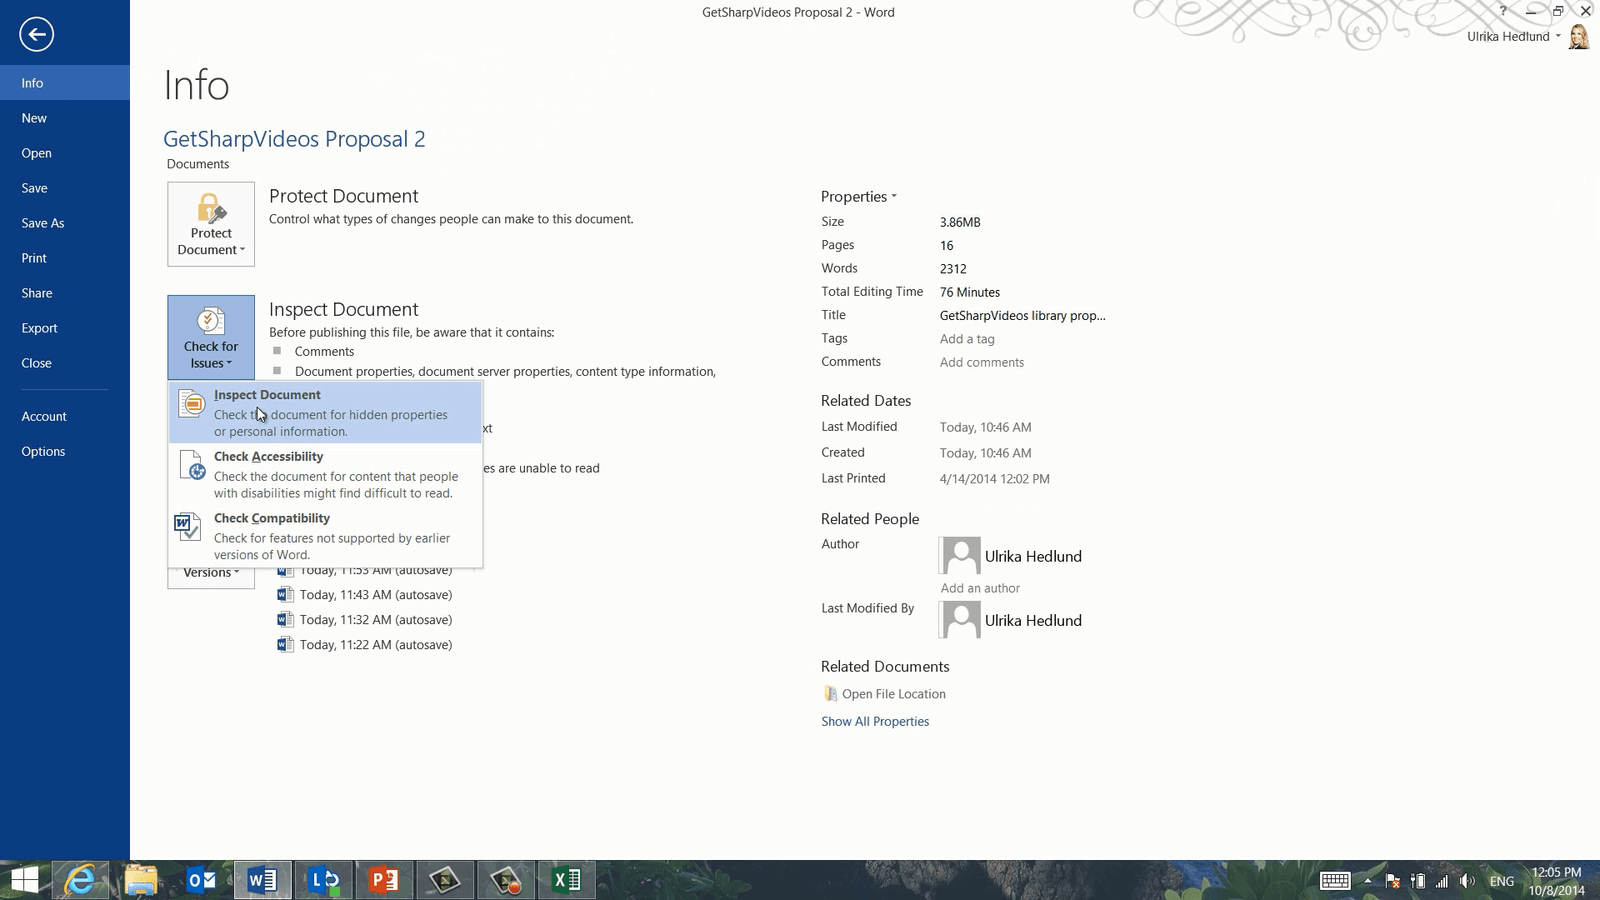
It will ask you to save the document once more. Click “Inspect” to start the inspection of all the hidden data of the document. Here I can see that my document contains a lot of data that I can remove such as annotation data, document properties, Task Pane Apps, and XML data. I’ll keep the headers and footers and then click “Close”.
As a final step, I’ll go to the “FILE” tab, Click “Protect Document” and then “Mark as Final”.
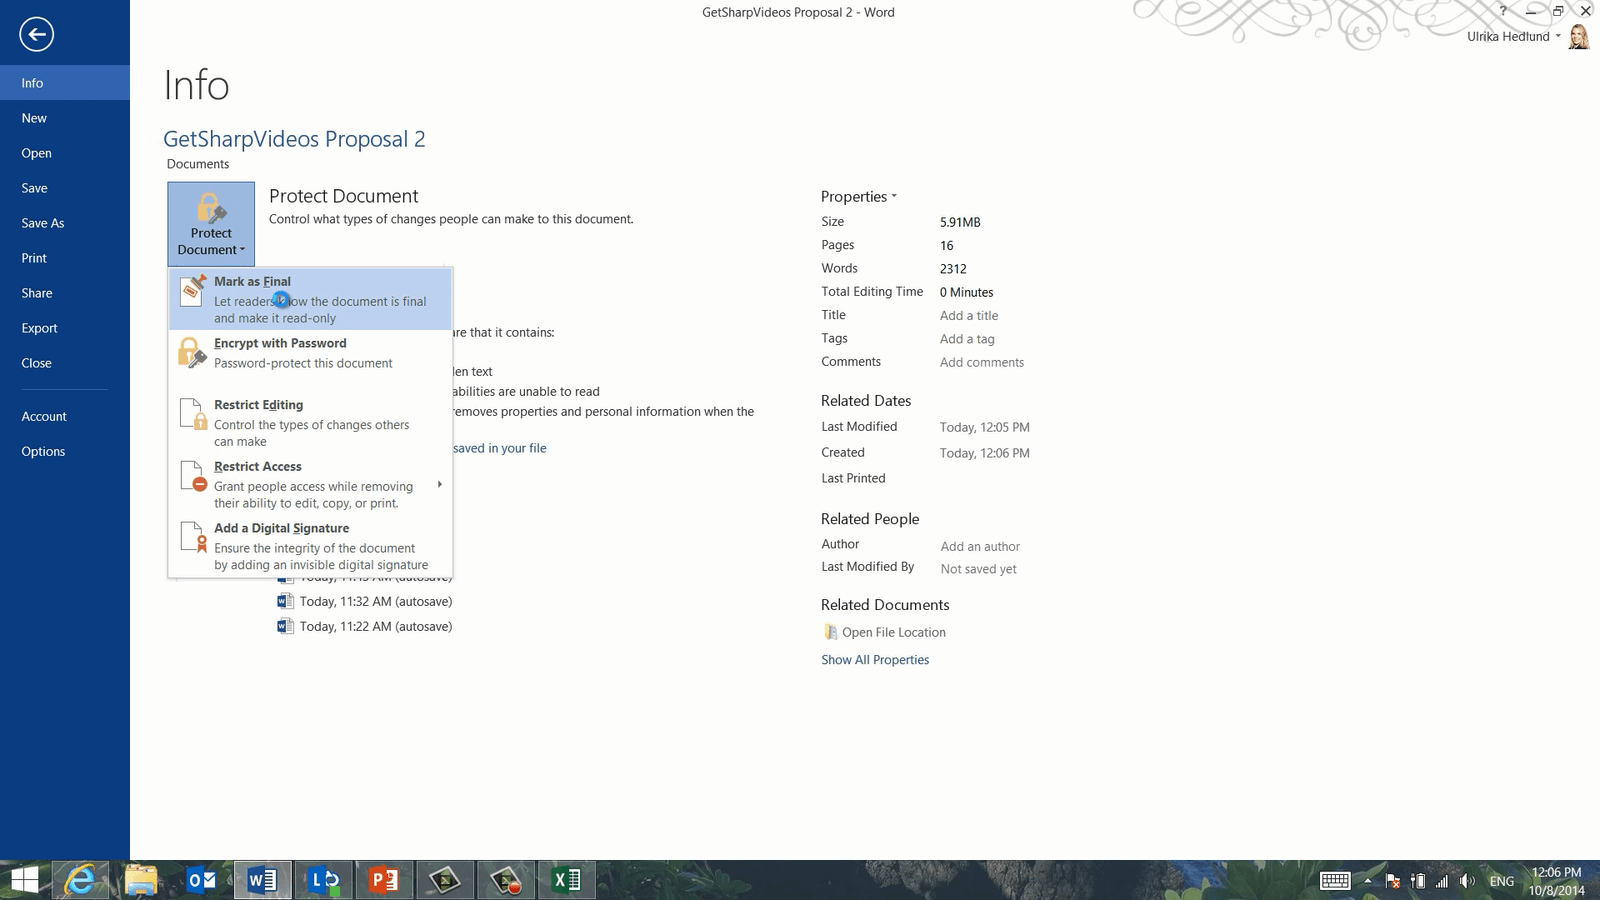
By marking your document as final, it will automatically open up in Read-only mode.
How to Track Changes in Word 2013?
Introduction
When you’re working on a document it’s very beneficial to ask others to review it for you and to track the changes they make to the document. In Word 2013 Microsoft has introduced a new, cleaner view of tracked changes and a richer experience for adding comments and replying to comments. Let’s have a look!
Inserting comments into a Word document
Here I have a proposal that I’ve been working on for a customer. Before I send it off, I’d like to ask Nourah to review it for me. First I’ll add some comments to the document highlighting things I want Nourah to give feedback on.
To insert a comment into a document, mark the text or object you want to comment on, click the “REVIEW” tab and then click “New Comment”. Now you can add your text to the comment bubble.
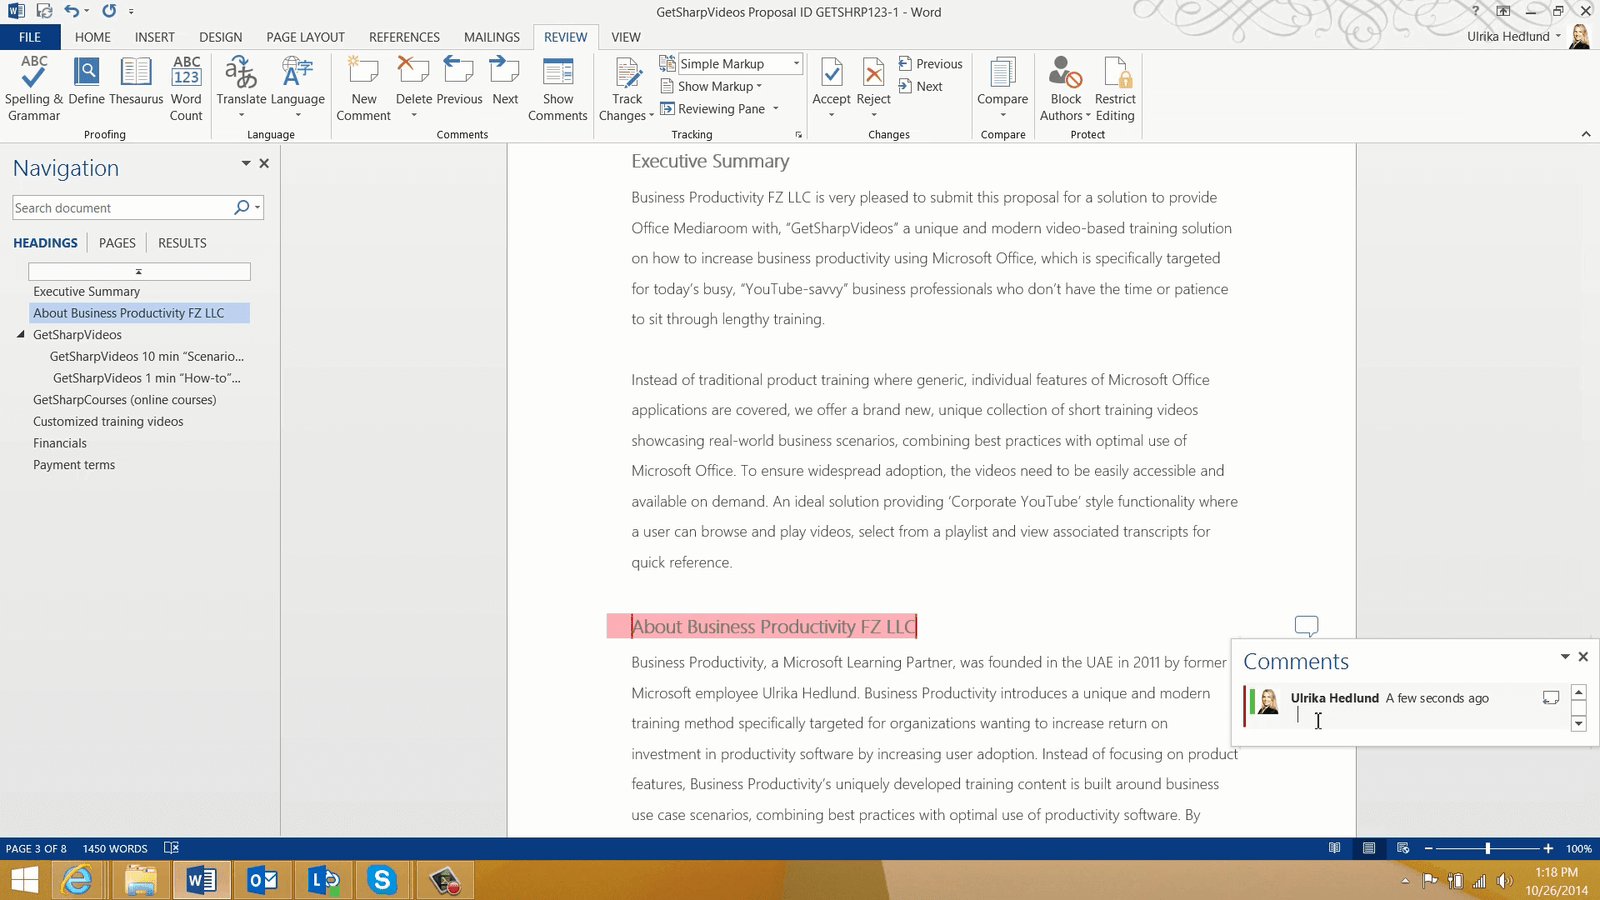
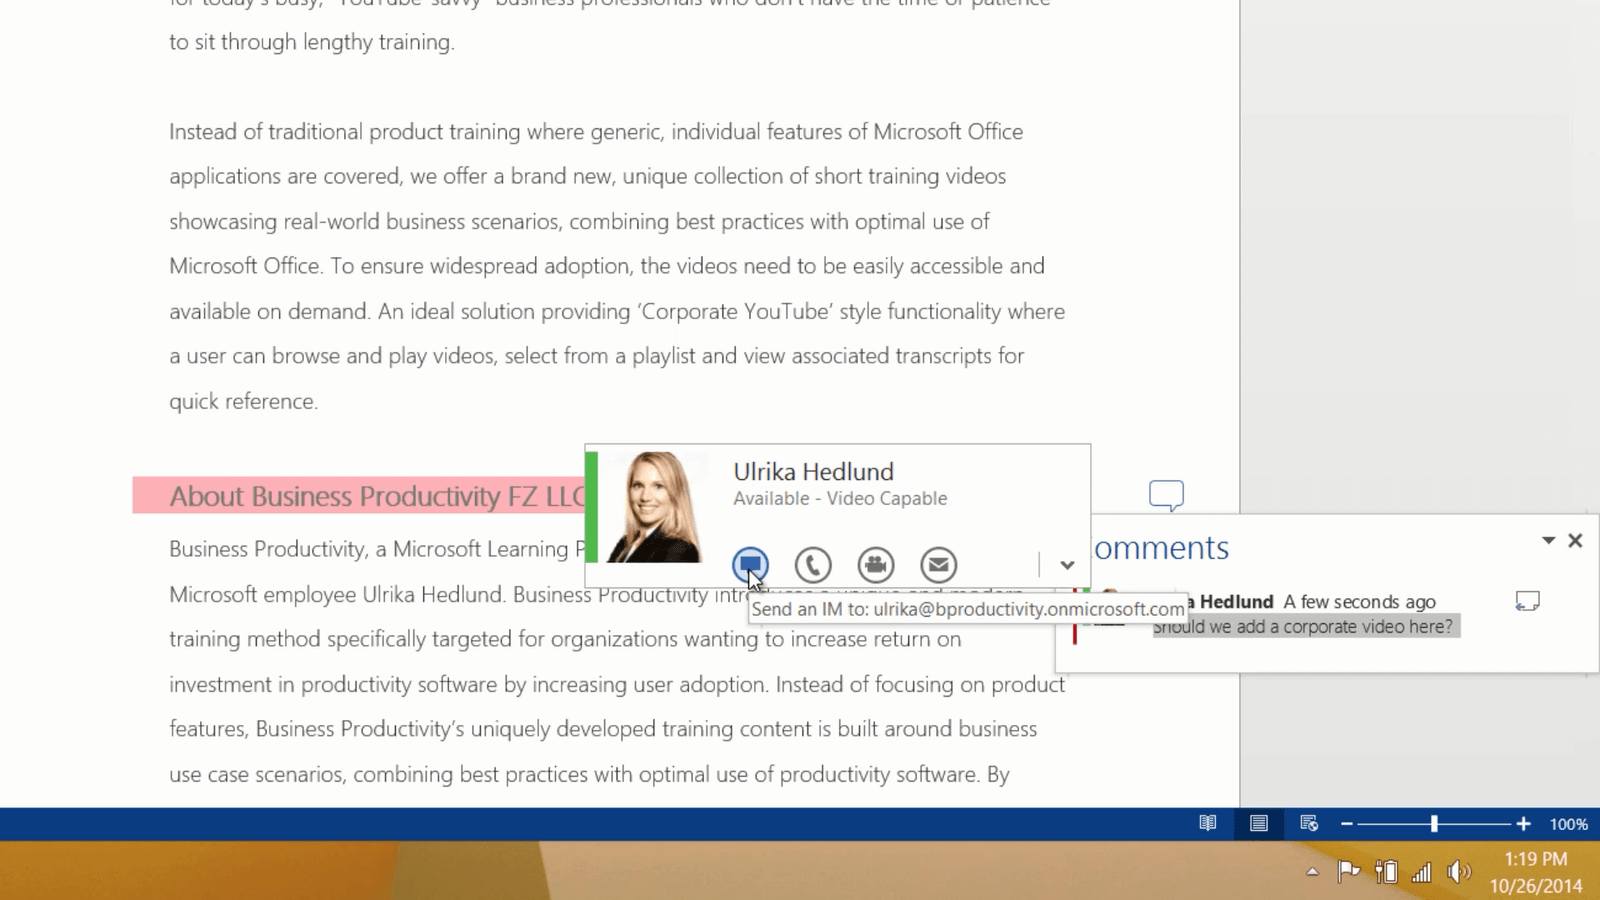
Here I’ll ask if we should insert our corporate video into the document. If you have a profile picture added to your Office account, it will show up next to the comment. This provides the reviewer with a quick overview of who has added the comment. If you are using a real-time communication platform like Microsoft Lync you can also see if the person is online and communicate with him or her directly from within the document.
I’ll insert another comment further down in my document by clicking the paragraph heading in the navigation pane. I’ll mark the section and ask Nourah to insert a picture.
Now I’m ready to ask Nourah to review the document.
How to turn on Track Changes in Word 2013?
To make sure that any changes that are made to the document are tracked, on the “REVIEW” tab click “Track Changes”. However, this is quite easy for someone to turn off by just clicking the “Track Changes” button again.
If you click the little arrow on the Track Changes button you will see the option to “Lock Tracking”. This is a great option if you want to make sure that everyone who reviews the document tracks their changes.
![]()
I’ll click “Lock Tracking” and enter a password. Now the “Track Changes” button is greyed out and it can’t be turned off without entering the password.
How to add Track Changes to the Quick Access Toolbar?
Sometimes it can be hard to see if Track Changes are on or off, especially if you don’t have the “REVIEW” tab open. I recommend that you add Track Changes to your Status bar so that you can always see if they’re on or off. To do that right click the Status bar and select “Track Changes”.
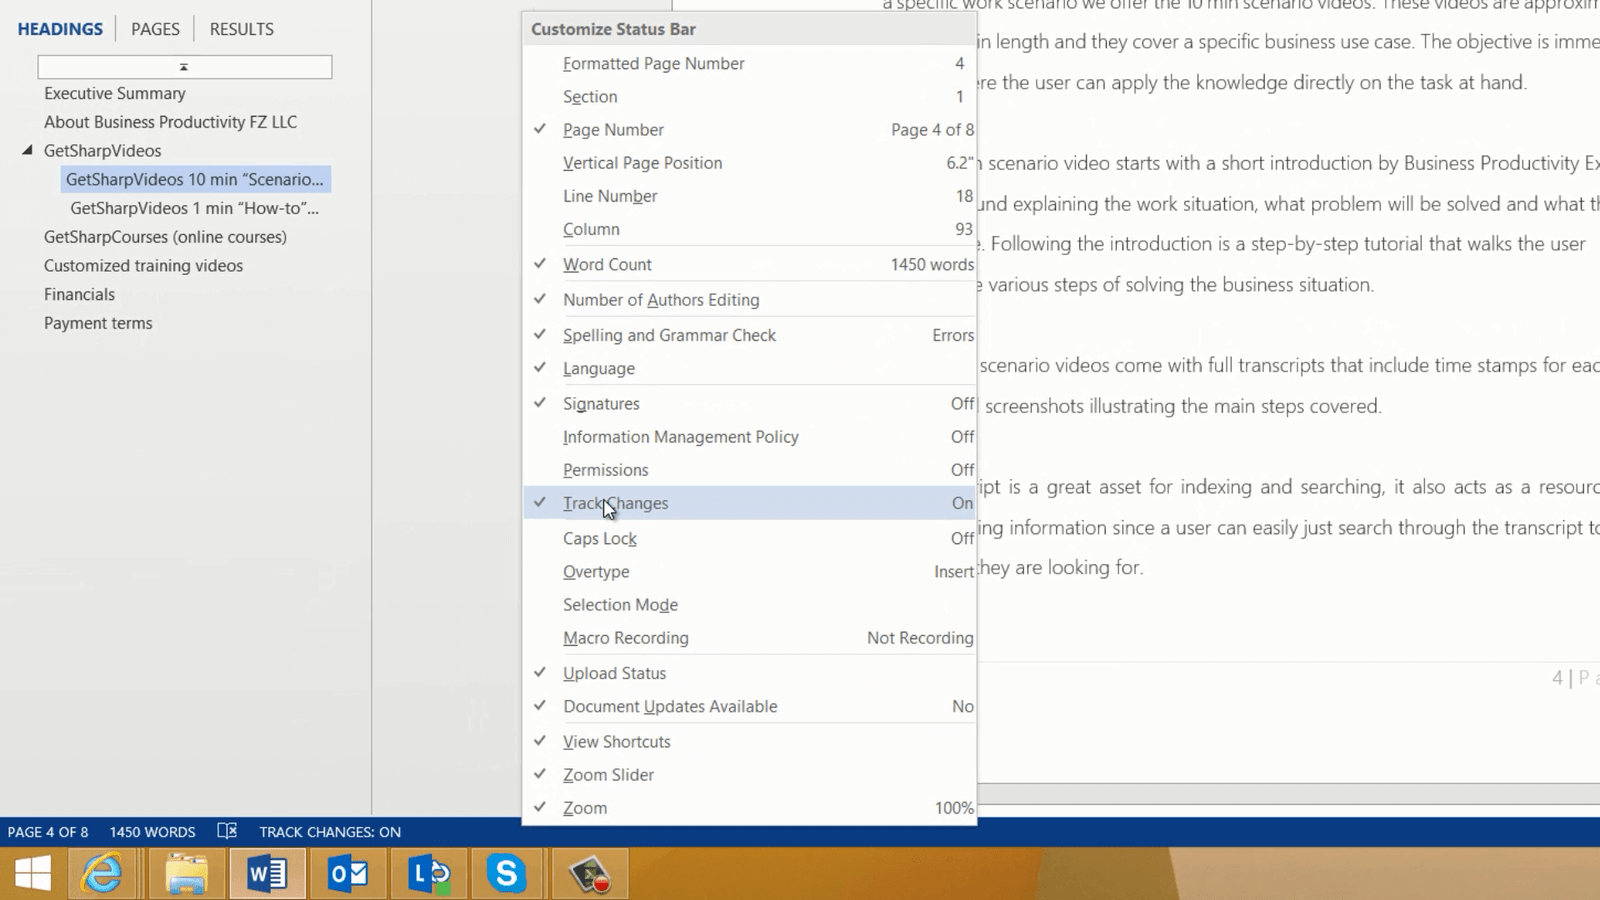
Now you can easily see if track changes are on or off when you are working on a document.
How to share a document via email link using SharePoint 2013?
I’ll save the document and then ask Nourah to review it. To share the document, I’ll click “FILE”, “Share”, “Email” and then, since I have this document shared on our SharePoint intranet site where my colleagues can access it, I’ll click “Send a Link”. This way we avoid sending multiple, large email attachments and we can all see the latest changes made to the proposal. I’ll write the email to Nourah asking her to review the document for me before I’ll send it off to the customer tomorrow morning.
Let’s switch over to Nourah to see what this looks like for her.
How to review and track changes in Word 2013?
Here we are logged in as Nourah – ready to review the document. To review a document, click the “REVIEW” tab and make sure that “Track Changes” is turned on. In this case, the Track Changes have been locked down so they can’t be switched off without a password. Then you can start making your changes. All changes – deletions, insertions and formatting changes are tracked.
In the “Tracking” section on the “REVIEW” tab, you can decide how your changes are displayed. In Word 2013 there is a new default view called “Simple Markup”. This view is less cluttered. It shows a red line where changes are made.

To see the changes just click on any red line to see the full markup. To collapse the view and go back to the Simple View click any red line again. You can also select view in the Tracking Display drop down. To see the full markup click “All Markup”.

To see the document with all of your changes applied click “No Markup” and to see the original document, without any of your changes applied, click “Original”. Here I’ll go back to the “Simple Markup” view.
How to reply to comments in a Word document?
In Word 2013 reviewers can easily respond to comments, keeping discussions related to documents organized. Here, Nourah responds to my comment regarding adding an online video. You can easily resize and move comments around by clicking the little arrow in the “Comments” window.
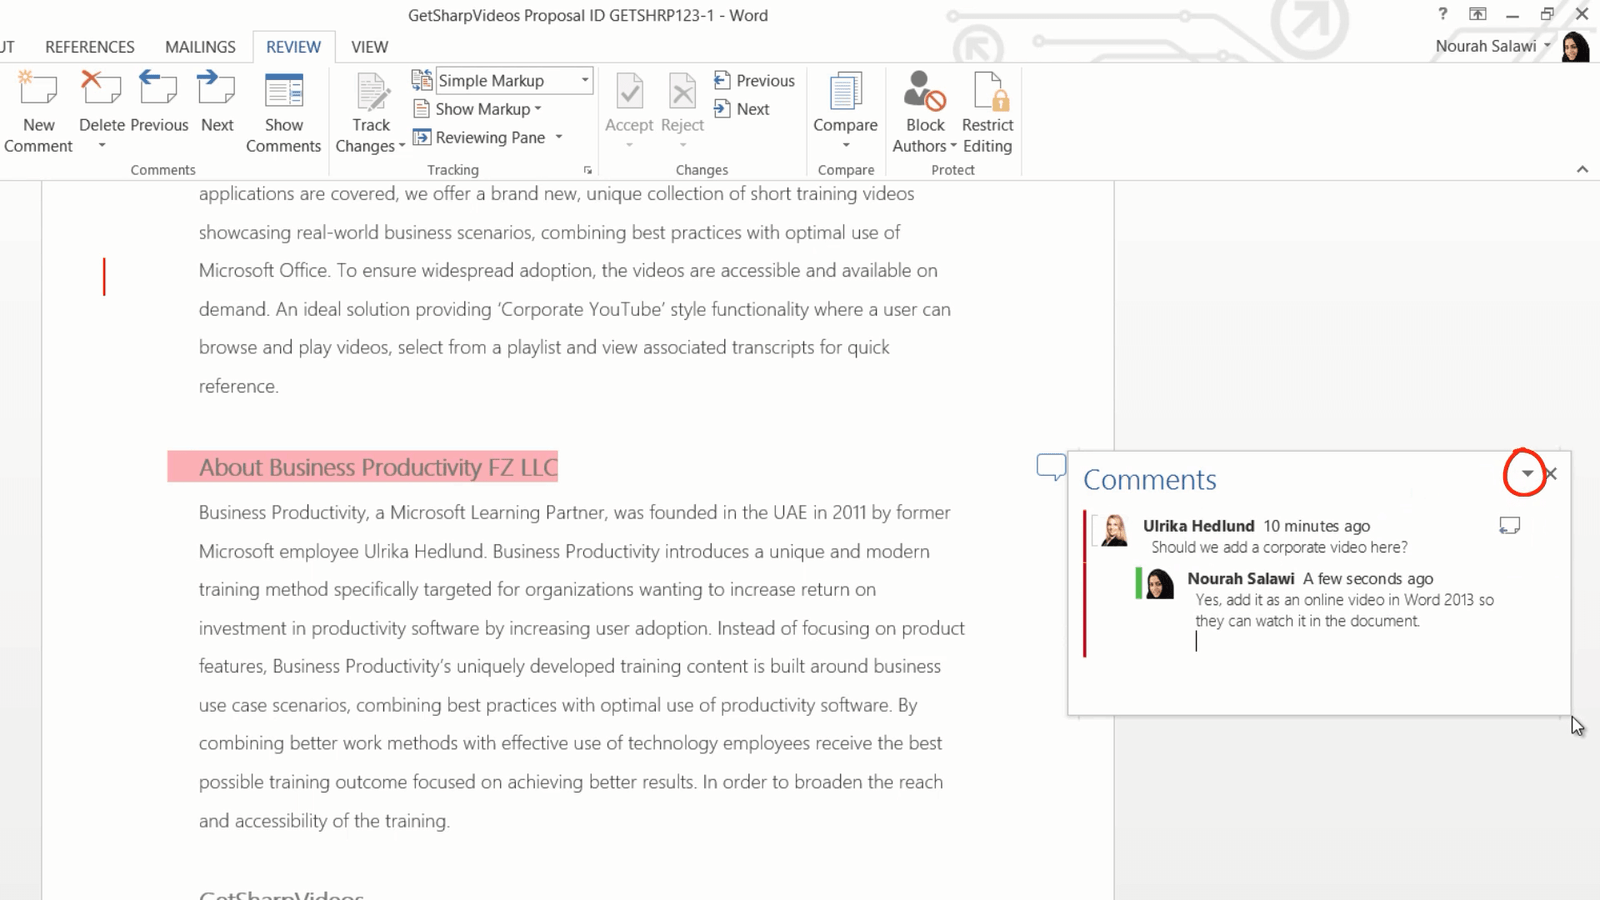
When Nourah is done reviewing the document she saves her changes and sends an e-mail to Jacob with a link to the document asking him to review the document as well.
How to accept or reject changes in Word 2013?
Now I’m back looking through the document that both Nourah and Jacob have reviewed. To accept or reject changes that have been made to a document click the “REVIEW” tab. Here I’ll click “Track Changes” and then “Lock Tracking” to unlock the Tracking of the document. Here I’ll insert my password.
To get a good overview of all the tracked changes that have been made to a document, on the “REVIEW” tab, click “Reviewing Pane” here I’ll select “Reviewing Pane Vertical”. Here I can see that 18 revisions have been made in total and I can see that Nourah and Jacob have made a number of different changes to the document.

I’ll change the display of the tracked changes to “All Markup” to see all changes. To start going through tracked changes, place your marker at the beginning of the document and click “Next” in the “Changes” section.
This takes you to the first change made. Here I can see that the text “for a solution” was deleted. I can hover over the change to see who made it and when.
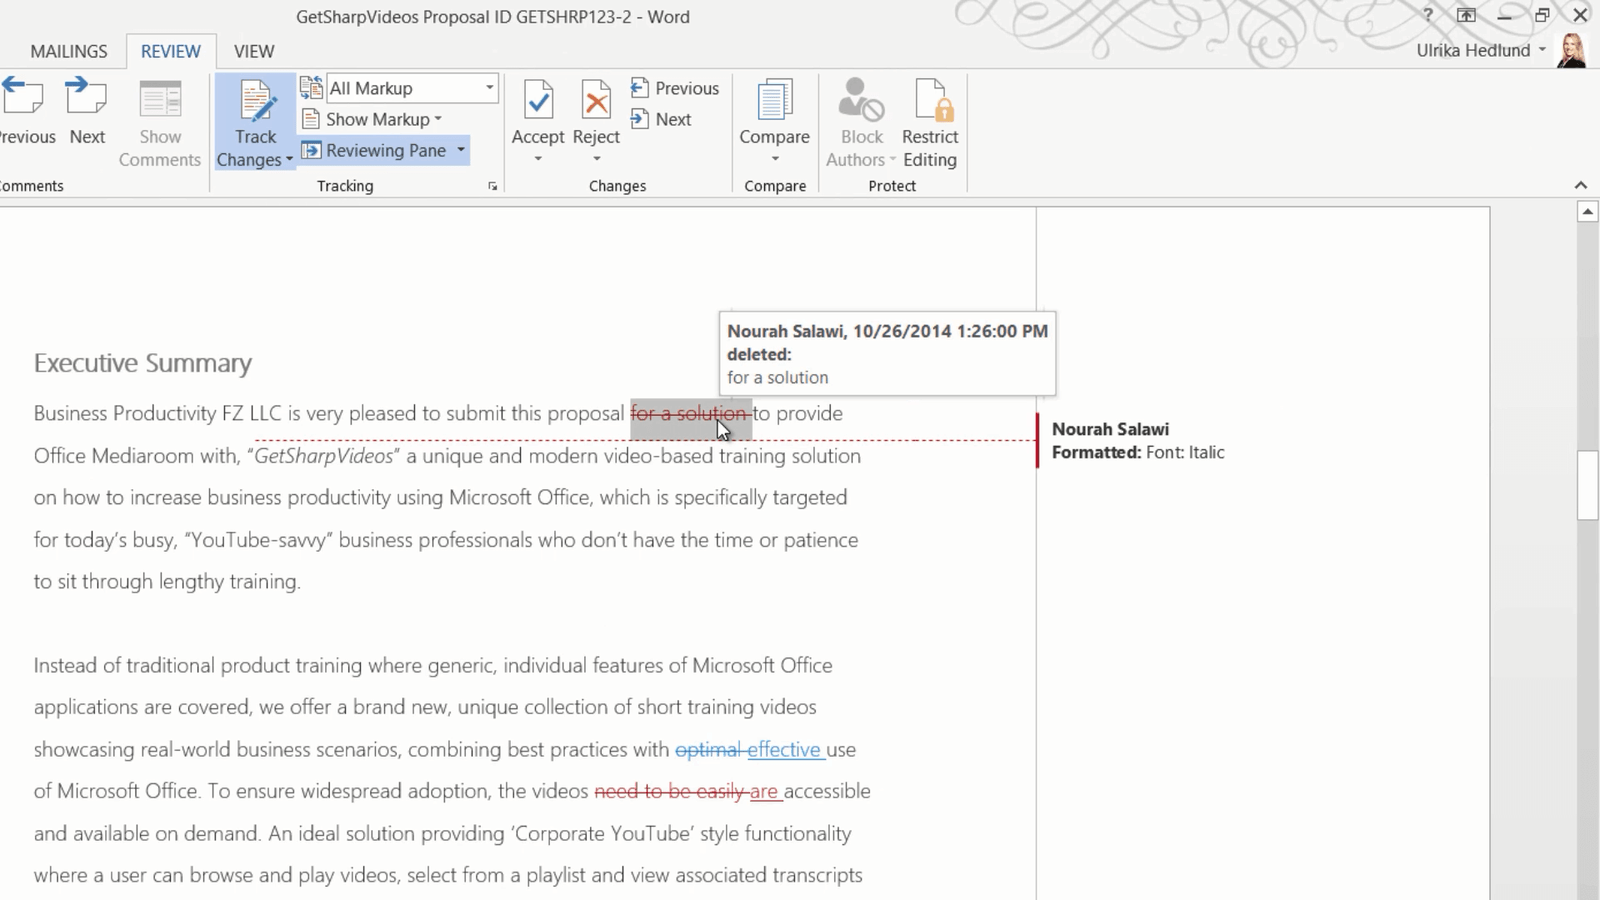
To see this information as a balloon instead I can click “Show Markup”, “Balloons”, and then select to “Show Revisions in Balloons”. Now the details of the deletion are showed. I’ll accept this change and move to the next. Here I can see that Nourah has changed the formatting to Italic, I don’t agree with this change so I’ll just click “Reject” to keep the original formatting. I’ll continue to accept and reject changes in the document as a see fit. Here Word stopped at the comment. I can see that both Nourah and Jacob have replied positively. To delete a comment, go to the “Comments” section and click “Delete”. By deleting the first comment, the whole thread is deleted.
How to accept all changes in a Word document?
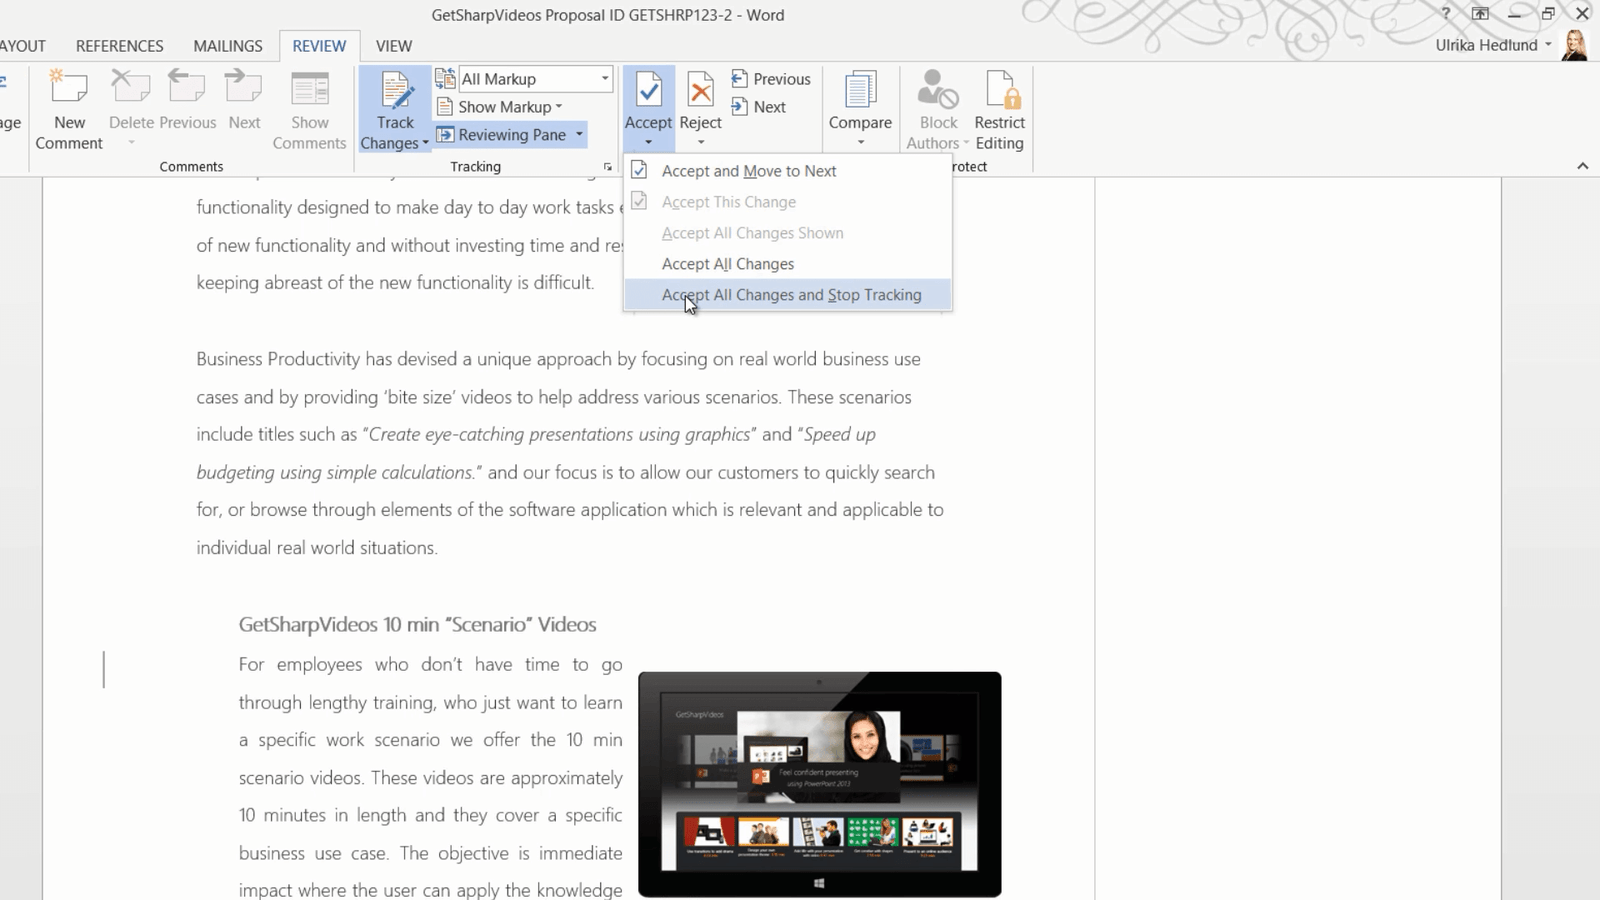
If you agree with all proposed changes in the document you can just click “Accept All Changes” in the document. Here I’ll select “Accept All Changes and Stop Tracking”.
Now I can see in the “Reviewing Pane” that no more revisions remain.
How to inspect your document for revisions in Word 2013?
Another great way to make sure that you don’t have any hidden comments or changes is to inspect the document. To inspect your document click the “FILE tab, “Check for Issues” and select “Inspect Document”.

I’ll save the document and then I’m asked what I want to inspect the document for. Here I’ll uncheck all options except for the first which is to check for comments, revisions, versions, and annotations. Here I can see that “No items were found” so I can be sure that there are no hidden revisions here. Now I’m ready to share the document with my customer.
How do you compare documents in Word 2013?
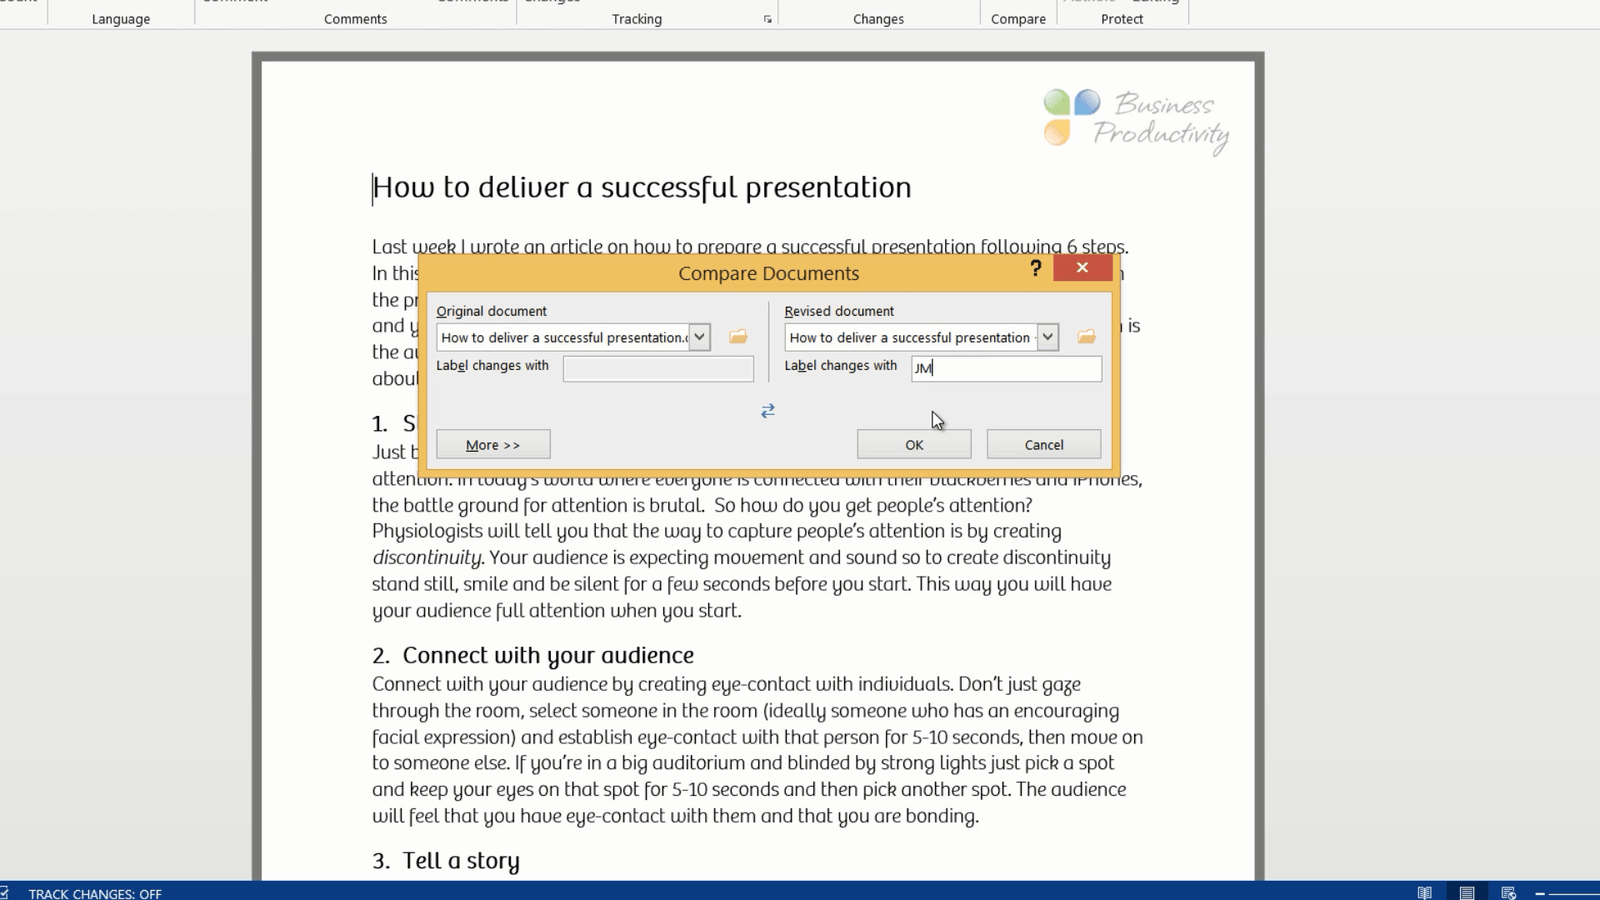
Yesterday I sent a blog article called “How to deliver a successful presentation” to Jacob for him to review. Here he has sent me the document with his changes. I’ll open it up to see what changes he’s made. Unfortunately, the Track Changes wasn’t turned on, so there’s no way for me to know what changes he’s done to the document. Luckily there is a way for Word to find these changes by using the compare tool.
To compare two documents, click the “REVIEW” tab and then “Compare”.

First select the original document, here I’ll open up the document I sent to Jacob for him to review. Then open up the revised document where the changes were made. You can choose to label the changes, here I’ll mark them with Jacob’s initials JM and then click “OK”.
Now you can see the original document up to the right, the revised document with his changes underneath and the document with the marked changes to the left. In the “Revisions” pane I can see that he made 5 changes to the document.

Now I can use the Reviewing tools to walk through the changes one by one. I’ll approve the changes he made and then when I’ve gone through all changes I’ll save the document.
Many people find the tracking feature of Word a bit difficult to use, but once you get the hang of it, it’s a really useful tool that can save you a lot of time when collaborating on documents.
How to use Mail Merge in Word 2013?
Introduction
Even though most of our communication today is done via email there are still times when you want to send out letters. Whenever you write a letter, you should make sure that it’s personalized. Your readers will be much more inclined to read the letter if they feel that it’s addressed uniquely to them.
In this video, you will learn how to use “Mail Merge” in Word 2013 to automate the process of personalizing multiple letters. You’ll also learn how to add some flexibility to your letter so that you can use the template multiple times.
Reviewing the final result
On Nov 4th, we’re having a Business Productivity workshop for one of our customers. The attendees will be arriving at the hotel the night before the workshop. When they arrive, each of the 14 participants will be given this welcoming letter printed out on a piece of paper.
The letter will greet each participant by the first name. The date of the letter should be the date before the event. The name of the hotel and the conference room where the workshop will be held should also be added to the letter. I could just write in the date, hotel and conference room into the letter, but since I want to make this into a reusable template that we can use multiple times, I’ll add some flexibility here so that we can easily change this information next time we use the template.
Finally, each of the participants will be assigned to a team, Team number 1 or Team number 2, depending on which department they belong to. So I’m going to add some logic to the letter to assign each participant to the right team.
How to Mail Merge to personalize letters in Word
Here is the welcome letter in Word. I’ve highlighted the fields that will vary in yellow. To start using Mail Merge, go to the “MAILINGS” tab and click “Start Mail Merge”, here you can select what type of document you want to create or if you want step by step guidance you can select the “Step-by-Step Mail Merge Wizard”.
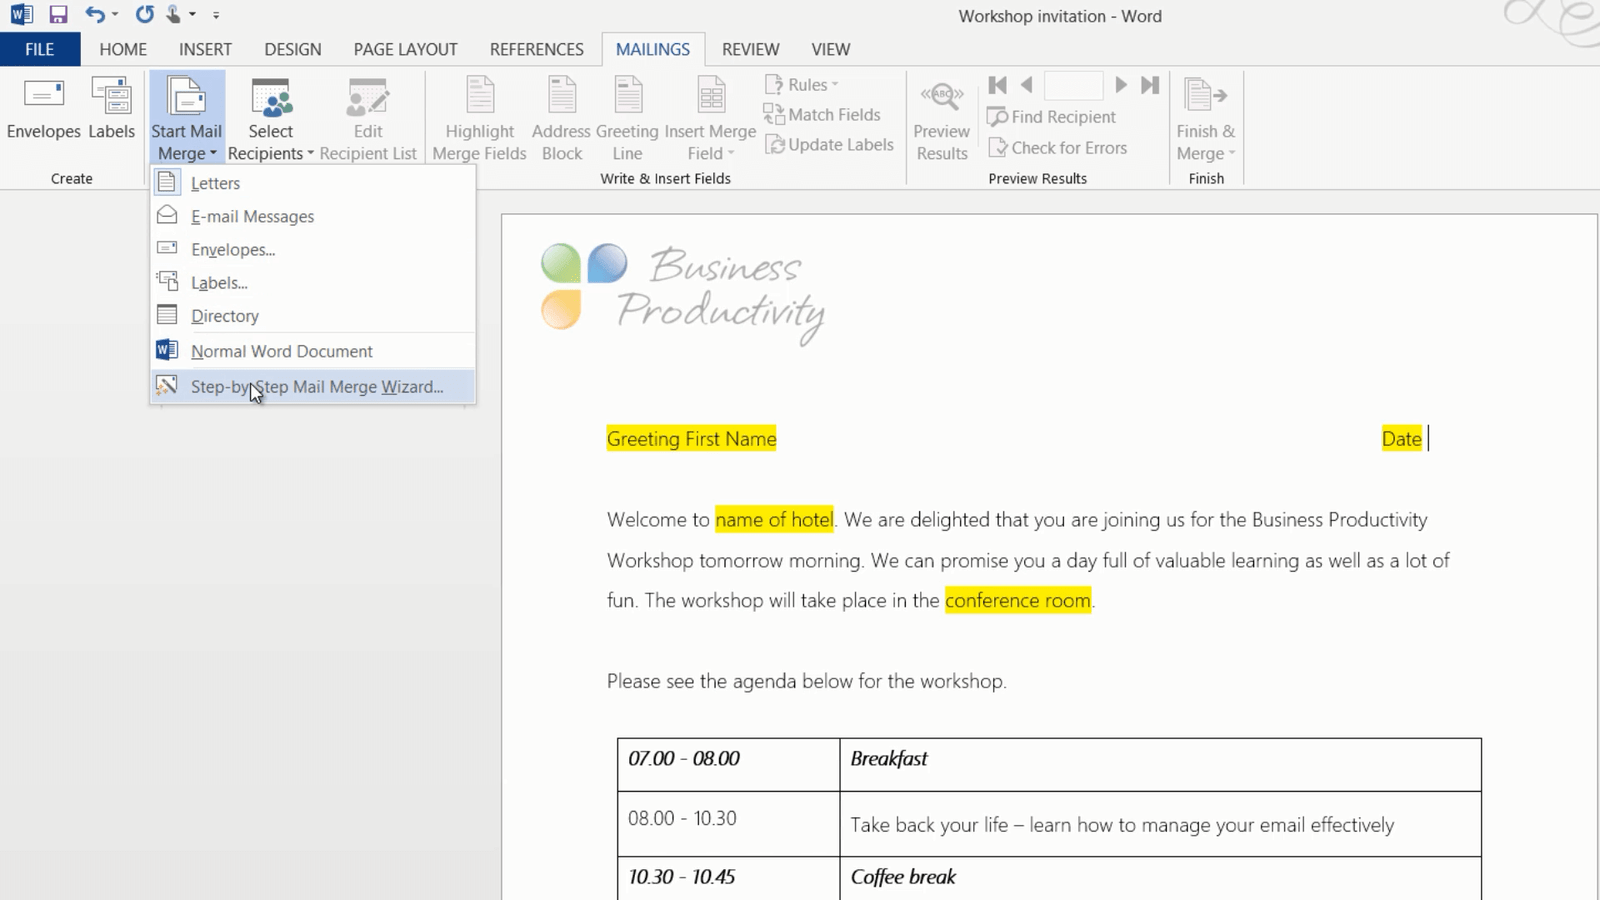
First, you need to decide what the outcome should be of your Mail Merge, letters, e-mail messages, envelopes and so on. In this case, I want to create personalized letters to print out, so I’ll select the first option which is “Letters”. The second step is to select starting document, and I’ll leave the default option which is “Use the current document”.
How to select recipients in Mail Merge
The next step is to select recipients. You can select recipients from a number of different sources, you can use an existing list, like an Excel spreadsheet or an Access database, you can select recipients from your Outlook contacts or you can type them into a new list by hand.
I want to personalize letters to the employees of the company BPG Group that I have in my Outlook Contacts.

Since I’m going to filter on the company name, I need to make sure that all the contacts have the company field entered correctly. I’m also going to use the first name field, so I’ll check to see that I have the names of all the people in my contacts.
To select my Outlook contacts I’ll click “Select from Outlook Contacts”. Here I can select between the different contact folders I have in Outlook and I’m going to select my main contacts folder which is associated with my business email account. Then I click “OK”.

have in my contacts folder and I only want to select the ones from the company BPG Group, so to do that I’ll click “Filter”. I’ll click the “Field” drop-down and select “Company”. I’ll leave the default “Comparison” which is “Equal to” and then I’ll type in the company name in the “Compare to” text field and click “OK”.

Now, only the contacts from the BPG Group will be selected for the Mail Merge. You can always go back and edit the recipient list at a later stage by clicking “Edit recipient list”.
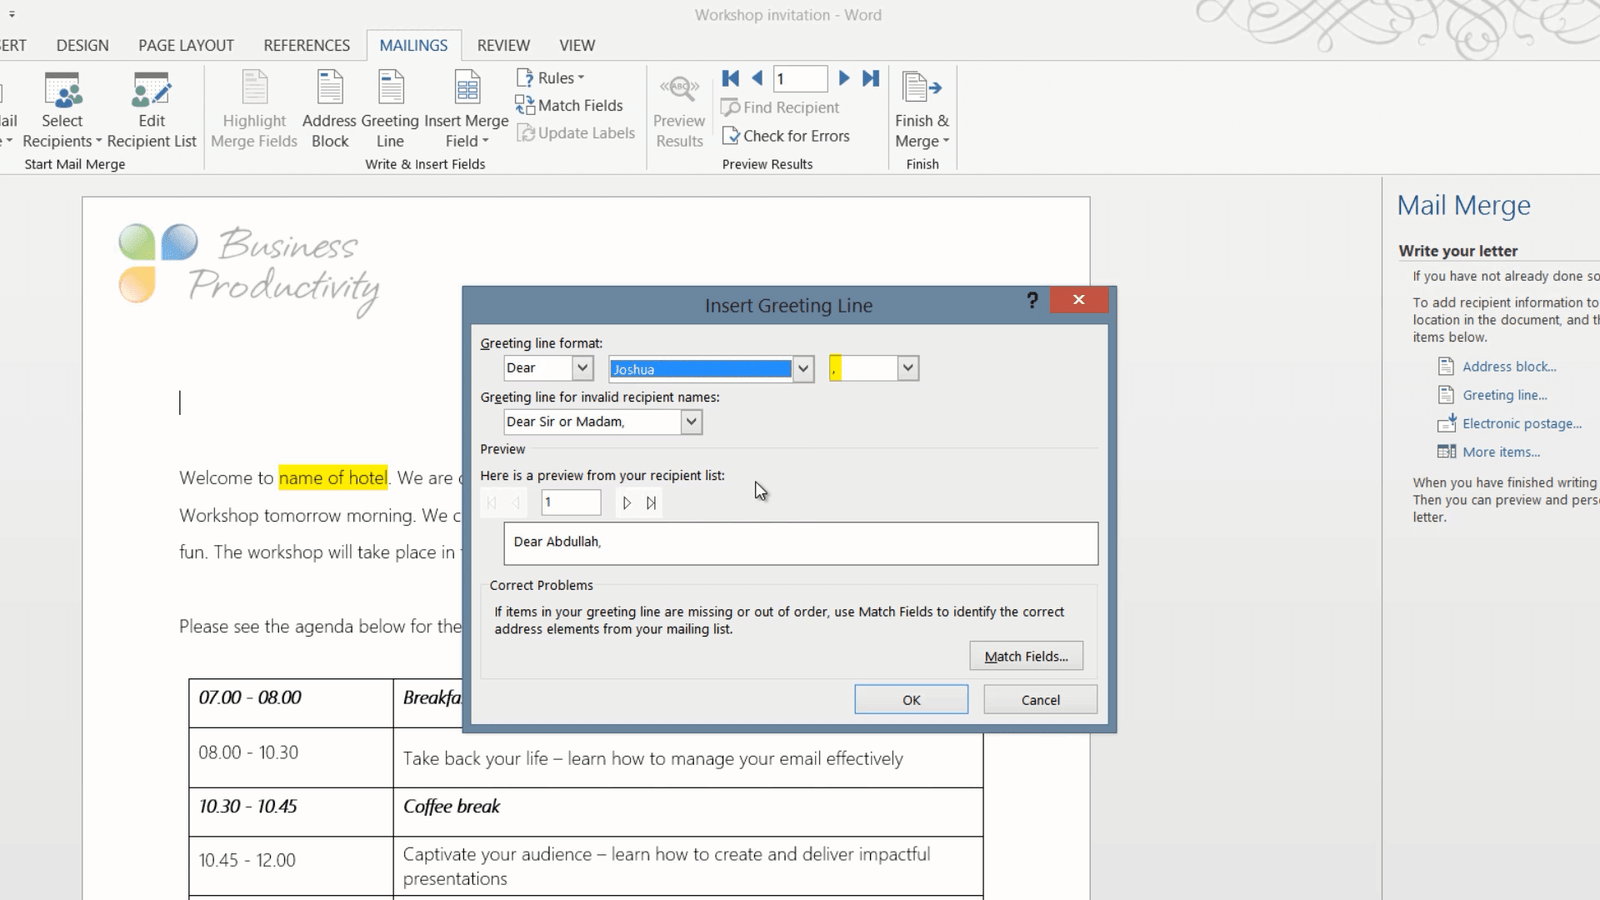
When I’ve selected my recipients I’ll go to the next step of the wizard which is to write the letter. First I want to add the greeting line and the first name. So I’ll just delete my placeholder text and click “Greeting Line”, either on the “MAILINGS” menu or in the “Mail Merge” wizard.
Here I can select between different greeting lines. I select “Dear” and then the first name. So I’ll scroll down and select the first name. A comma is automatically inserted after the greeting line. I can also select which greeting line I want to have if the recipient name is missing and I’ll just leave the default “Dear Sir or Madam”. Here I can see a preview of my recipient list and it looks good so I’ll just click “OK”.
When a mail merge field has been inserted into your letter you will see the name of the field inside two tags. If you want to add additional fields from the contacts, such as the postal address or the e-mail address just click “Insert Merge Field” on the “MAILINGS” menu or click “More items” in the Mail Merge wizard and select the appropriate fields from the list.
If you want to see what the actual letters will look like when they are done, just click “Preview Results” and then you can step through the recipients in the list by clicking the back and forth arrows.
Using “Fill-in” Rules in Word 2013
Next, I want to insert the date. I want this to be flexible. I’ll click “Rules” and select “Fill-in”. In the Prompt field, I’ll enter the text that I’ll be prompted to fill in when I open up this letter template. So here I’ll write: “Letter date”. I can select to have a default fill-in, but I’ll leave this blank. By default, the Word template will automatically populate this with the latest used field anyway. At the bottom of the message box, there is an option called “Ask once”. If I mark this check-box, the same date will be used for all letters without asking about the letter date for each one. Since the date should be the same for all letters I’ll mark the checkbox and then I’ll click “OK”.

I have been prompted right away for the letter date, so I’ll enter “November 3rd, 2014”. I’ll click “OK”, and as you can see, the date is inserted into my letter.
Now I’ll do the same thing for the hotel and the conference room since these will likely change next time we have a workshop and want to use this letter. There now these fields have all been inserted into my document.
Using “If..then..else” rules
The final field I want to add to the letter is the team number. Everyone in the sales department should be in team number 1 and everyone else should be in team number 2. I’m going to use the department field in the Outlook contact to determine the team number for each attendee. Here I can see that Abdullah, who is a Sales Representative doesn’t have the “Department field” filled out, so I’ll just update the department field in Outlook to “Sales”.

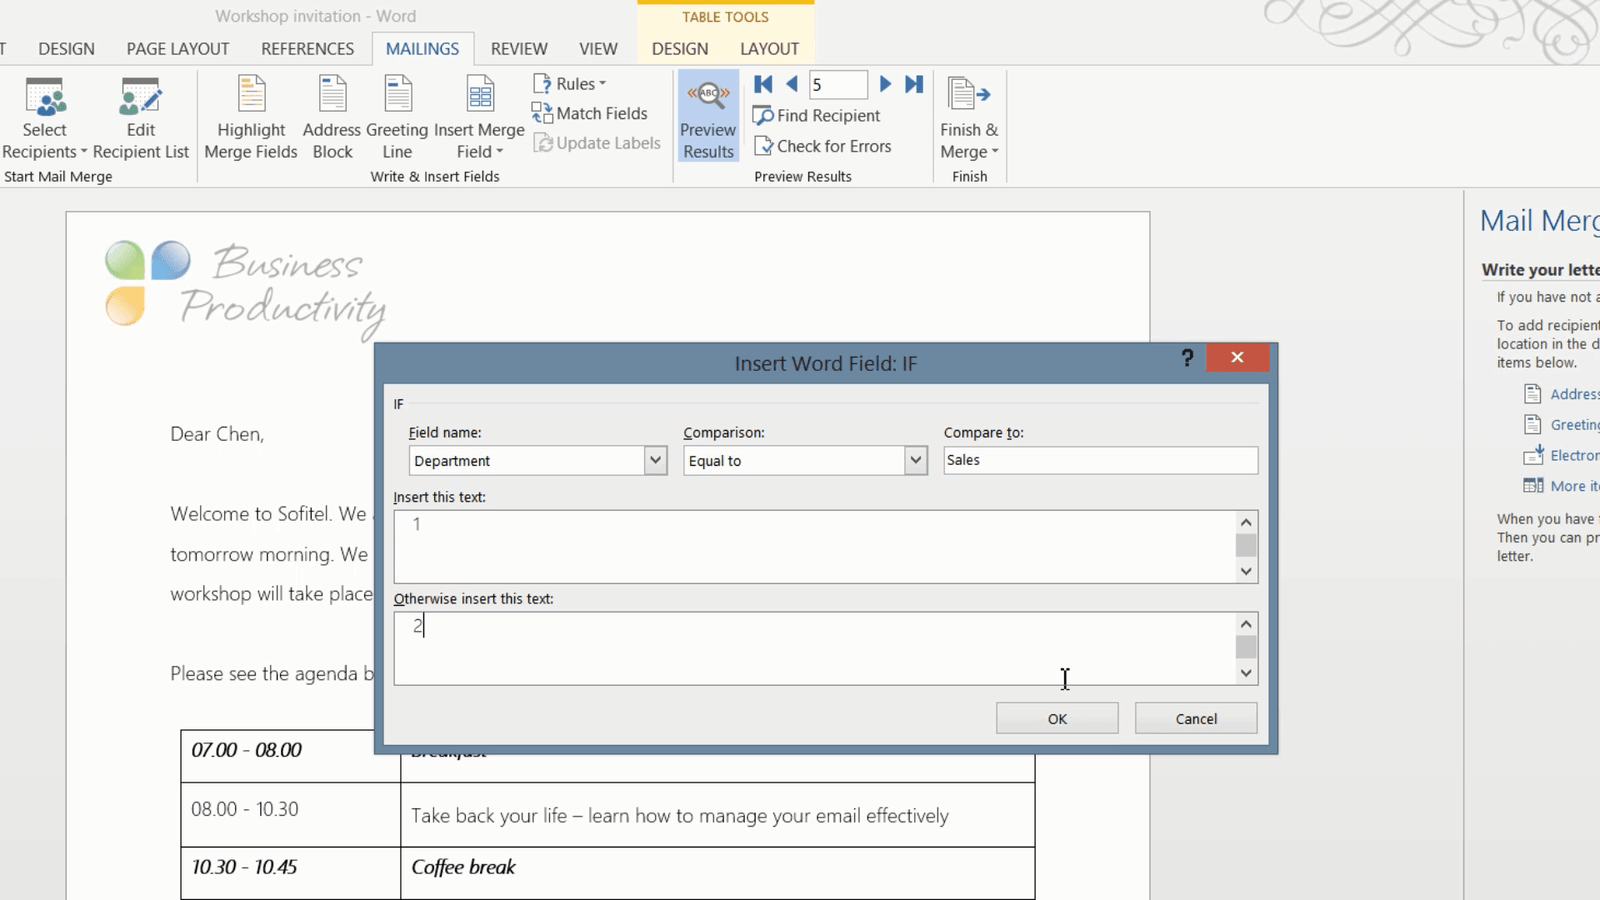
I’ll go back to the invitation letter and delete the placeholder text for the “Team nr” and click “Rules”. Here I’ll select “If…Then…Else”.
In the “Field name” drop-down I’ll select “Department”, I’ll leave the “Comparison” as “Equal to” and then in the “Compare to” field I’ll enter “Sales”. In the “Insert this text” text box I will write the number 1. In the “Otherwise insert this text” text box I’ll enter the number 2. And then click “OK”.
If I scroll down, now you can see that the team number has been inserted into the letter. I’ll mark the number and change the formatting to Italic so that it’s consistent with the rest of the text. On the “MAILINGS” tab I will step through some of the recipients to make sure that the team numbers are assigned correctly.
How to edit individual letters/documents in Mail Merge?
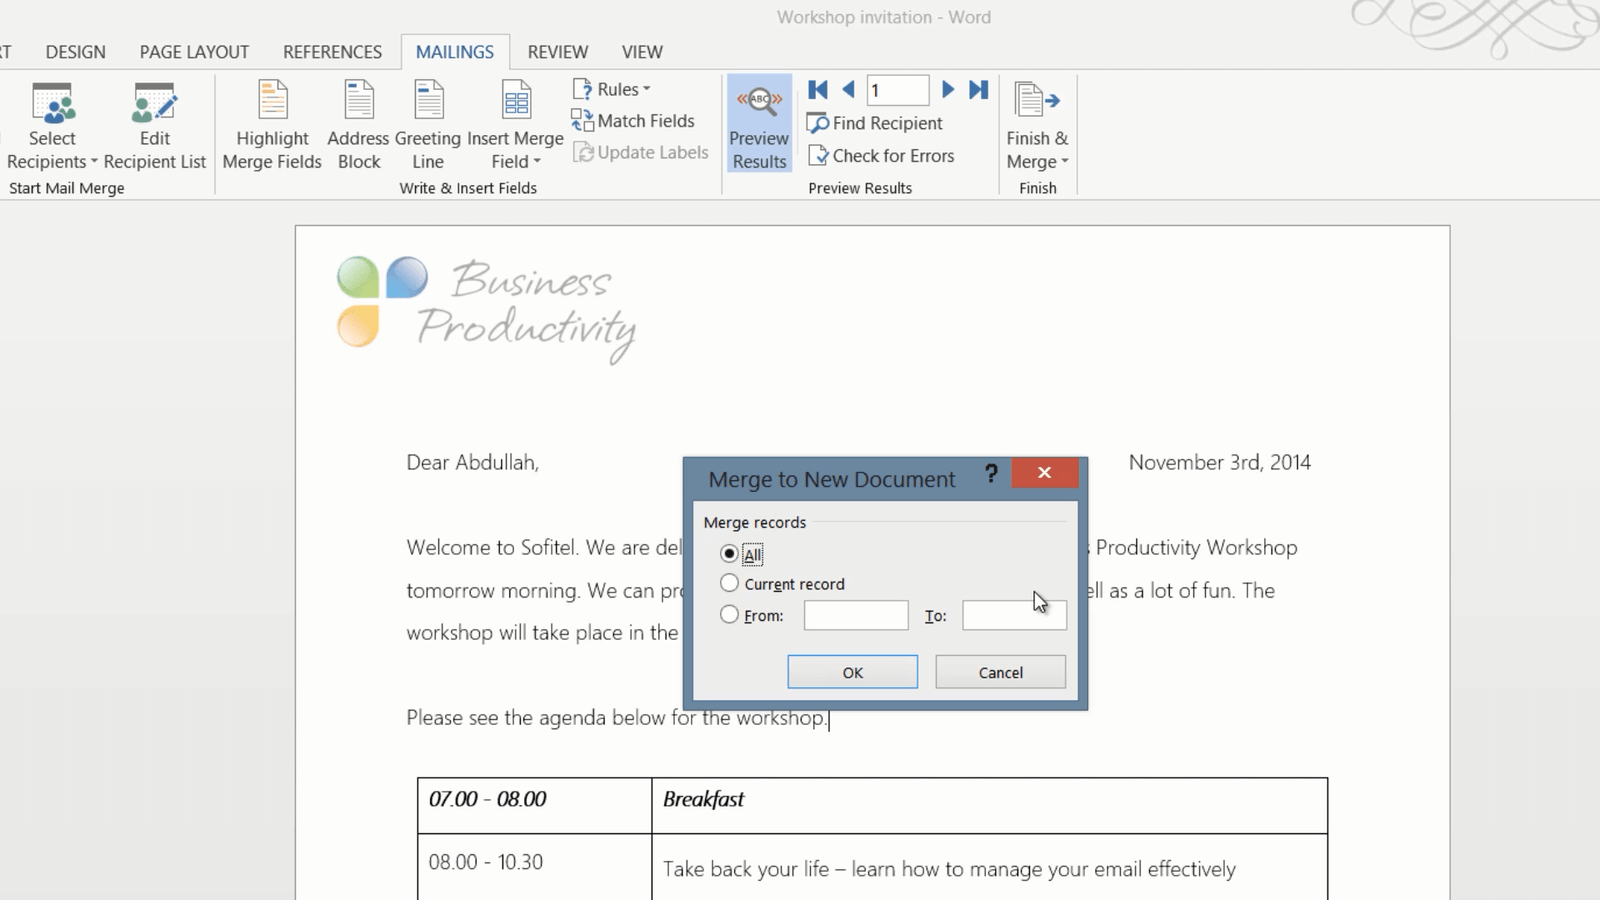
Now I’m done with the welcome letter. I’ll step through the remaining steps in the Mail Merge Wizard, I’ve already previewed my letters so I’ll go to the 6th and final step which is to complete the Mail Merge. Here you can select between “Print” and “Edit individual letters”.

If you select “Print”, this will send the letters directly to the printer, you won’t have the option to save the individual letters as a reference. Instead, I recommend that you select “Edit individual letters”.
If you are not using the Mail Merge Wizard, you can accomplish the same thing by clicking “Finish & Merge” and selecting “Edit individual Documents”. I’ll select this option and here I can select if I want to generate a selection of the received letters or all of them. I’ll select “All” and then enter the fields that I’m prompted for.
The result is a 14-page long document with a unique page for each recipient. I’ll click “FILE” and “Save” and then I’ll save this document for future reference. Unfortunately, there is no option here to create the letters as individual files, which might be useful if you also want to email a welcoming letter to each recipient.
Save and re-open the mail merge letter template
Now that I have reviewed and saved the letters I’ll print them. After that, I’ll close down the document with the 14 pages. Next, I’ll save the changes to my letter template and close it down as well. Next time I open up the letter template for our next workshop I will get a warning message telling me that opening this document will run a SQL command. Click “Yes” here and select the contacts folder from Outlook. To use the template again just click the “MAILINGS” tab and make the changes you need to your new welcome letter.
Using Mail Merge I have saved a lot of time by automating the process of personalizing multiple letters.
How to use Advanced Mail Merge in Word to Personalize Emails in Word 2013?
Introduction
From time to time you need to send out an email to multiple people. You might want to thank customers for attending an event, or you want to send out the email to your colleagues asking them for feedback on something. Whatever the reason is, you’ll be much more successful in your communication if your email is personalized.
In this video, you’ll learn how to use mail merge in Word 2013 to add individual names to your email messages, you’ll also learn how to customize the email message based on the data in an Excel file. Let me show you!
How to review an email recipient list?
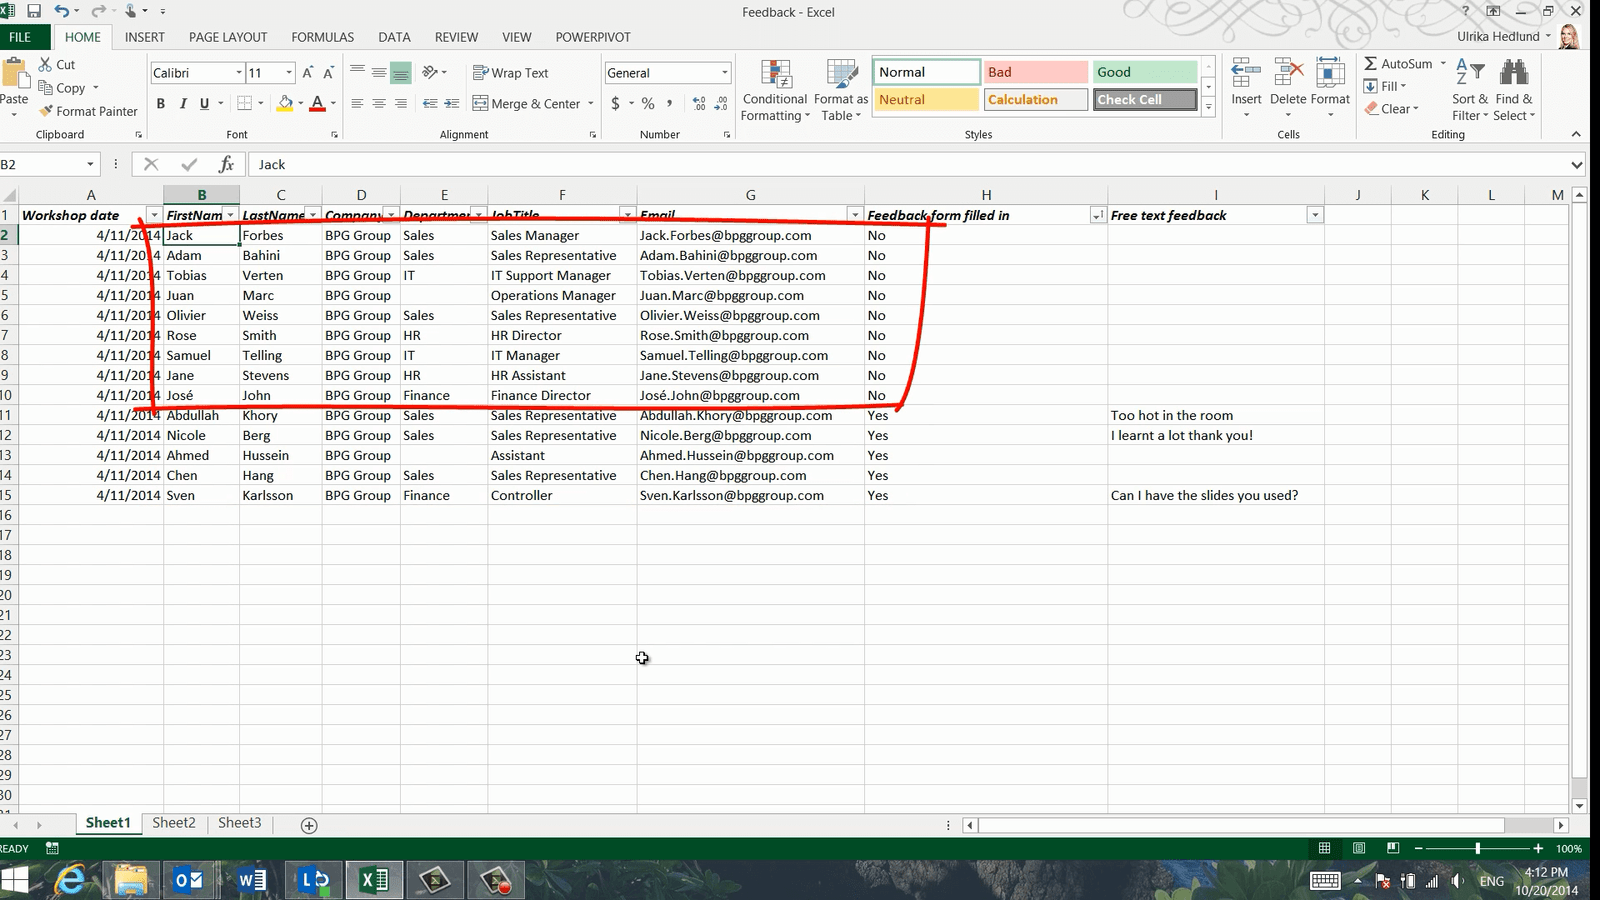
We recently had a workshop for one of our customers. After the workshop, we asked the participants to fill out a feedback form. In this Excel spreadsheet, I can see who has filled in the feedback form and who has still not given us their input.
I’d like to send out personalized email messages to all attendees thanking them for participating in the workshop.
How to Review email messages?
All email messages should address the participant by the first name. All email messages should also include a link to the content covered during the workshop. In the thank you email to those who have not filled in the feedback form, I’d like to include a reminder with a link to the form.
In the email going to those who have filled in the feedback form, I’d like to thank them for their input and address any specific feedback they might have provided us with.

How to start a start a Mail Merge in Word 2013?
Even though I’m going to use Outlook to send the email messages I’m going to use Mail Merge in Word 2013 to automate the process of personalizing the email. To start the Mail Merge click the “MAILINGS” tab and then select “Start Mail Merge” and then “E-mail Messages”.

How to select recipients in Mail Merge from an Excel spreadsheet?
Next, I’ll select my recipient list.

I’ll click “Select Recipients”, “Use an Existing List” and select the feedback spreadsheet I have open. I’ll select “Sheet 1” and since my first row of data contains column headers I’ll leave this checkbox marked and click “OK”. To see all recipients click “Edit Recipient List”. Here I can see that all 14 attendees have been selected.

How to filter recipients in a mail merge?
First I want to compose the email to those nine participants that have not responded to their feedback. In the spreadsheet, the column called “Feedback form filled in” for these participants is filled with “No”.

To select only these participants, I’ll click “Filter” and in the “Field” drop-down I’ll select the field “Feedback form filled in” and write “Equal to” “No” in the “Compare to” field. Then I’ll click “OK”.

Now you can see that only the participants that have not provided their feedback have been selected for the Mail Merge. I’ll click “OK” and now I can compose the personalized email messages to these nine participants.
How to add a greeting line in a mail merge?
First I want to greet each participant by their first name. I’ll click “Greeting Line” and then leave the default which is “Dear” and then select the first name “Joshua”, which is just a sample first name.
Here I get a preview of my own recipients.
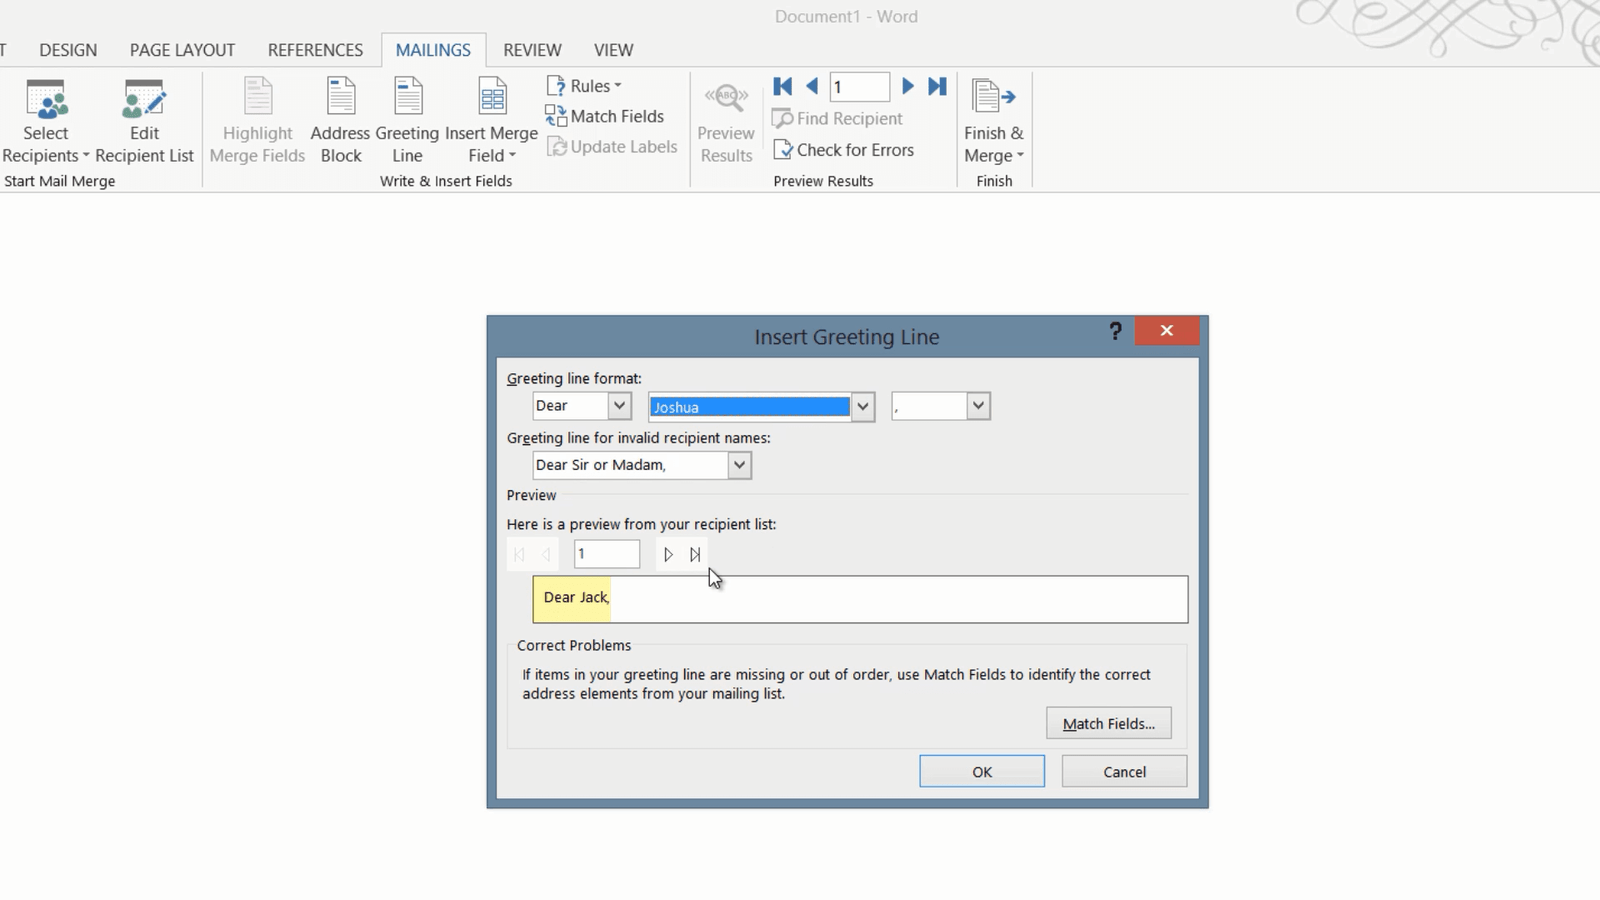
I’ll click “OK” and the greeting line is inserted into my email message. Now I’ll copy some of the text that I’ve already written in my draft email message. I’ll mark the text, including my email signature, right-click and “Copy,” and then I’ll go back to Word, right-click and “Paste” “Keep Source Formatting”. I want the whole email to have the same formatting so I’ll just mark some of the text from my email, click the Formatting Paint Brush and then paint the greeting line so that it has the same formatting as the rest of the email.
Previewing individual email messages
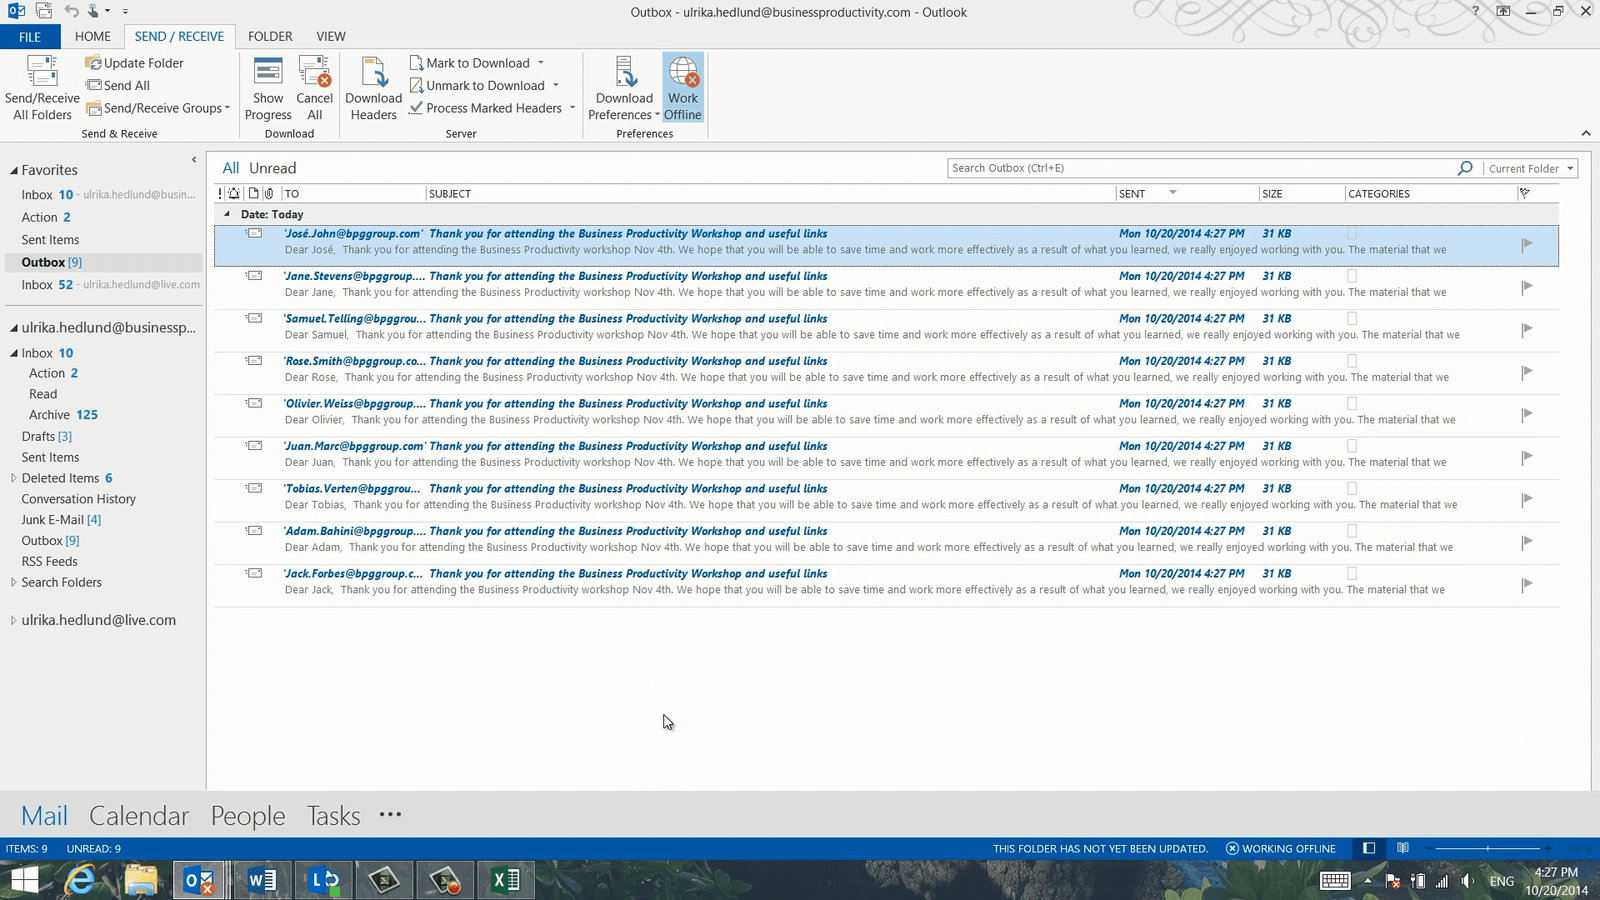
To preview the results click “Preview Results” on the “MAILINGS” tab. You can step through the recipients one by one, or go to the very end to make sure you have them all. Before the email messages are sent, I want to have the ability to review them in my Outbox, so I’ll disconnect Outlook by opening up Outlook and under the “SEND/RECEIVE” tab I’ll click “Work Offline”.

How to finish Mail Merge?
I’ll go back to my Word document and click “Finish & Merge” and select “Send Email Messages”. Here I’ll enter the “Subject line” “Thank you for attending the workshop and useful links”. I’ll keep the mail format as HTML and I’ll keep the default option which is to send it out to all selected recipients and then I’ll click “OK”.

As you can see, Word loops through all recipients, and if I now go to Outlook and open up my Outbox you can see that the nine personalized email messages are there.
Filtering recipient list
Now I want to compose the email to those participants who have provided us with feedback. To change the selection of recipients, click “Edit Recipient list”, click “Filter” and then change the criteria for your selection. Here I’ll change the “Comparison” field to “Not equal to” and click “OK”.

Now I can see that the remaining 5 participants have been selected from the Excel spreadsheet. I’ll click “OK”, and then I’ll open up the second draft email and copy the line thanking the participant for their feedback. Then I’ll paste it into the email message.
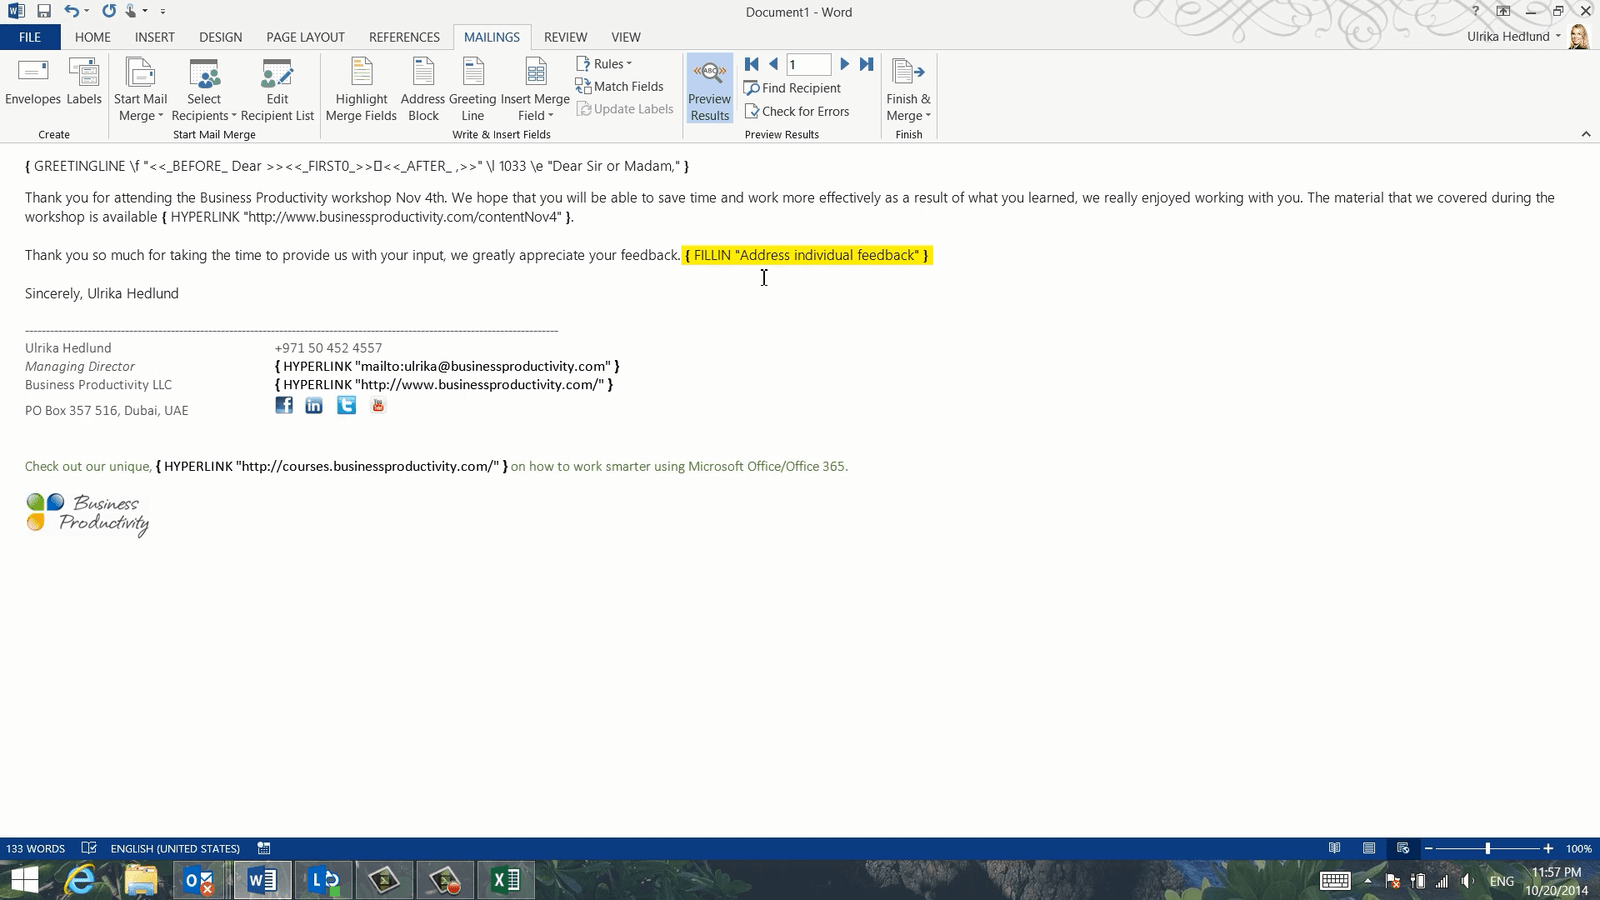
In addition to thanking them for their input, I also want to address specific feedback provided by each participant. You can enable Mail Merge to prompt you for individual text for each email message. Place your marker where you want the individual text to be added, click “Rules” and then “Fill-in”. In the prompt field, I’ll write “Address individual feedback”. I don’t want to have any default fill in text since each feedback will be unique. I’ll leave the checkbox “Ask once” unmarked because I want to be asked for each individual email and then I’ll click “OK”.

The prompt opens up and I’m asked to address individual feedback, in this case, it is for Abdullah. I’ll open up the Excel spreadsheet to see what his comments where. His feedback was that it was too hot, so I’ll go back to the text prompt and address his feedback and then click “OK”, and as you can see the text is added to the email message addressed to Abdullah.

Modifying the underlying Mail Merge code
Unfortunately, there is a problem here, when you finish the Mail Merge, you won’t know what recipient Word is prompting for input. Let me show you. I’ll click “Finish & Merge”, and “Send Email Messages”. I’ll keep the same subject line as before and select all recipients, I’ll click “OK” and then I’m prompted to address the first individual feedback which is for Abdullah so I’ll just leave the initial text and click “OK”. I’ve been prompted again, but now I don’t know who for.

To solve this issue I’ll show you a little workaround. I’ll click “Cancel” here and go back to my document. To see the underlying code that Word uses for the Mail Merge press “Alt + F9” on your keyboard. Here you can see what goes on behind the scenes. At the very end, you can see the field to “Address individual feedback”.
Here I want to add the recipient’s first and last name to the text box where I’m prompted to address the individual feedback. I’ll click right after the text “Address individual feedback” add a space and then write “for”, add another space and then I’ll insert the name by clicking “Insert Merge Field” and selecting the “FirstName”, I’ll press space again, click “Insert Merge Field” and then select “LastName.” The name will not be inserted into the email message, it will only be shown in the message window prompting me for input.

I’ll press Alt + F9 again to hide the code.
Now I’ll try it again, I’ll click “Finish & Merge” and select “Send Email Messages”. I’ll keep the subject line and select all records and click “OK”. Now I’m prompted to address the feedback for Abdullah Khory, which I’ve already entered so I’ll just click “OK”. Next, I’m prompted to address the feedback of Nicole Berg, I’ll go back to the Excel spreadsheet to see her feedback. She just wrote that she learned a lot, I’ll go back to Word and personalize the text to her saying that we’re happy she learned a lot. The next email is to Ahmed, Ahmed and Chen didn’t provide any comments so I’ll just delete the text and leave it empty for both of them. Finally, we have Sven who asked us for the slides. Here I’ll reply that the slides are available on the link provided in the email.

I’ll click “OK” and then I’ll go to Outlook and look in my Outbox to see all email.
How to review your emails before they are sent?
I’ll open up the email message to Sven just to make sure that the individual text has been added, and here I can see that it has. I’ll click “Send” and then when I’ve reviewed all of the email messages I’ll just click “Work Offline” to put Outlook back online to send the email.
Using Mail Merge you’ll save a lot of time when personalizing email messages.
How to Enhance Your Writing Using Word 2013?
Introduction
If you are a business professional and you want to have a successful career, you have to possess the ability to express yourself in writing. Whether you’re writing a sales proposal, a marketing brochure or a blog article – you have to be able to write well.
There are a number of built-in tools in Word 2013 that can help you enrich your writing. In this video, I’ll show you how to enrich your writing using synonyms, how to look up more background information about a topic and how to use the translation tool to translate your text to another language.
How to Check for Grammar and Spelling in Word 2013?
Here I have a blog article that I’m writing in Word 2013. The title is “Amazing new ways to interact with computers”. Since this is a title, each word ought to be capitalized, so I’ll mark the entire title by clicking in the margin next to the title. On the “HOME” tab, in the font section, I’ll click “Change Case” and select to “Capitalize Each Word”. I get a blue squiggly line under the word “to”. A blue squiggly line means that the word is formatted incorrectly or that there is an issue with the grammar.
In general in a title you should capitalize all words except prepositions and conjunctions and since “to” is a proposition, Word shows me that it should not be capitalized. To correct it, I’ll just right-click and select the correct case.
In previous versions of Word, grammar mistakes were marked with green lines, now all formatting and grammatical mistakes are marked with blue.
In this first sentence, I have another grammatical mistake that Word has picked up. What I meant to write was “the way we interact” so I’ll just add “way” and the blue line disappears.
The red line, which indicates spelling mistakes, shows that I have misspelled “fingers” so I’ll just right-click and select the correct spelling.

For the spell checker to work, make sure you have the right language configured. To check your language settings, go to the “REVIEW” tab, click “Language” and then “Set Proofing Language”. Make sure you have the correct language selected. If you work with multiple languages you can add those languages to the Language Preference settings. Click “Language”, “Language Preferences” and then select your preferred language in the drop-down and click “Add”. I already have the two languages I use so I’ll just close down this window.
In this paragraph, there is another blue line in the sentence starting with, “The Wii controller is used as a pointing device”. The word is not miss-spelled, but I’m using a word with the wrong meaning. Instead, Word suggests I should use a device, with a “c”. If you are unsure of a Word, you can look up the definition. To look up the definition of a word, right-click and select “Define”.
You need to have a dictionary installed and be online for this to work. If you haven’t already installed a dictionary you’ll be prompted to select and install one. I’ve already installed the Bing Dictionary so it opens up next to the document. Here I can see that the definition of the word “device” is, in fact, the one I wanted. If I look up the word spelled with an “s” I can see that it means “to invent a method”.

The definition lookup works really well when in read-mode. Just right-click the word, select “Define” and a definition window pops up. If you are unsure of how a word is pronounced you can just click the little audio icon. This is a great help if you are reading a long report and you want to look up a word you are unsure of.

How to automatically replace words in Word 2013?
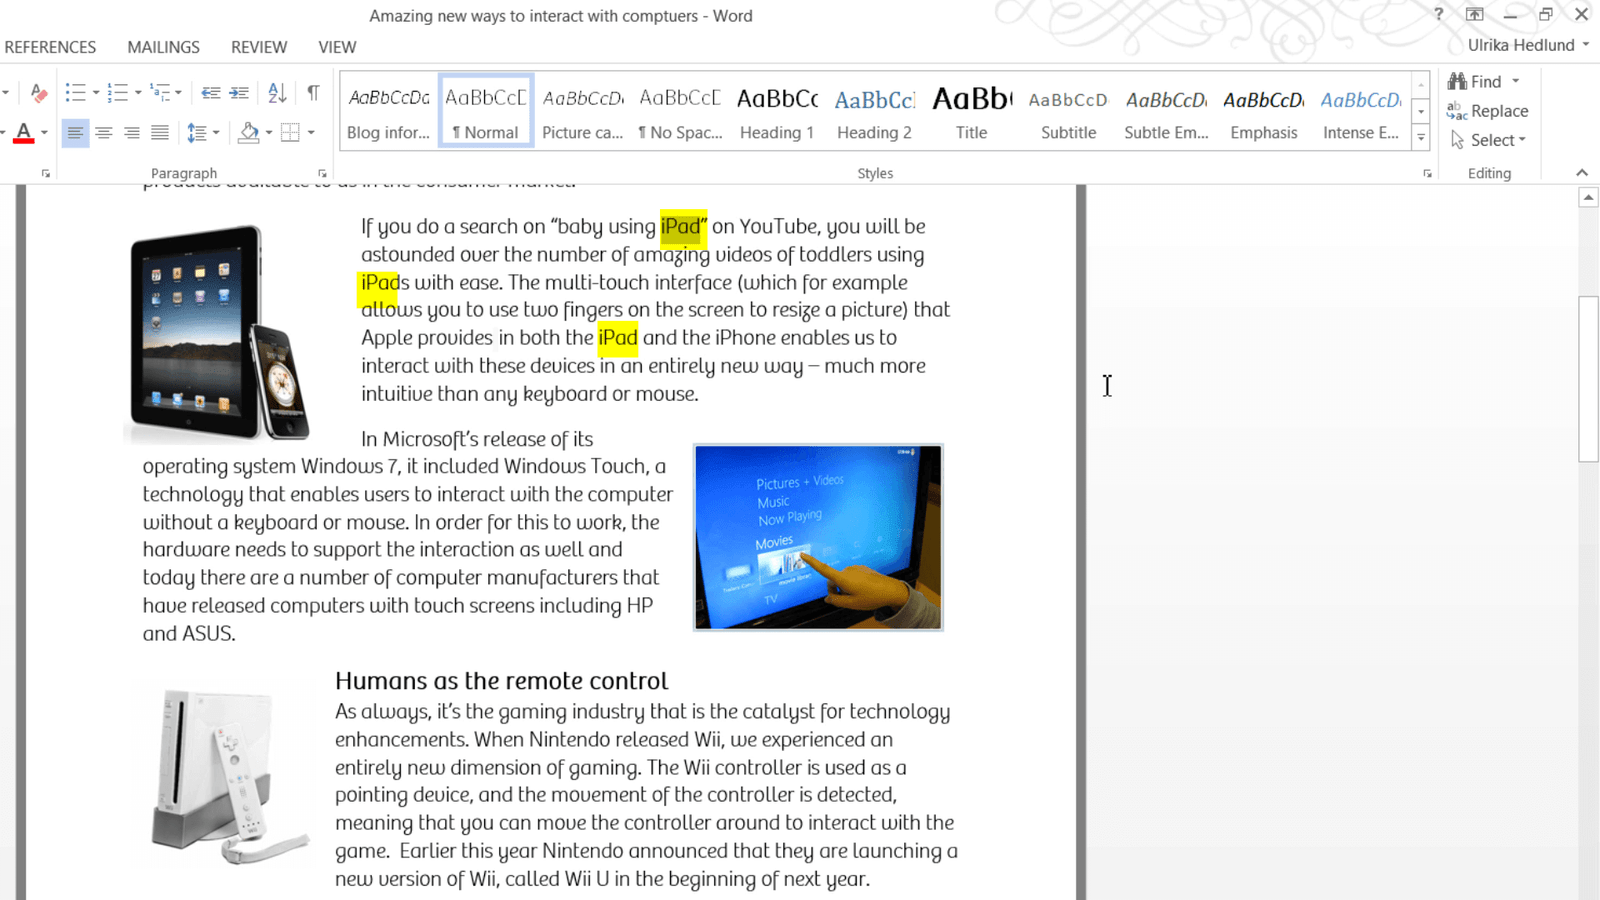
In this paragraph, I’ve written “IPad” numerous times. But I’ve written it with a capital “I” and I’d like to change it to a lower case “i”. Instead of changing this manually I’ll let Word do this for me by using the “Replace Tool”. To replace a word in your document, mark the word you want to replace and go to the “Editing” section at the far end of the “HOME” tab and click “Replace”.
Here I’ll choose to replace IPad with a capital “I” to iPad with a lower case “i”. In order for Word to capture this I need to click “More” and then “Match Case”, then I click “Replace All”.

Word goes through the rest of the document and makes three replacement. To go through the document from the beginning I just click “Yes” and then “OK”. As you can see the changes have now been applied to the entire document.
Enriching your vocabulary using the Synonym Tool
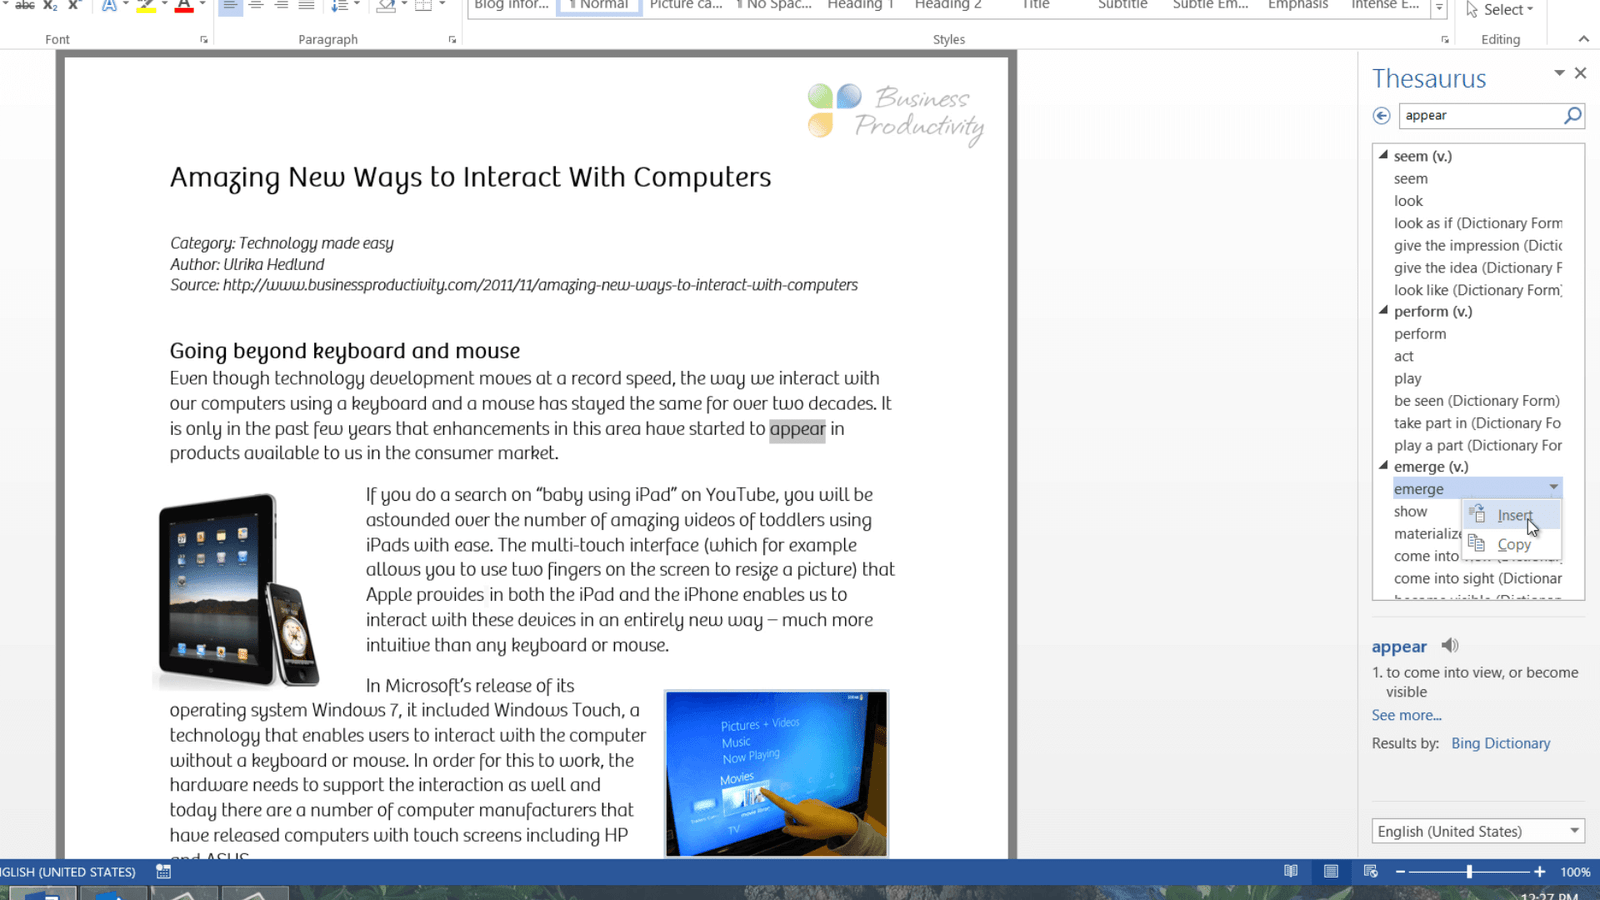
I don’t know about you but I tend to use a rather limited vocabulary when I write. A great way to enrich your writing is to use the “Synonym” tool. To find a synonym for a word, place your marker on the word, right-click, and select “Synonyms”. You will get a number of different options that you can use in your text. Here I’ll replace the word “improvements” with “enhancements”.

If you’d like to see even more options than the synonyms provided in the menu you can choose to open up the “Thesaurus”. To do that click on a word, in this case, I’ll choose “appear” right-click, select “Synonyms” and then click “Thesaurus”. Here you have more options to replace the word. Here you can also see “Antonyms”, these are opposites of the word. I’ll choose to replace “appear” with “emerge“, so I’ll click the drop-down menu and click “Insert”.
Using the Wikipedia App for in-document research
In this section, I write about Nintendo’s Wii. I’d like to add to my text what year Nintendo released Wii and I’ll be sure to find this information on Wikipedia. Instead of opening up a web browser and then going to Wikipedia, I can search directly from my document using the Wikipedia Office App. To use the Wikipedia app you first need to make sure that it’s available. If you’ve added it you will see it under the “INSERT” tab in the “Apps” section.

If you don’t see the Wikipedia app there, click the “Store” button. Search for “Wikipedia” in the Office Store and then click “Add”. Once it’s been added, click “Wikipedia” to open up the Wikipedia sidebar. Double-click the word you want to look up. I’ll double-click “Wii” and can see here from Wikipedia that Wii was released in November 2006. So I can easily just add this to my text. The beauty here is that you don’t have to leave Word to find the information you’re looking for – it’s all there directly at your fingertips.

Translating text between different languages
The final tool I want to show you is the Translation Service. Sometimes when I’m writing a text I find it difficult to find the right word in English since English isn’t my first language. To use the Translation service, mark the word you want to translate. Here I have a word in Swedish that I’d like to translate into English. Right-click the word and choose “Translate”. The research bar opens up where you can enter the language you want to translate from and the language you want to translate to. I want to translate this from “Swedish” to “English.” Here I get the translation of the word which is “diseases.”
![]()
To insert the word into your document just click “Insert”. If you want to translate the entire document select the language you want to translate from, and the language you want to translate to, and click “Translate the whole document”. The text will be sent to the online translation service. As you can see the document is now being translated and for those of you who understand Swedish, you can now see that it has been translated. I can easily select another language, here at the web interface. Here I’ll translate the document into Arabic. After a few moments, the Translation service has translated the document.
![]()
This is a very useful service if you want to get an understanding of what a text is all about. However, I would not recommend that you use this for professional translations.
If you frequently want to see the translation of words in your document you can open up the “mini translator”. To use the mini-translator click the “REVIEW” tab and then “Translate”. First, you need to make sure that you have the desired language entered in the settings. To check your settings click “Choose translation language”.
![]()
Select which language you want to translate to in the language drop down. Click “OK” then click “Translate” again and turn on the Mini-translator by clicking it. Now, if you place your mouse cursor over a word and pause, the Mini-translator will open up showing you the translation of the word. You can also listen to how it should be pronounced.
![]()
Closing
It’s really convenient to have the tools you need to enrich your writing accessible without having to leave Word. Not only do you save time, but you also minimize distractions and the temptations to start doing something else when you should be writing.
How to Create an Attractive Article in Word 2013?
Introduction
In order to attract your readers and to provide them with a great reading experience, it’s important that you as a writer think about the layout and the design of your article – as well as the contents. There are a number of tools in Word 2013 that can help you create an attractive article.
Introduction to the document
Here I have a text that I have written for an article on “Running effective meetings”. I’m going to show you how I can use the formatting tools within Word to make the article look like this instead, a much more attractive article.
How to change margins in Word?
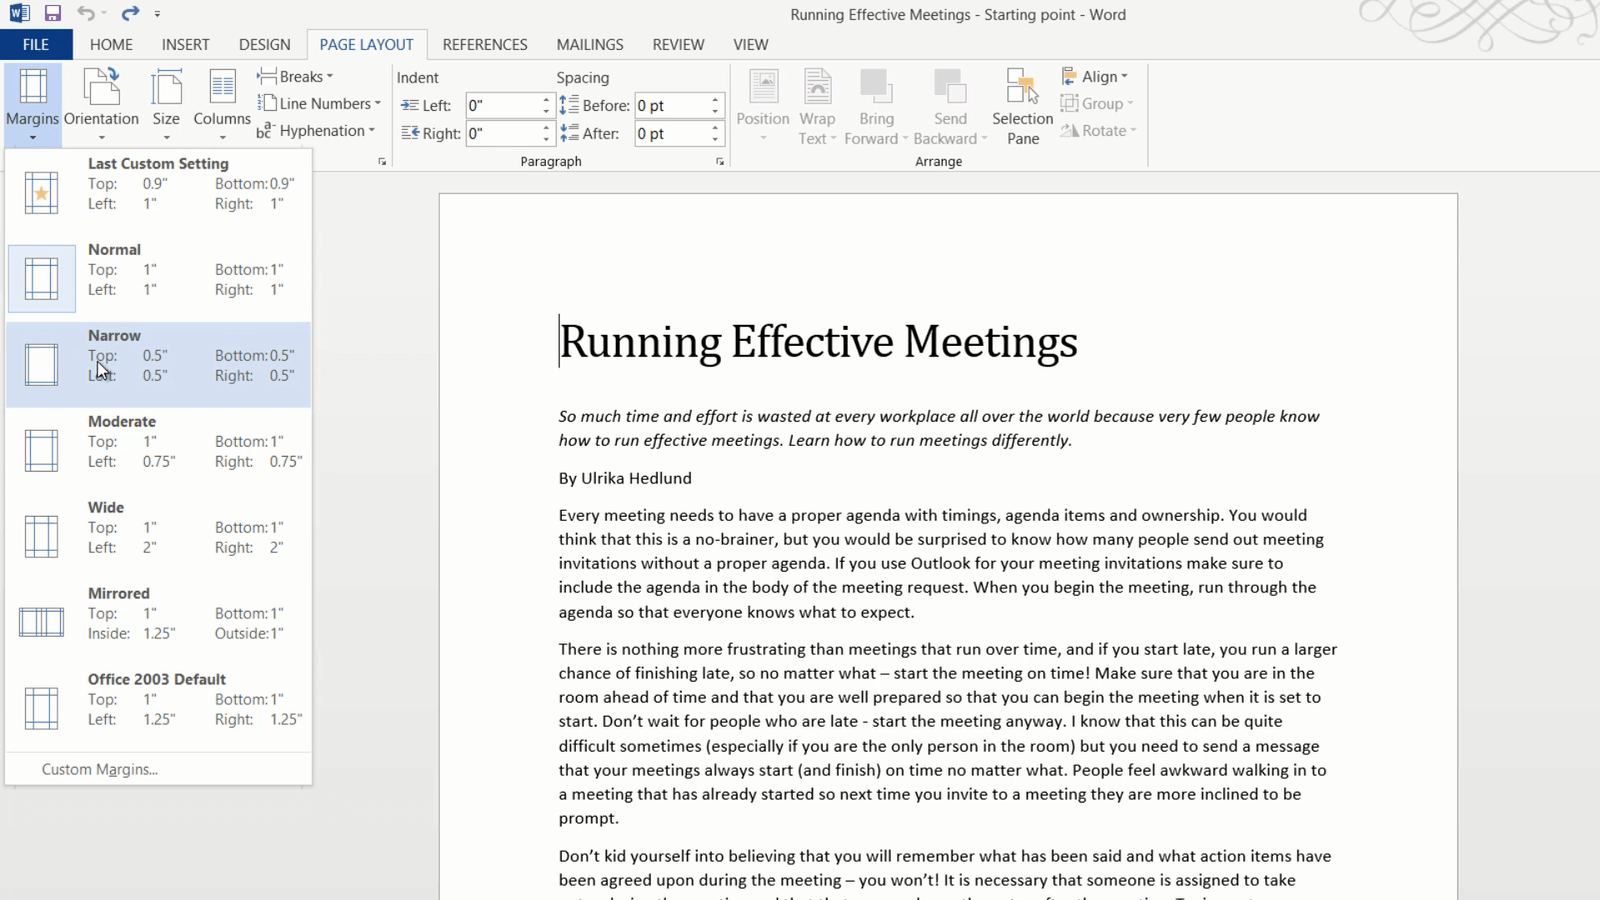
First I want to make better use of the paper by reducing the margins. To change the margins of a document, go to the “PAGE LAYOUT” tab and click “Margins”. Here you can select from a number of pre-defined margin settings. You can also define exactly how wide you want the margins to be by clicking “Custom” and entering the exact measurements. I’ll click Cancel here and go back to the Margin settings. If you have set up custom margins before, the last used custom settings are available on the menu. In this case, I’ll select “Narrow” margins and as you can see the text now fills out more of the page.
How to arrange text in columns in Word?
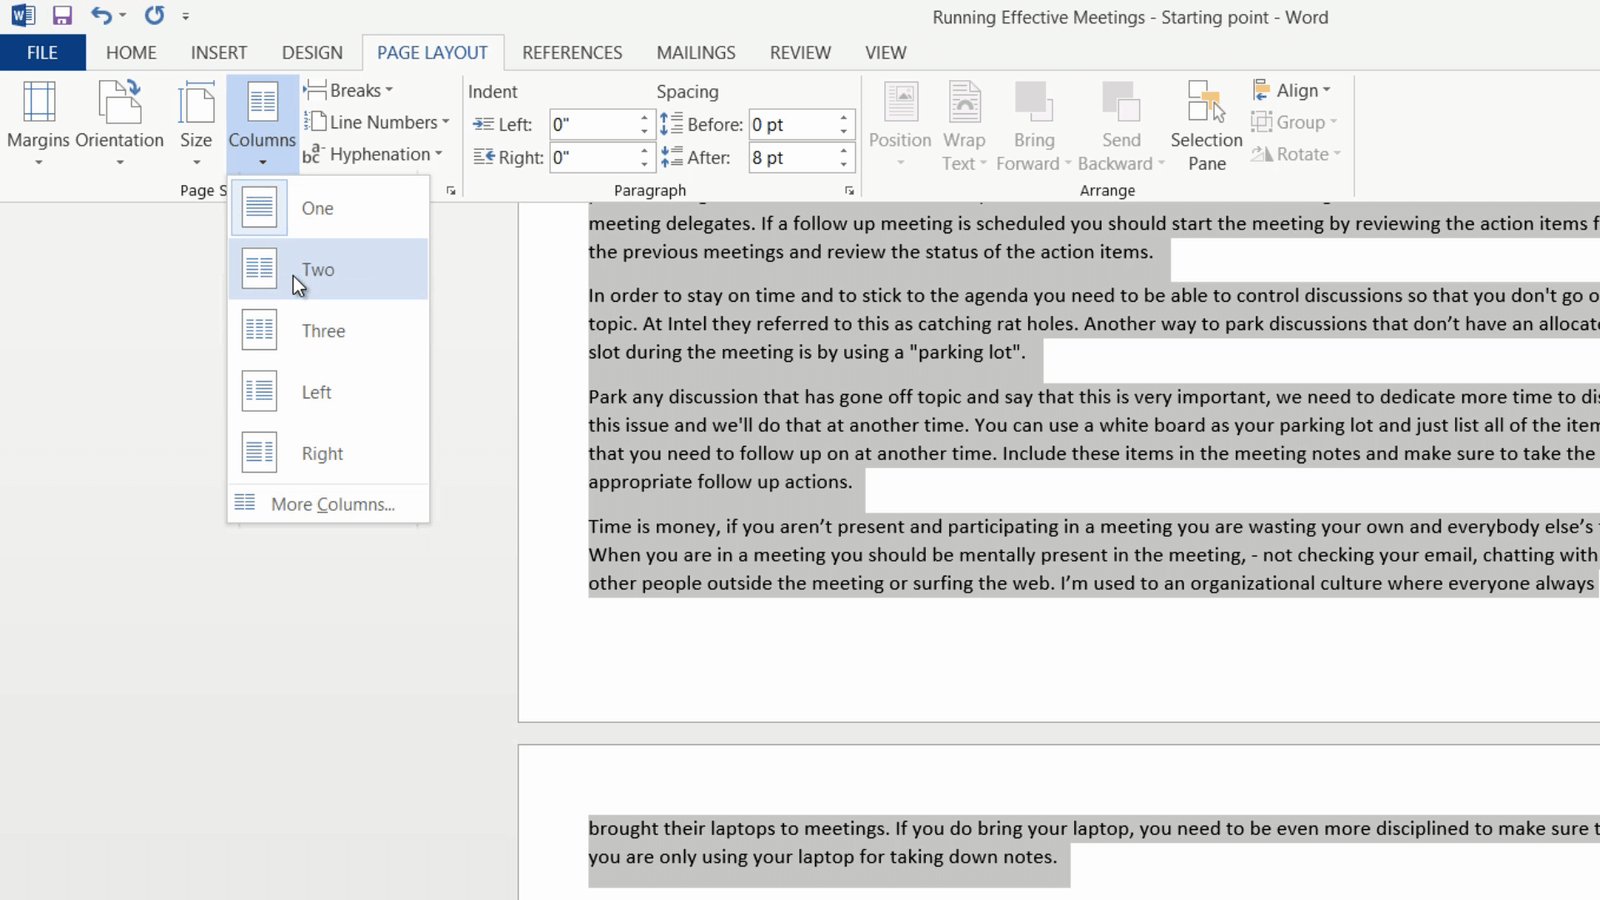
Now I want to change the layout of the text into two columns. I want the title or the headline and the sub-headline to remain in one column, I only want the body text of the article to be arranged into two columns. To arrange text into columns, mark the text you want to re-arrange. To mark large chunks of text place the marker at the beginning of the text and then scroll down to the end, hold down Shift on the keyboard and then mark the end of the text. On the “PAGE LAYOUT” tab click “Columns.” Select the number of columns you want, here I’ll select “Two” columns.
The text is now arranged into two columns. If you want to change the spacing between the columns open up the ruler by clicking the “VIEW” tab and then mark the “Ruler” option. To change the width between the columns, move your mouse until it becomes a double-sided arrow, now hold down the left mouse button and then move the marker with your mouse.
How to work with images in Word?
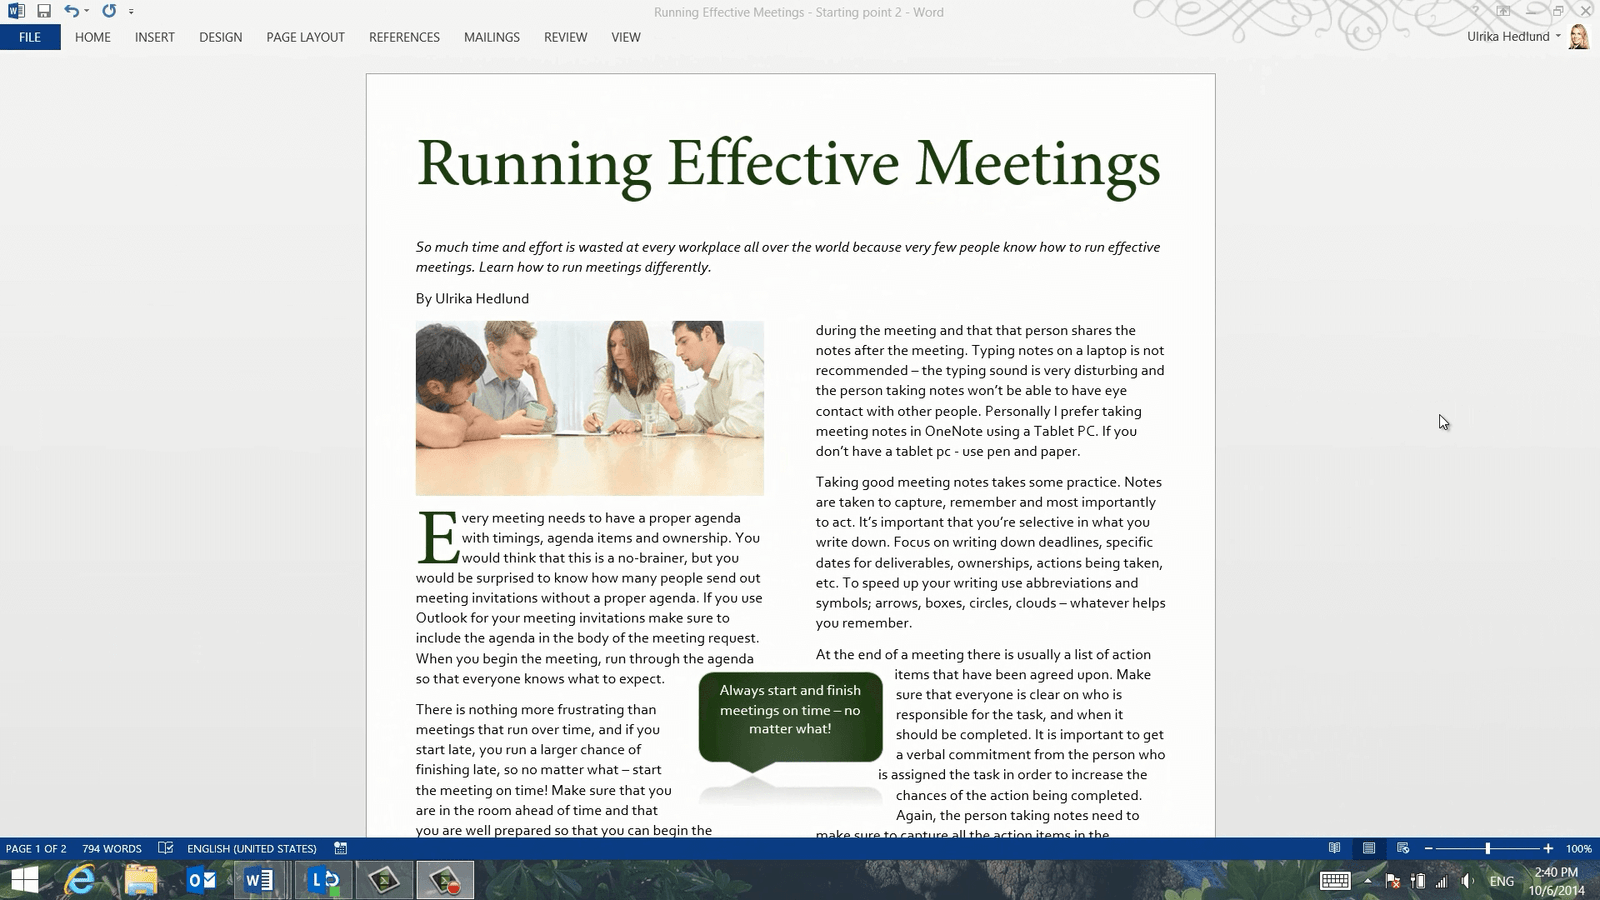
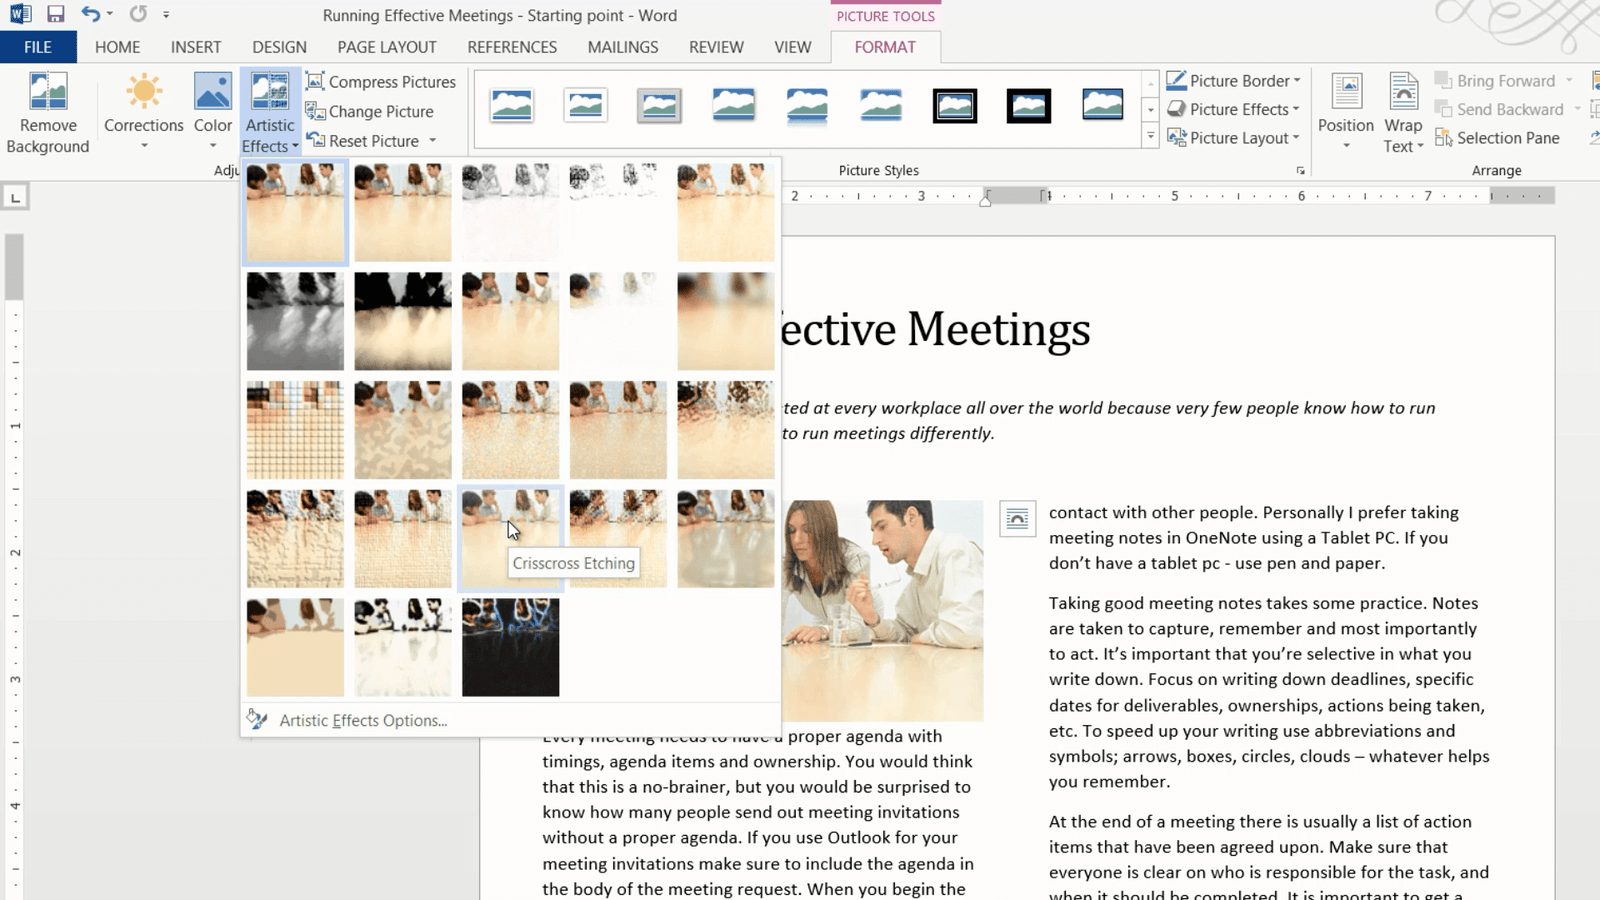
Now I want to add some pictures to make the article easier to digest. To insert a picture into your document, place the cursor where you want to position the picture and click the “INSERT” tab. I want to insert a picture from the Internet so I’ll click “Online Pictures”. In this case, I want to use a royalty-free image from Microsoft’s ClipArt library on Office.com. I’ll write “meeting” in the search text box and select this one by marking it and clicking “Insert”.
The image is a bit too big, so I’ll click “Crop” and then I’ll crop the picture to an appropriate size. Now I want to change the image a bit by adding an artistic effect to it. To apply an artistic effect to your picture, mark the image and click “Artistic Effects” in the “PICTURE TOOLS” menu. You get a live preview of what different effects look like. The “Blur” effect is great if you want to censor something, like a face or a credit card number. The “Film Grain” effect is good if you want to make something look older. Here I’ll select the “Crisscross Etching” effect which is quite subtle.
How to position images in Word?
I’ll insert one more image, this time I want to insert a picture that I have on my computer so I’ll click “INSERT”, “Pictures” and select my image.
When you insert an image in Word 2013 a layout button appears. Click on the “LAYOUT OPTIONS” buttons to see how you can position your image.

Here you can select if you want your image to be placed in line with text, or if you want it with text wrapping. The default layout is “In Line with Text”. I’ll select to position the image with text wrapping using the “Square” option. If you often use this layout you can set it as the default by right-clicking and select “Set as Default”.
You can also select if you want the image to be positioned relative to the text or relative to the page. I want this image to be located at the bottom right corner of the page, so I’ll select, “Fix position on page” and then I’ll close down the “LAYOUT OPTIONS”. Now I can position the picture where I want it on the page. I get a live preview of what the positioning of the image will look like. The new alignment guides help me position the images more precisely. The little anchor shows me what text the image belongs.
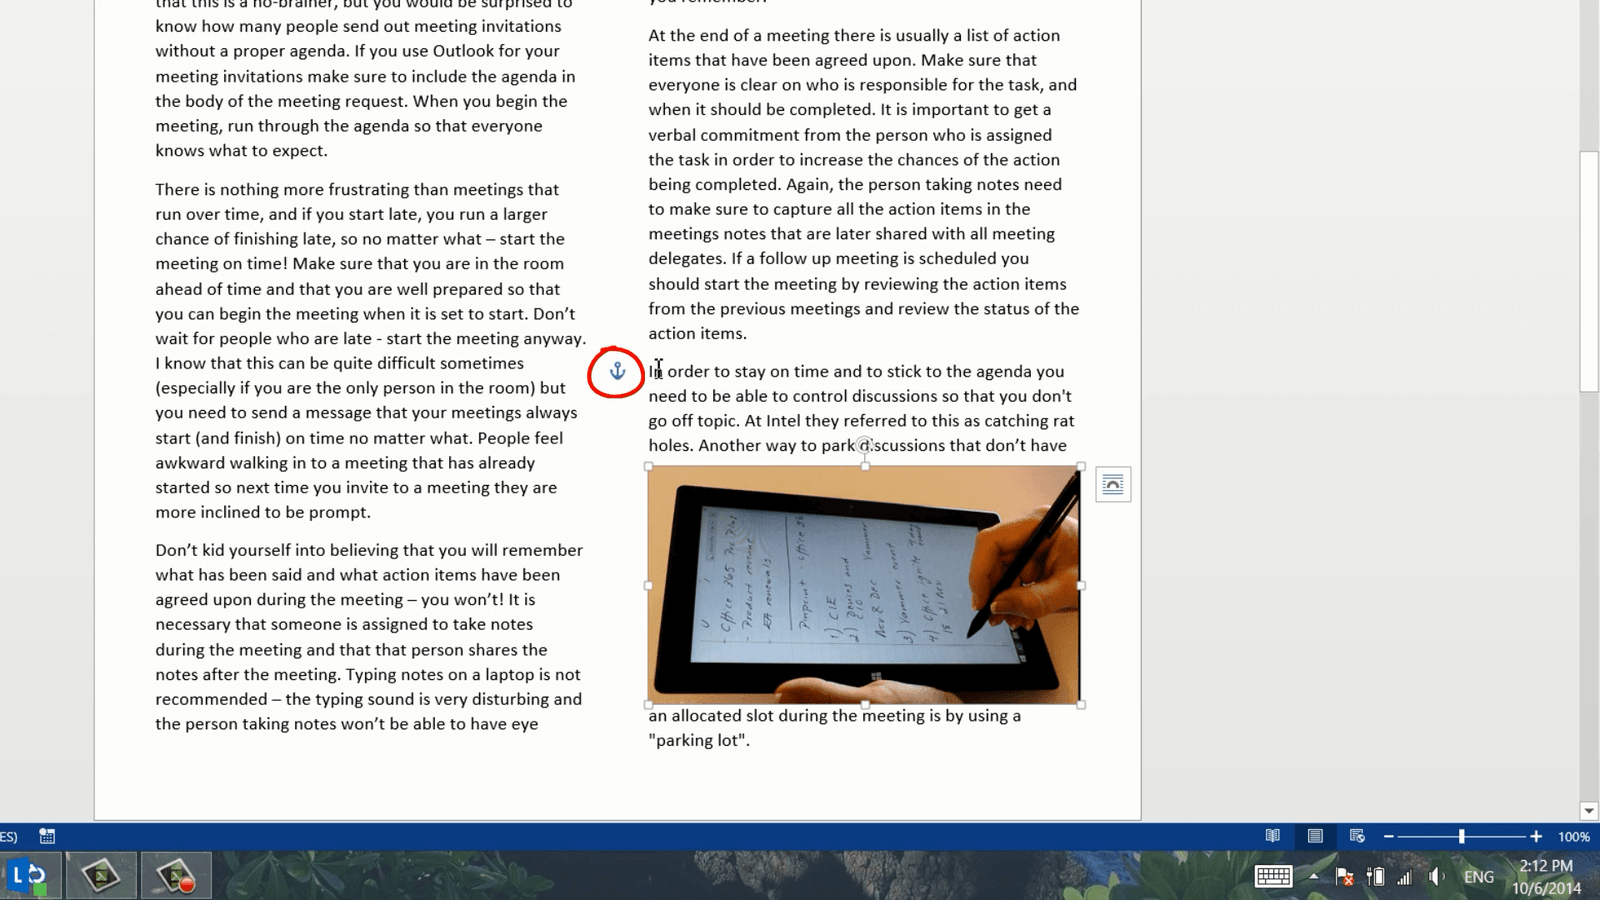
Even though I’ve said I want the image to have a fixed position on the page, the image always belongs to a defined text that needs to be on the same page. In this case, the image belongs to the paragraph starting with “Taking good meeting notes”. So to anchor the image with that text, I’ll just grab the anchor and move it to that paragraph. If I insert a page break and move the paragraphs after the anchored text, the image will remain in the position since the anchoring text is still on the same page. If however, I change the page break so that the anchored text moves to the next page, the image will also move, having the same fixed position, but on the next page.
Again I want to apply the same artistic effect to this picture so I’ll mark the image, Click “Artistic Effects” and select the “Crisscross Etching” effect.
How to insert a caption for an image in Word?
I want to add a caption to this image. Along with the title, the lead, and section headings, captions are the most commonly read words in an article, so they should be concise and informative. To insert a caption go to the “REFERENCES” tab and click “Insert Caption”.

I don’t want the caption to have a label, but even if I select the option “Exclude label from caption” the caption number will be shown, so I’ll just leave this option and delete the label from the text box instead. I’ll write the caption and then click “OK”. Now I’ll remove the caption label from the text box by marking it and pressing Delete. I’ll mark the image, right-click and select “Group”. This way the caption stays with the image no matter where I move it.
How to add a Callout in Word 2013?
To capture my reader’s attention further I’ll insert two callout bubble shapes highlighting some of the text in the article. To insert a callout shape, click “INSERT”, “Shapes” and then select the one you want to insert.
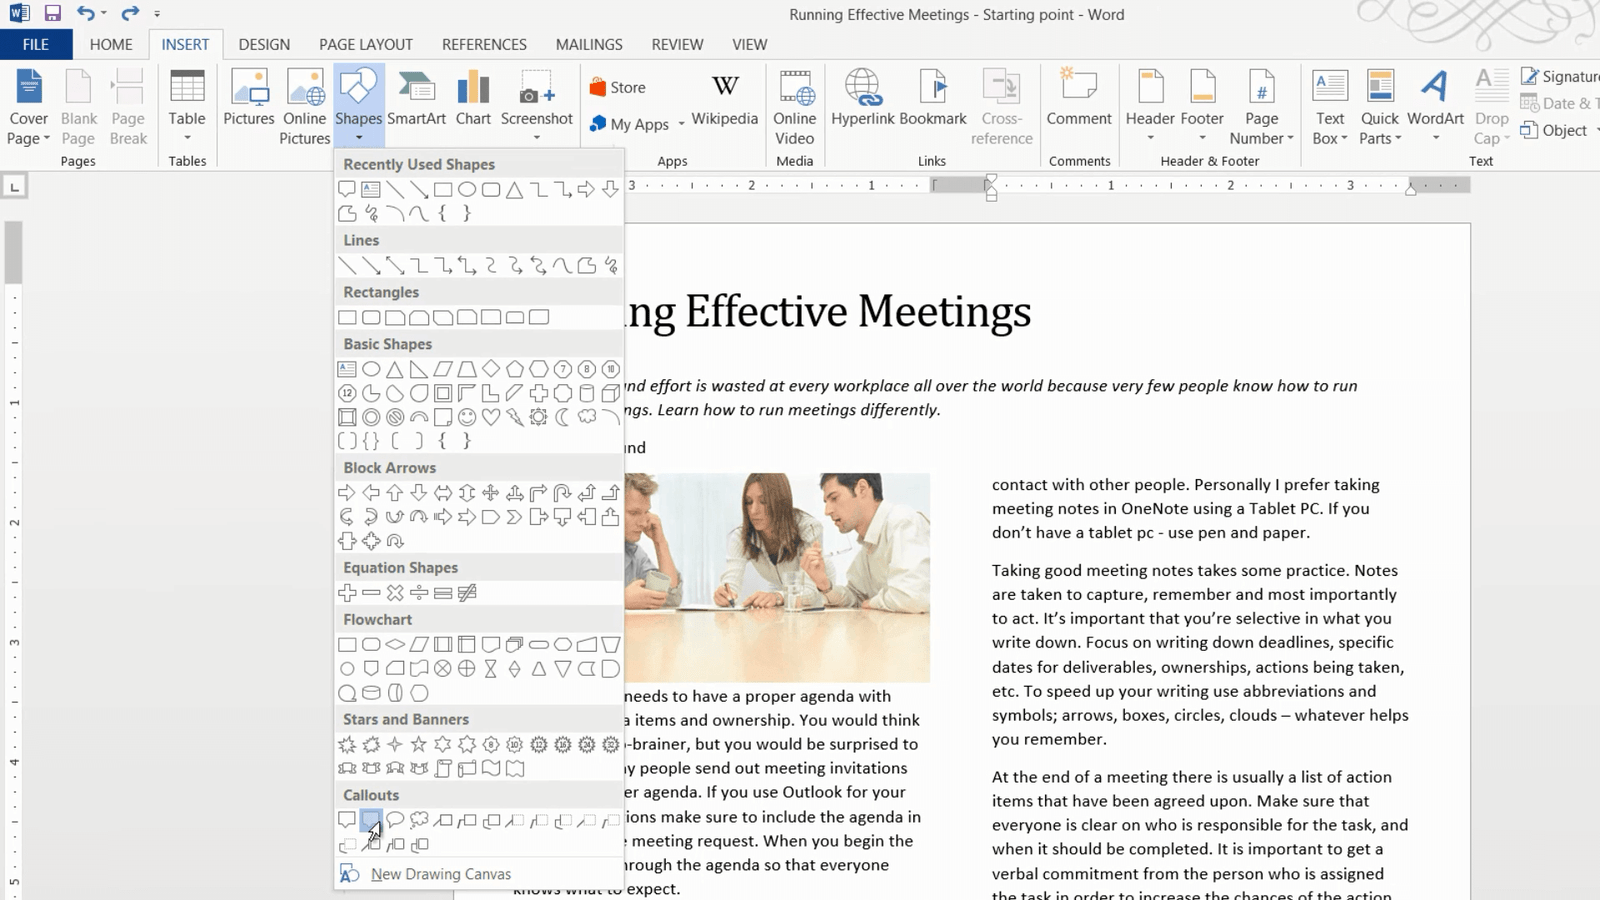
I’ll select this bubble callout and write my text in the bubble. I’ll click the “LAYOUT OPTIONS” button and select to position the shape wrapped with text with the square option. Now I can position the bubble exactly where I want it. I’ll click the “Shape Styles” to apply a nice design. I’m not thrilled about the color, but I’ll change that later.
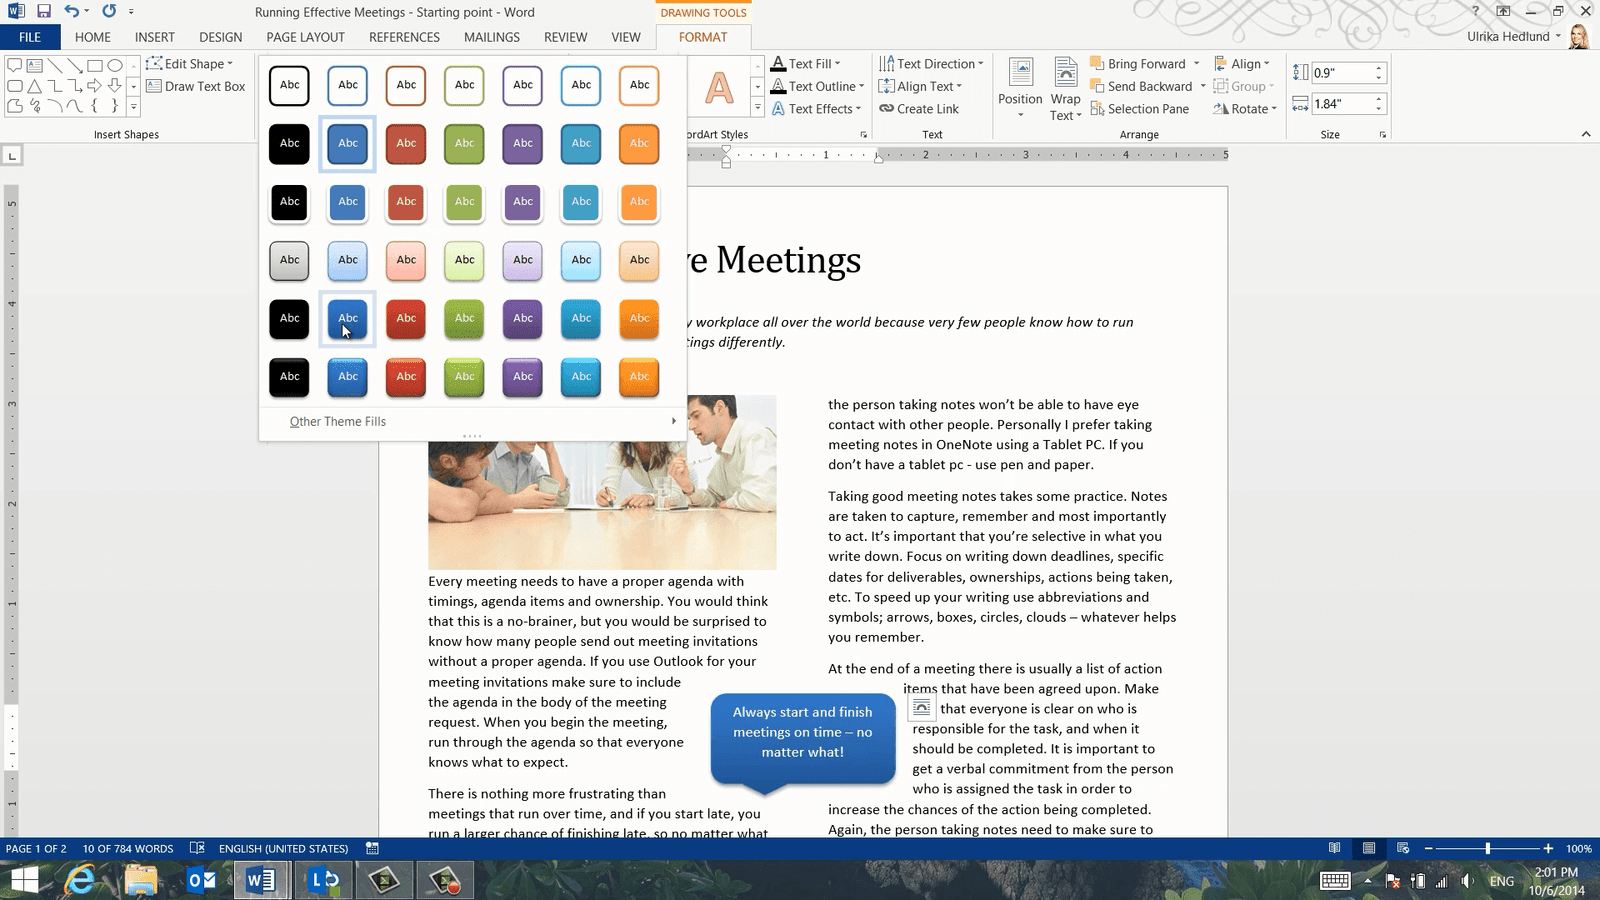
To insert one more similar shape, I’ll just copy this by pressing CTRL C on my keyboard and then CTRL V to paste it in again. I’ll position the second one and change the text. There!
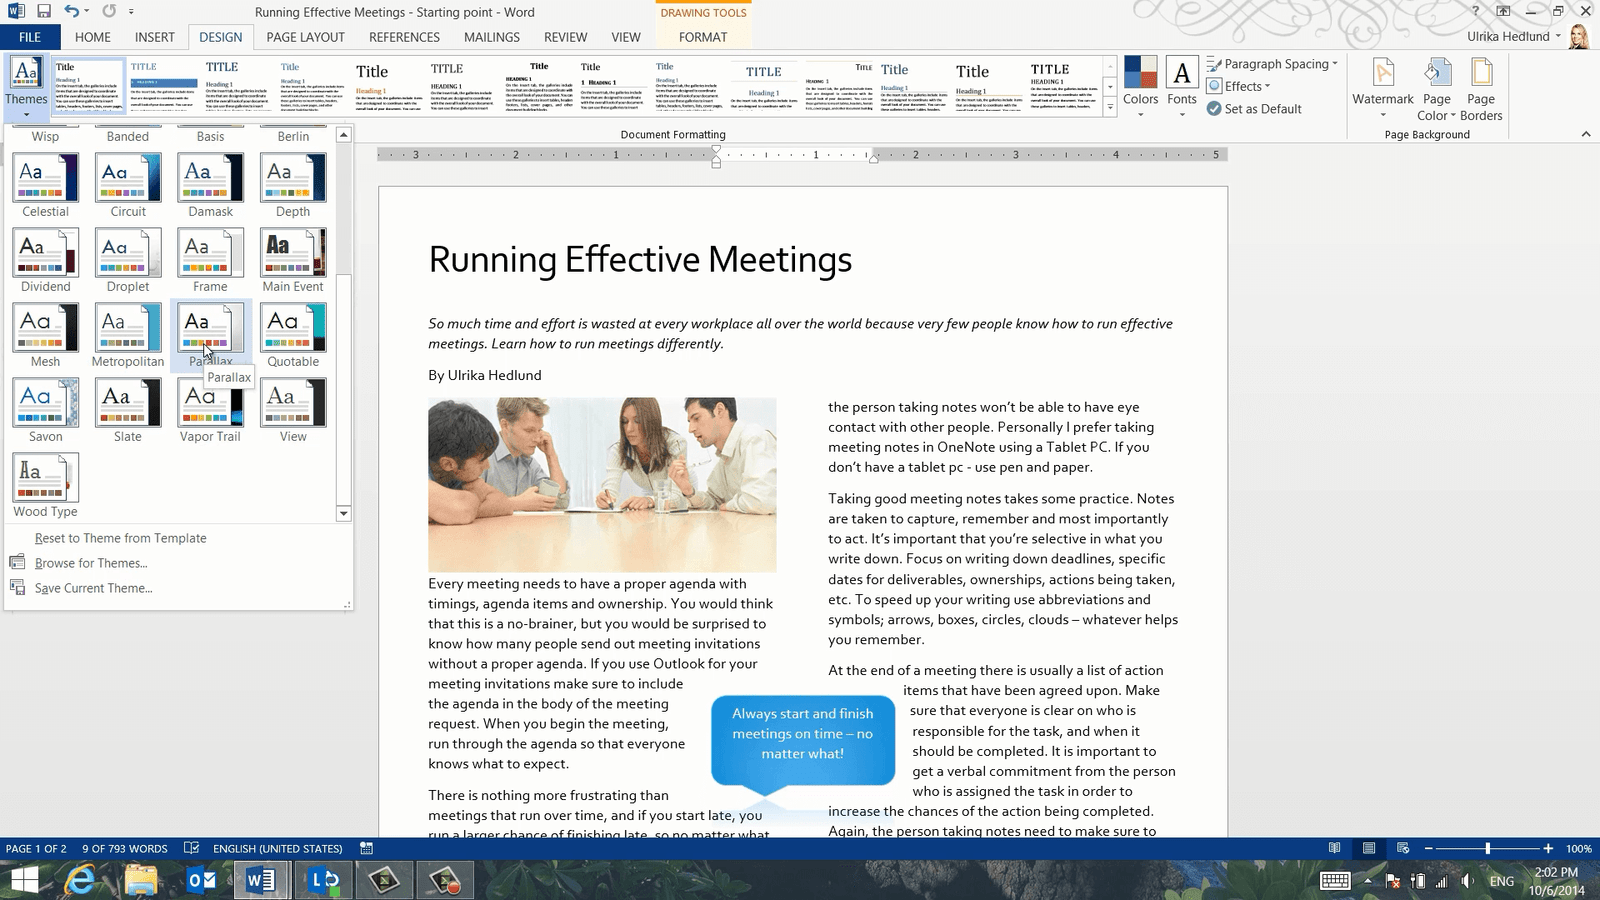
How to apply a theme in Word?
Now I want to change the look and feel of my article. I’ll click the “DESIGN” tab and then browse through one of the many themes in Word 2013. A theme is a collection of styles and color combinations. I will select this one called “Parallax”.
I’ll click the “Colors” drop down to select another color combination. I’ll select this green color theme. But I’d like to change the shading a bit. I’ll click “Colors” again and select “Customize Colors”.

I’d like to choose a dark green that goes well with the image of the article so I’ll change the first accent color to a dark green. I’ll save the custom color combination and name it, “Dark Green”.
Now I want to make some changes to the title. I’ll mark the title and change the font to “Adobe Hebrew”, I’ll increase the font size so that the title covers the full page width. Finally, I’ll change the color by selecting the “Dark Green” in the applied color theme. I’ll update the title style by right-clicking and select “Update Title to Match Selection”.
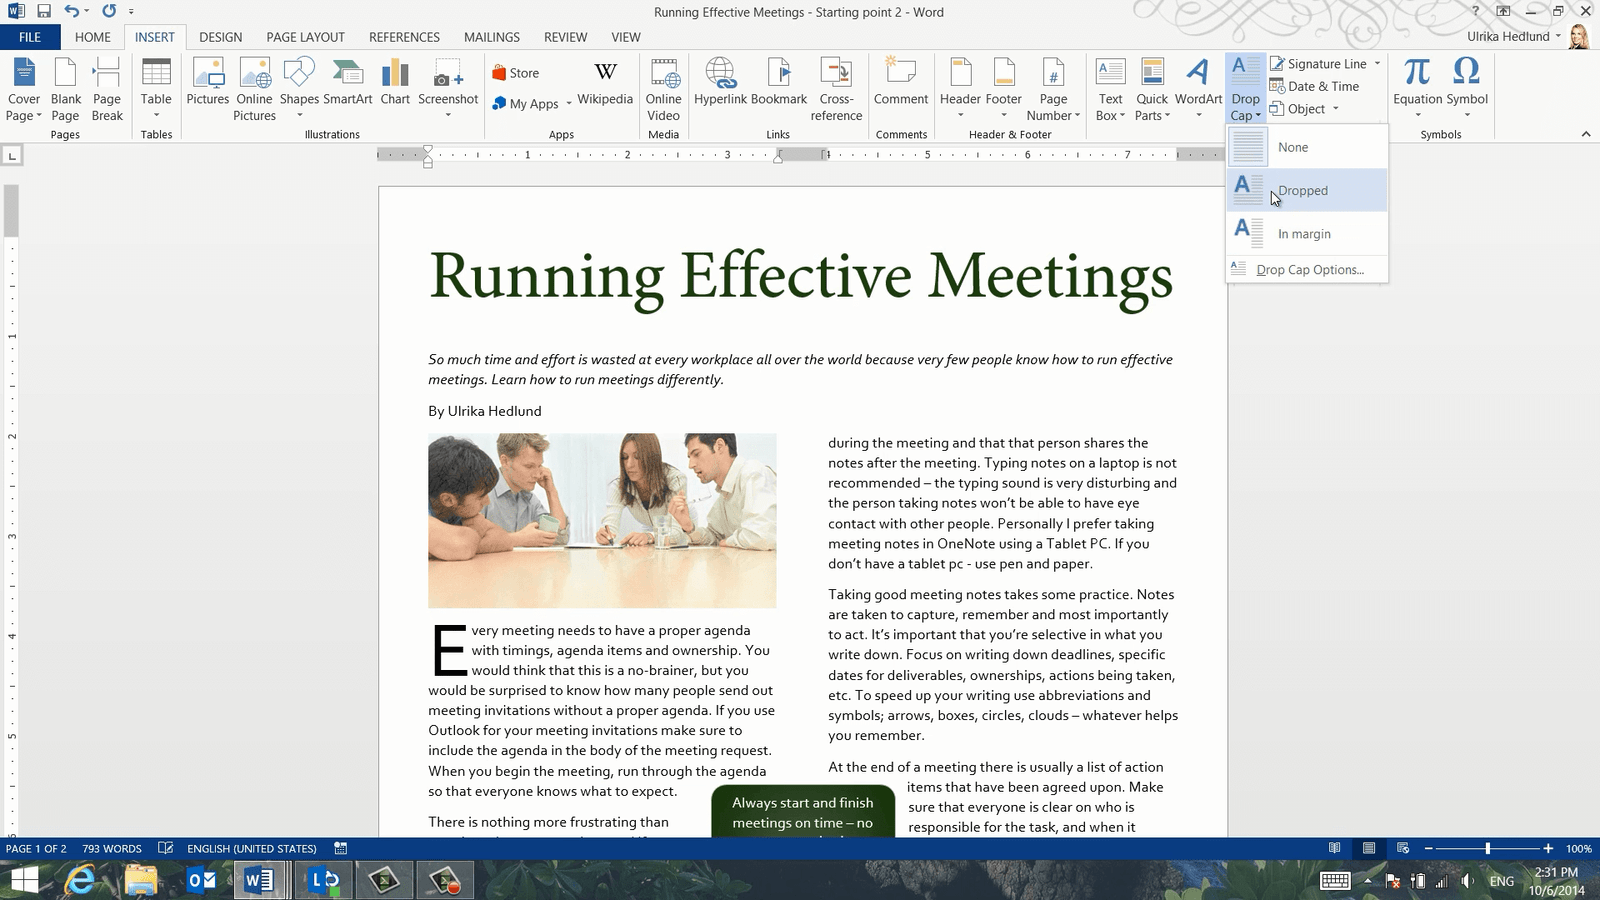
How to insert a Drop Cap in Word?
Now I want to highlight the beginning of the text by enlarging the first letter, by inserting a so-called Drop Cap. To insert a Drop Cap, place your cursor by the word where you want the Drop Cap inserted, click “INSERT” and then “Drop Cap”. Here you get a live preview so that you can select which layout option you prefer. I’ll select the one where the letter is dropped into the text.
To make it stand out even more I’ll mark the Drop Cap and change the font to “Adobe Hebrew”. I’ll also change the color and select a dark green in the color theme. There, now the beginning of the article stands out more.
How to distribute columns evenly in Word?
The final touch is to even out the text on the second page to balance the article. I’ll move the callout shape and position it at the top of the page. The marker is placed where I want to break the text to even it out. I will click the “PAGE LAYOUT” tab, “Breaks” and then select to insert a “Column” break.

The text is now split, evening out the article.
Closing
What I’ve shown you here are just a few examples of how the built-in tools in Word 2013 can help you create a really attractive article.
How to Create a Professional Letterhead in Word 2013?
Introduction
Any document that represents official correspondence from your company should be written on a document with a company letterhead. In this video, I will show you how you can use headers and footers in Word 2013 to create a clean, professional letterhead template. Even if your company already has a letterhead template that you should use, you will learn a lot of things in this video that might be useful in other situations.
Overview of different letterhead samples
I want to create a letterhead that looks like this with our logo added to the header and our contact details to the footer.

As you can see, the logo looks a bit faded, a bit washed out. But this is just Word’s way of showing you that this is part of the header. If we go to the print preview, you can see that the logotype will be printed in the full colors.
To create a new template I’ll just start from a blank page, by clicking “New” and then “Blank document”.
How to insert a logo in the header?
To insert your logo in the header, click the “INSERT” tab and then “Header”. Here you have a number of built-in designs that you can choose from. But since we’re only going to insert a logotype select “Edit Header”.
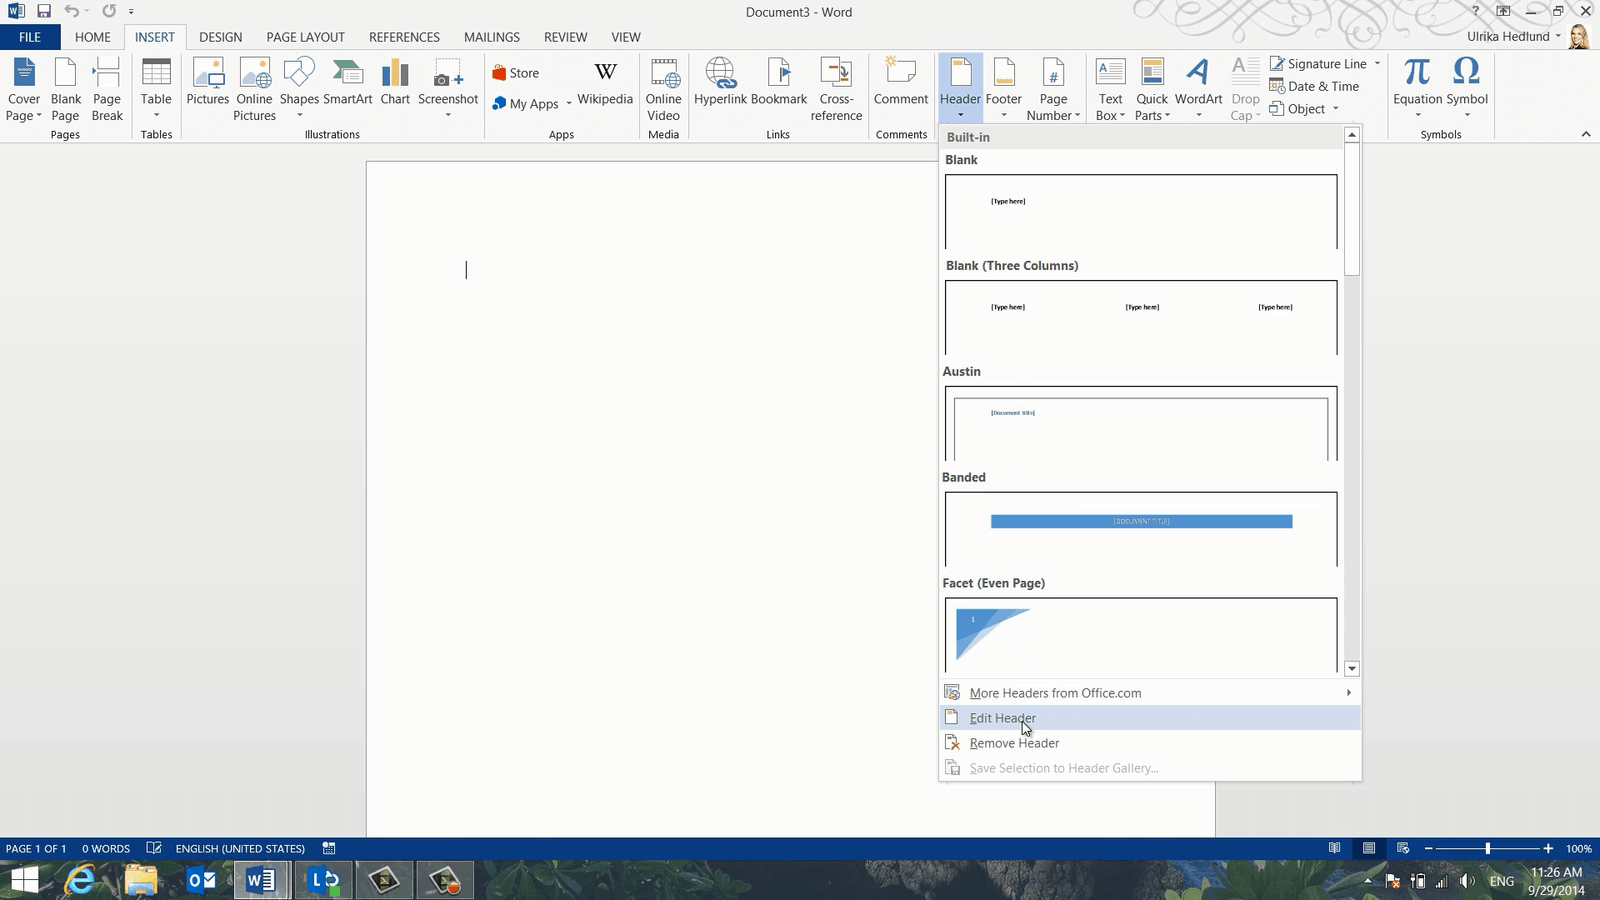
To insert the logotype click “Pictures”, select your image and then click “Insert”. A new button with layout options has been introduced in Word 2013 to help you position objects more easily. Click the Layout Options button and select “Behind text” or “In front of text”. This way you don’t have to worry about text or margin settings.

Resize the image by dragging the bottom right corner holding down your left mouse key. Now you can position the logo exactly where you want it.
To close the header go to the Header and Footer “DESIGN” tab and click “Close Header”, or just double-click out of the header area.
How to insert company details in the footer?
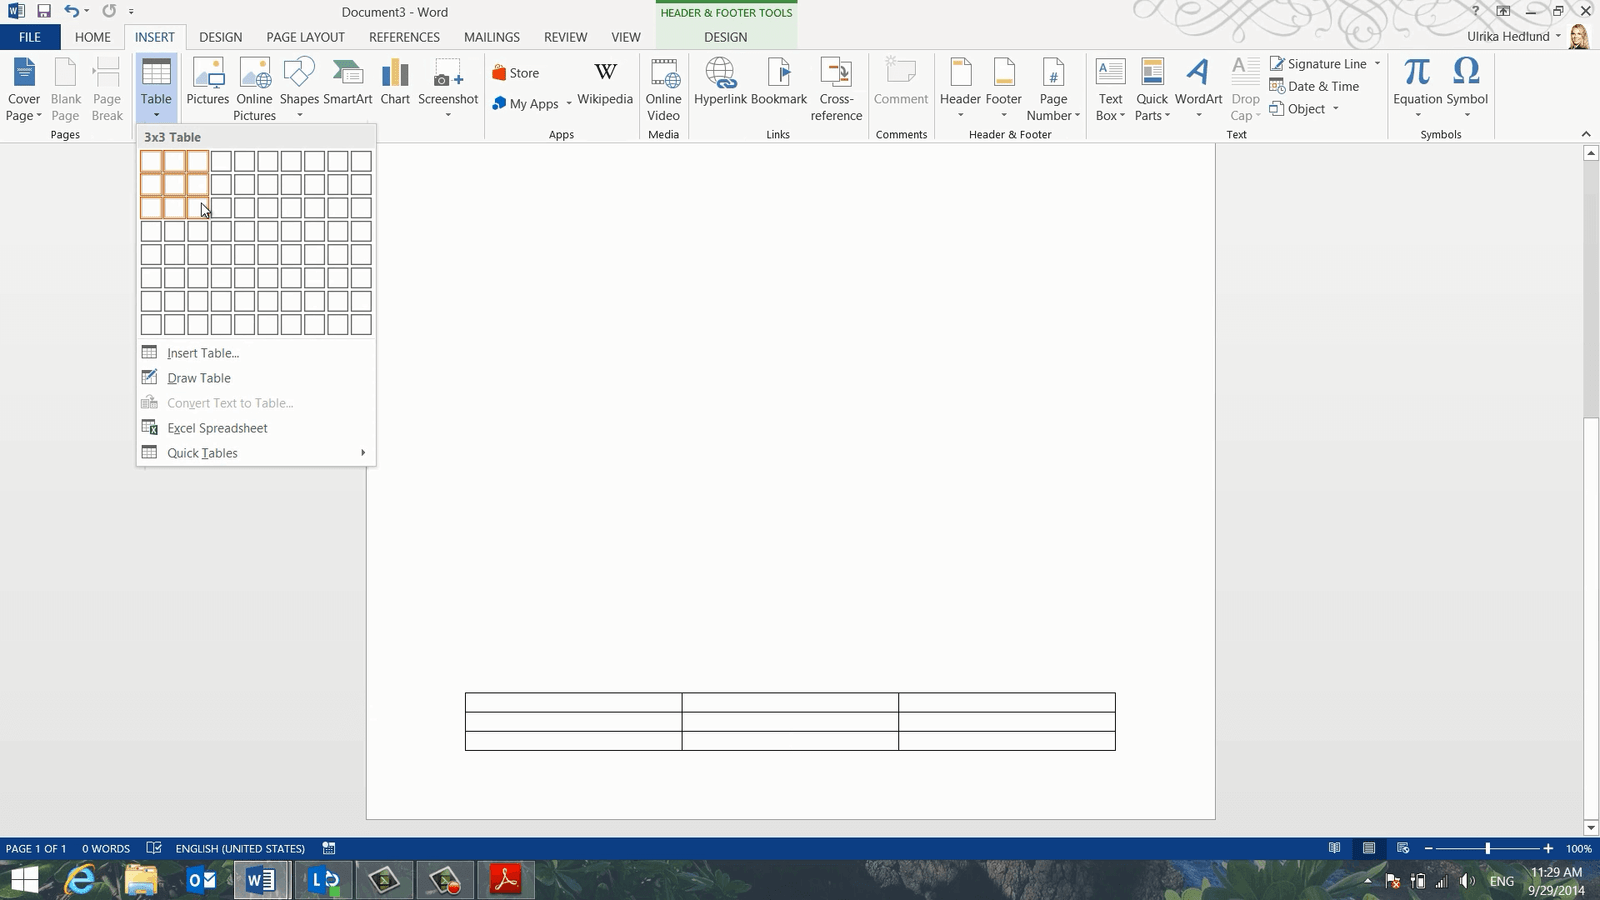
Now let’s insert our company details in the footer. To insert a footer click “INSERT” and select “Footer”. To create a custom footer click “Edit Footer”. To have more control over how the text is aligned I’ll insert the text into a table. To insert a table, click “INSERT” and then “Table”. Here I’ll select a 3 by 3 table.
In the first cell, I’ll type in our company name. I already have all of our company details in one of our brochures, so instead of typing them by hand, I’ll just copy them from here. If you want to copy multiple objects the Clipboard is very useful. Go back to the “HOME” tab. To open up the Clipboard click the little arrow in the Clipboard section on the “HOME” tab.
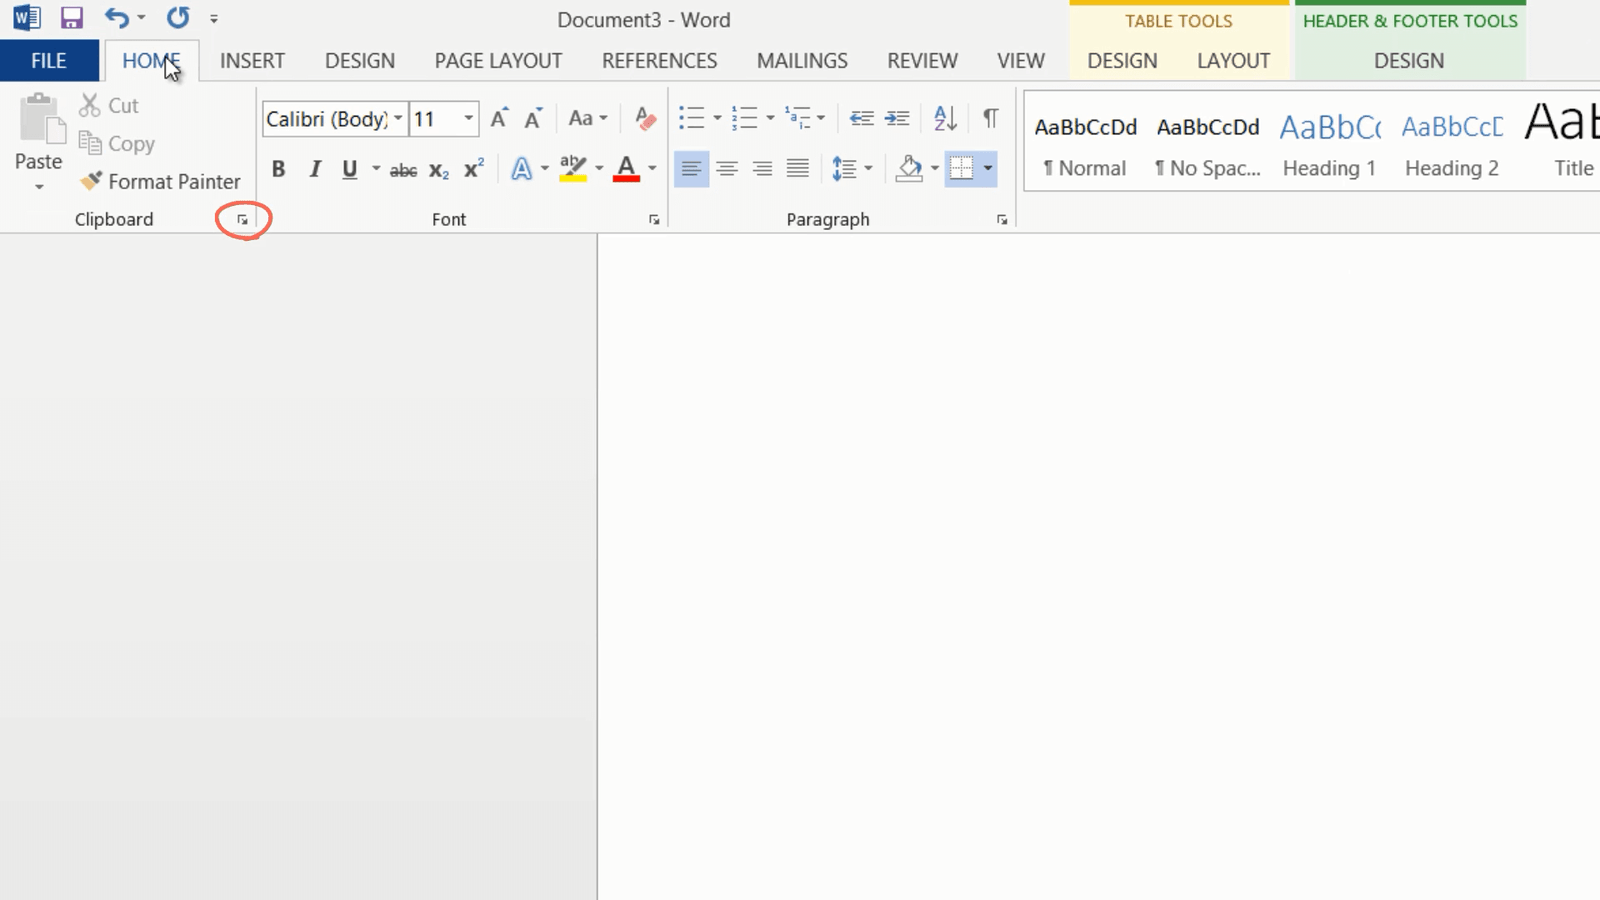
Next, I’ll open up the pdf document from where I want to copy text. I’ll right-click the pdf document and select the Selection Tool. I’ll mark our email address and then I’ll press CTRL + C on my keyboard to copy it. As you can see a little pop up tells me that the clip has been saved to the Clipboard. I’ll continue to copy our web address, postal address, telephone numbers and finally the Facebook page. The Clipboard can hold up to 24 clips.
When I have all the information I need I’ll close down the brochure. I’ll position my marker where I want to insert the postal address and then I’ll just click on the clip in the Clipboard. I’ll continue to add all the clips from the Clipboard until I have populated the entire table.
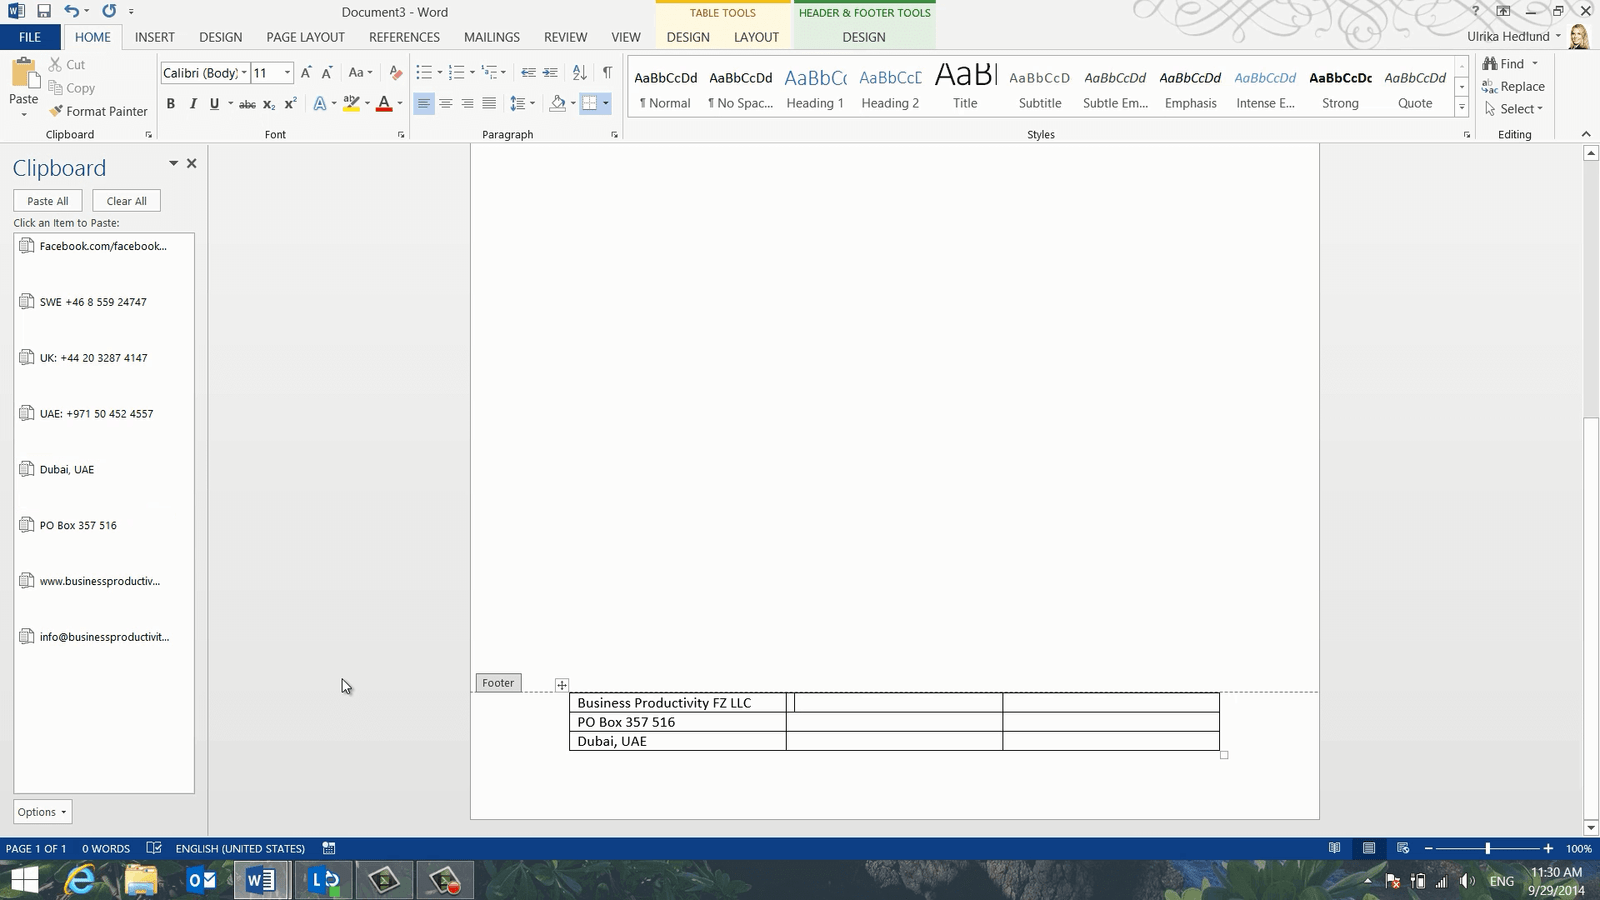
When I’m done I’ll clear the Clipboard by clicking “Clear All” and then I’ll close down the Clipboard.
I’ll mark the table and reduce the font size to 9 and change the color to a dark grey. I’ll move the entire table down by going to the Header and Footer “DESIGN” tab and reducing the “Footer from Bottom” distance to 0.1.

I’ll spread out the text by dragging the left side of the table further to the left and then I’ll do the same thing with the right side. I’ll mark the text in the last column, go to the “HOME” tab and change the text alignment to Right Alignment. Finally, I’ll just move the middle column a bit to even out the text.
I don’t want the lines of the table to be visible so I’ll mark the table, click Borders and then select “No Borders”. Finally, I want to insert a line to have a clear divider. To do that I’ll click the “INSERT” tab and then “Shapes”. Here I’ll select a line.

I’ll hold down the “Shift” key when I draw the line to make sure that it is perfectly horizontal. I’ll change the color of the line to a dark grey. Ok, let’s see what this looks like! I’ll double-click outside of the footer area to close it.
How to create reusable templates in Word?
I’ll click “FILE” and “Print” to see the Print Preview. This looks good so now I want to save it as a template.

To save it as a template I’ll click “Save As” and change the file type to “Word Template”. I’ll give the template a name, “Letterhead Template” and then click “Save”. The template is saved in the template folder.

Next time I want to create a document using this template I’ll click “FILE”, “New” and then “PERSONAL”. From here I can access my newly created template. If I want to have it on the first page I can just click the little pushpin and my template will be easily accessible on the start page.
How to change header and footer on certain pages?
From time to time you might want to modify how headers and footers are displayed. Here I have a document where I have used my newly created letterhead template. I’ll change the view so that you can see multiple pages.

I don’t want the cover page to have the header and footer, but if I open up the header and footer on the first page and try to delete the logo, it will be removed from all pages.
To remove the header and footer from the first page, but keep it on the remaining pages in your document, open up the header or footer and on the “DESIGN” tab in the “Options” section mark the option to have a “Different First Page”.
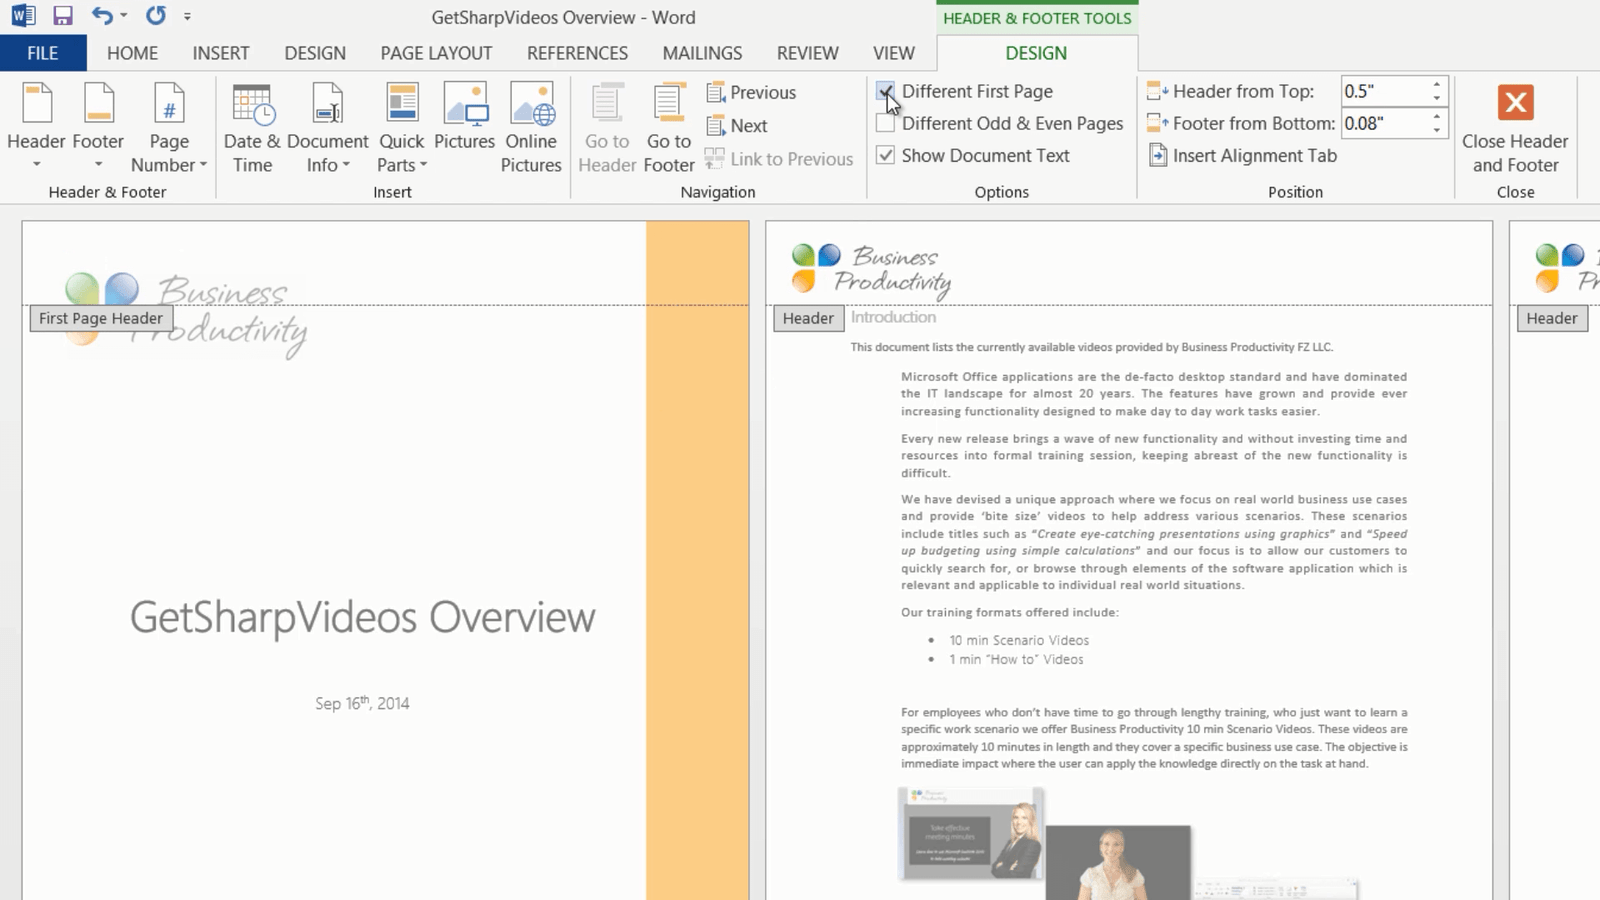
The contents of the Footer and Header are removed from the first page. As you can see a unique header called “First Page Header” and a unique footer called “First Page Footer” is created where you can add pictures or text. For here I’ll just leave them empty.
Changing header and footer on certain pages
Let me open up another document. Here I want to have our company header and footer on the first page, but I want the following pages of the document to have a different header and footer. To insert a header and footer that are different from those on the first page, place your marker on the page where you want the new header and footer to begin and go to the “PAGE LAYOUT” tab. Under “Breaks” click “Continuous” section break.

Now click on the header on the second page. It says “Header – Section 2 –“. In the “Navigation” area on the “DESIGN” tab click “Link to Previous” to unlink the header from the one in the previous section.
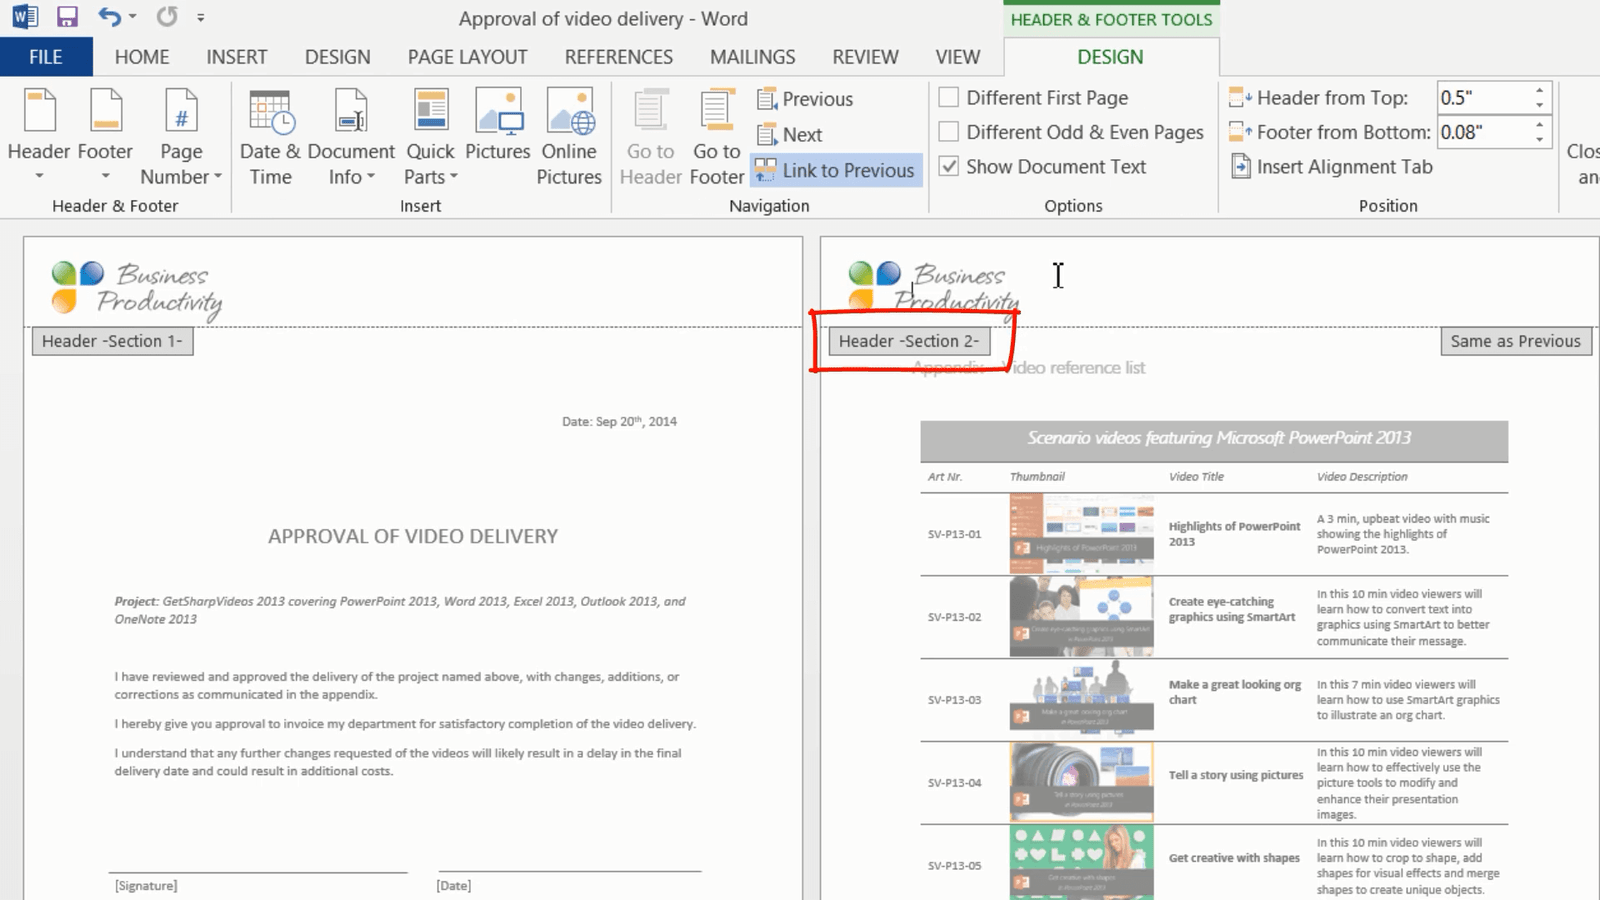
Now you can delete the logotype but only in the header in section 2, the header in section 1 is still intact. Here I’ll insert a different version of our logo.
I’ll click “Pictures” and select this logo flower image. Under the “LAYOUT OPTIONS” I’ll select “In front of the text” and then I’ll resize the image and position it in the top left corner. To change the footer, mark the footer and click “Link to Previous” to unlink the footer. I’ll mark the table with our company contact details right-click and select cut, then I’ll delete the line divider. I’ll click “Page Number” and select one of the predefined formats.

I’ll close down the footer, and as you can see you now have different headers and footers in the same document.

By mastering headers and footers you’ll be able to create a wide range of professional looking documents.
How to Create a Professional Report in Word 2013?
Introduction
If writing a report is not something you do every day, it might be a bit daunting. How should you structure it? What should be included? There are some basics you should be aware of when it comes to creating a professional report. This includes adding a table of contents to your report, adding page numbers and properly referencing all of your sources. Let me show you how to do this effectively in Word 2013.
Introduction to the report
Here is a report that a colleague of mine has written. Even though it looks ok, he hasn’t used Word effectively. He has just applied formatting to the headings, without using any heading styles. Because of this Word has no idea about the structure of this document and it’s very hard to navigate. If I go to the “VIEW” tab and open up the “Navigation Pane” you will see that it is completely empty.

If I go to the “REFERENCES” tab and try to insert a table of contents, I get a message informing me that styles need to be applied, otherwise no entries for the table of contents can be found. I’ll click Undo to remove the table of contents holder.
How to apply heading styles in Word 2013?
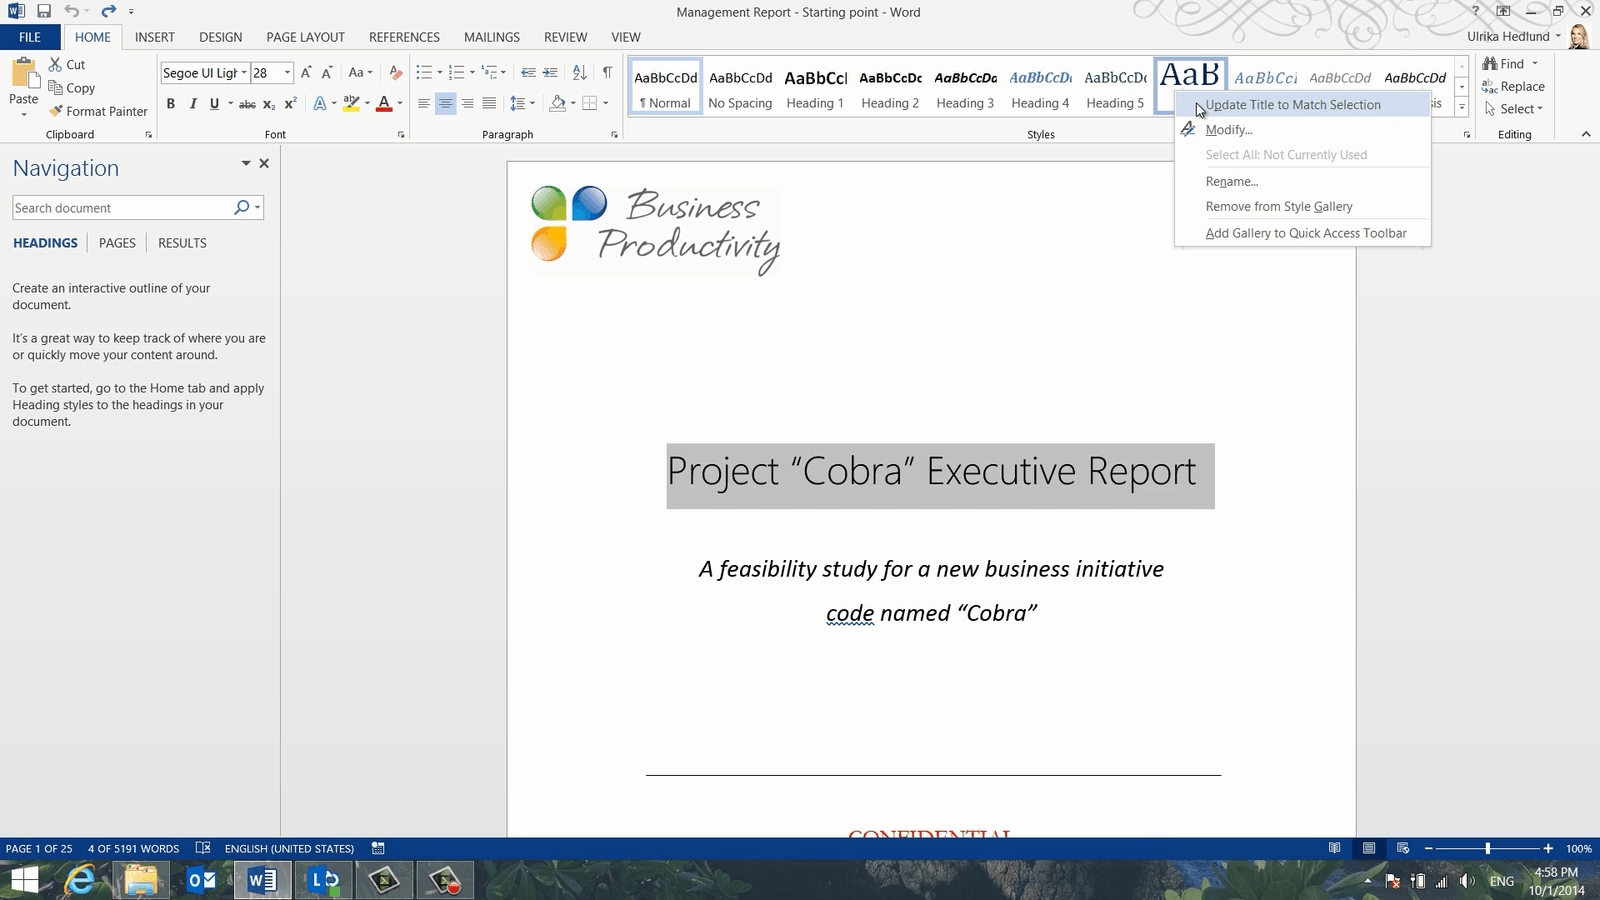
The first thing I’ll do is to add heading styles to the document. To add heading styles, mark the heading you want to apply the style to, I’ll start with the title. On the “HOME” tab, right-click the style you want to apply and select “Update Title to Match Selection”.
This way the title keeps the current formatting. Next, go to the first level heading. Here I’ll mark the heading by clicking in the margin next to the heading. Instead of marking all of the headings one by one manually, click “Select” – “Select Text with Similar Formatting”. All text that has the same formatting has now been selected. Now you can apply the “Heading 1” style. To keep the look and feel of the orange formatted headings, right-click and choose “Update Heading 1 to Match Selection”. Now you can see that all the first level headings are visible in the navigation pane, making it easier to navigate.

I’ll continue to add styles to the rest of the headings. I’ll scroll down and mark the bolded text, choose “Select Text with Similar Formatting”, right-click “Heading 2” and choose “Update Heading 2 to Match Selection”. I’ll do the same thing for the third and final heading. As you can see, as I add the heading styles the hierarchy in the navigation pane grows. I’ll click the arrow to go to the top of the document.

How to insert footnotes with references in Word 2013?
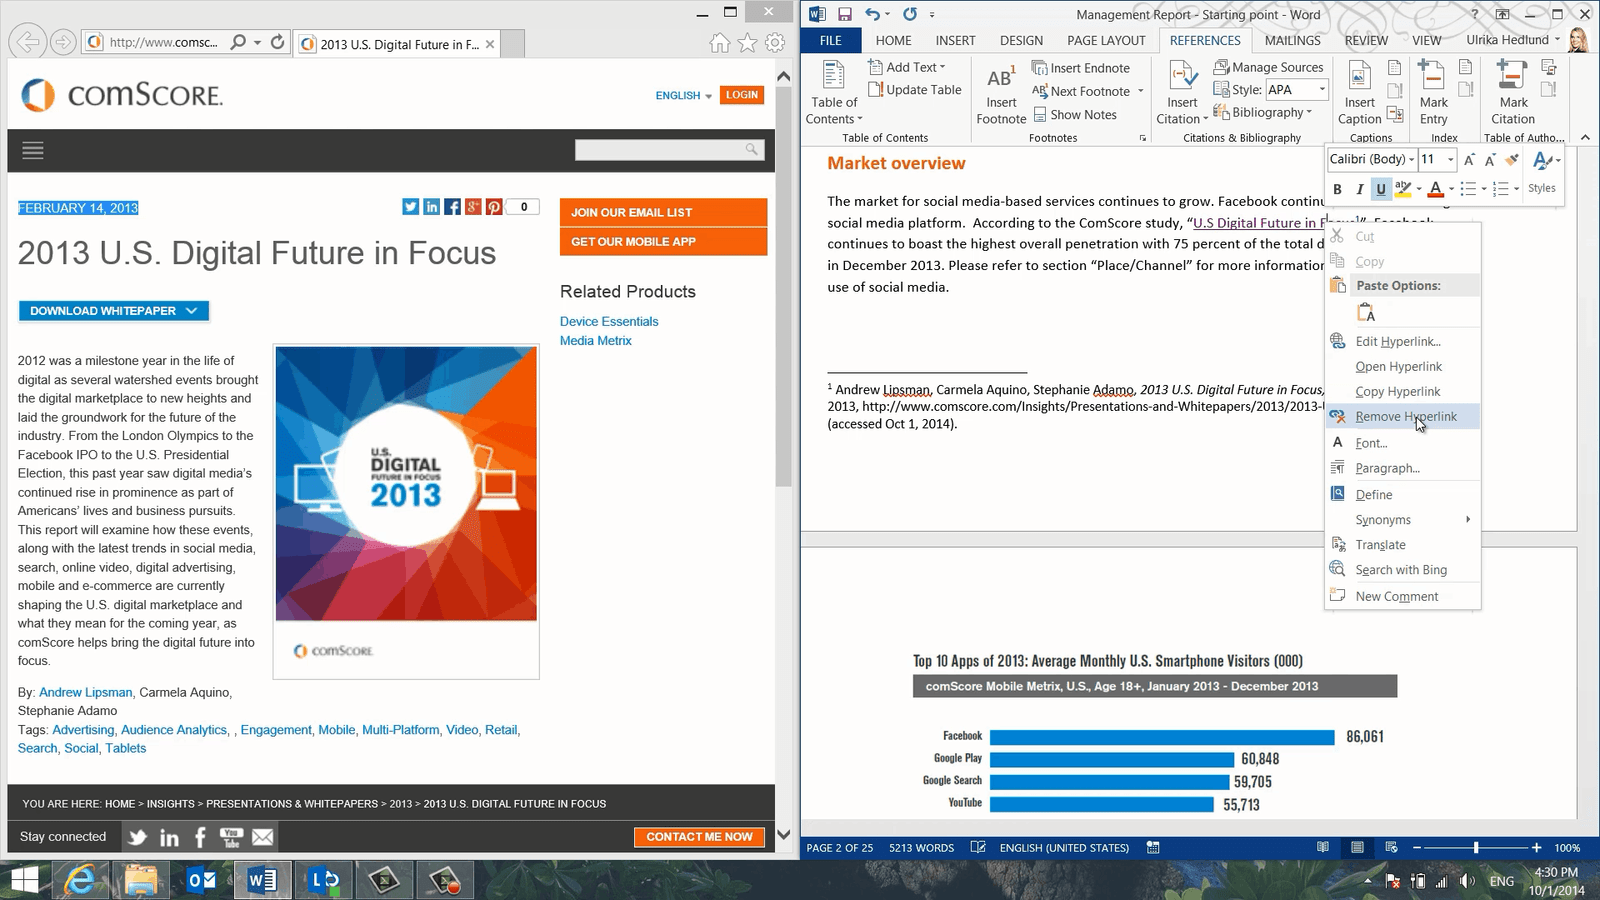
Using the Navigation Pane I can easily navigate my document. In this paragraph, I can see that my colleague has included information from a report. The website has been added as a hyperlink. It’s good that he has linked to the source, but in a professional report, you ought to insert source references as footnotes so that more information can be shown and the source more easily verified. To see more information about the source I’ll open up the hyperlink by pressing the CTRL key on my keyboard and then clicking the link.
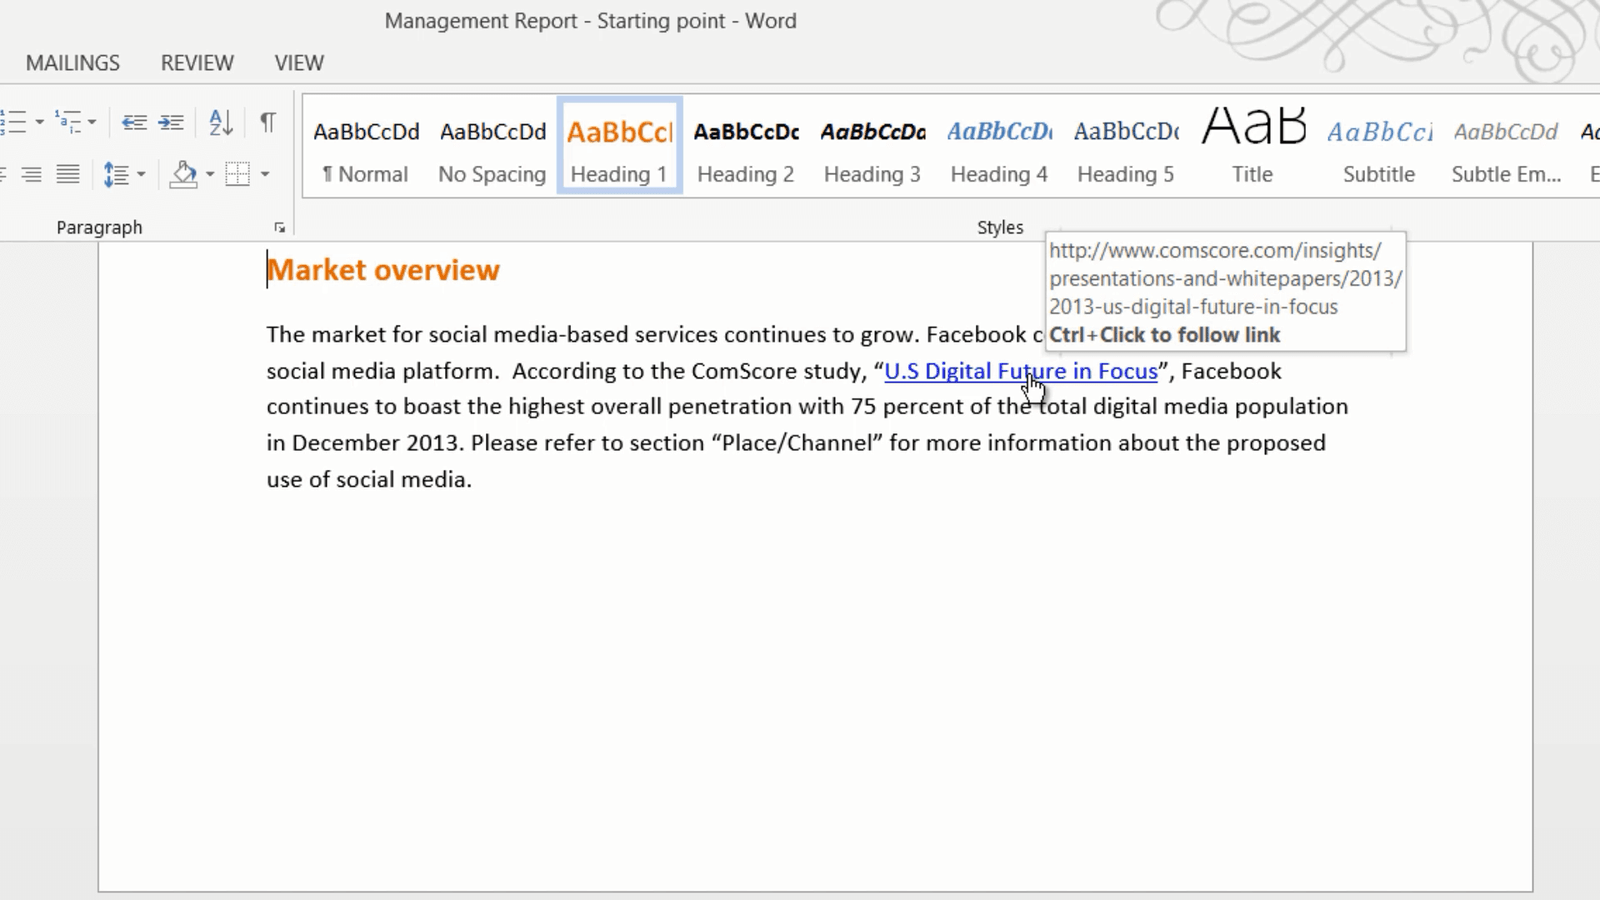
I’ll position the web page to the left on my screen by pressing Windows key arrow left and then I’ll click my document and then press Windows key arrow right. Now I can see the two windows side by side. This works if you are using Windows 7 or later. To insert a footnote, place the mouse cursor after the word or title you want to add the footnote to. Go to the “REFERENCES” tab and click “Insert Footnote”.

Now you can write the proper source reference in the footnote. Start with the author, in this case, there are three. I’ll copy the authors by marking them and pressing the keyboard shortcut CTRL + C. Place your marker by the footnote, right-click and select “Paste”, “Keep Text Only”, then add a comma. Next, copy the name of the article and copy and paste in the same way. Make the title italic by marking it and selecting italic in the floating bar, or press the keyboard shortcut CTRL+ I. I’ll add the name of the publication company, the date and then finally the web address. Since the Internet changes all the time, it’s recommended that you include the date you accessed the web page in parenthesis at the end. Finally, I’ll remove the hyperlink from the text by right-clicking and select “Remove Hyperlink”.
How to create cross-references in Word 2013?
In the next sentence, I can see that my colleague has added a reference to a paragraph later in the document called Place/Channel. To reference a section in a document properly, mark the name where you want the reference added, on the “REFERENCES” tab click “Cross-reference”. In the “Reference type” drop-down, select what it is you want to refer to and in this case, it is a heading. In the “Insert reference to” select what information you want to add to your document. Select the heading name and click “Insert”.

The name of the heading is now inserted as a cross-reference so that if you change the name of your heading in the document, the name will be updated here as well. You also have a hyperlink embedded in the reference so that the reader can easily go to that section. In order to help readers that read the report on paper, it’s good to add the page number as well. Add the text, “on page” and then click “Cross-reference” again, change the “Insert reference to” to the page number. Again, select the heading you want to refer to.

Now the page number is added to the reference.
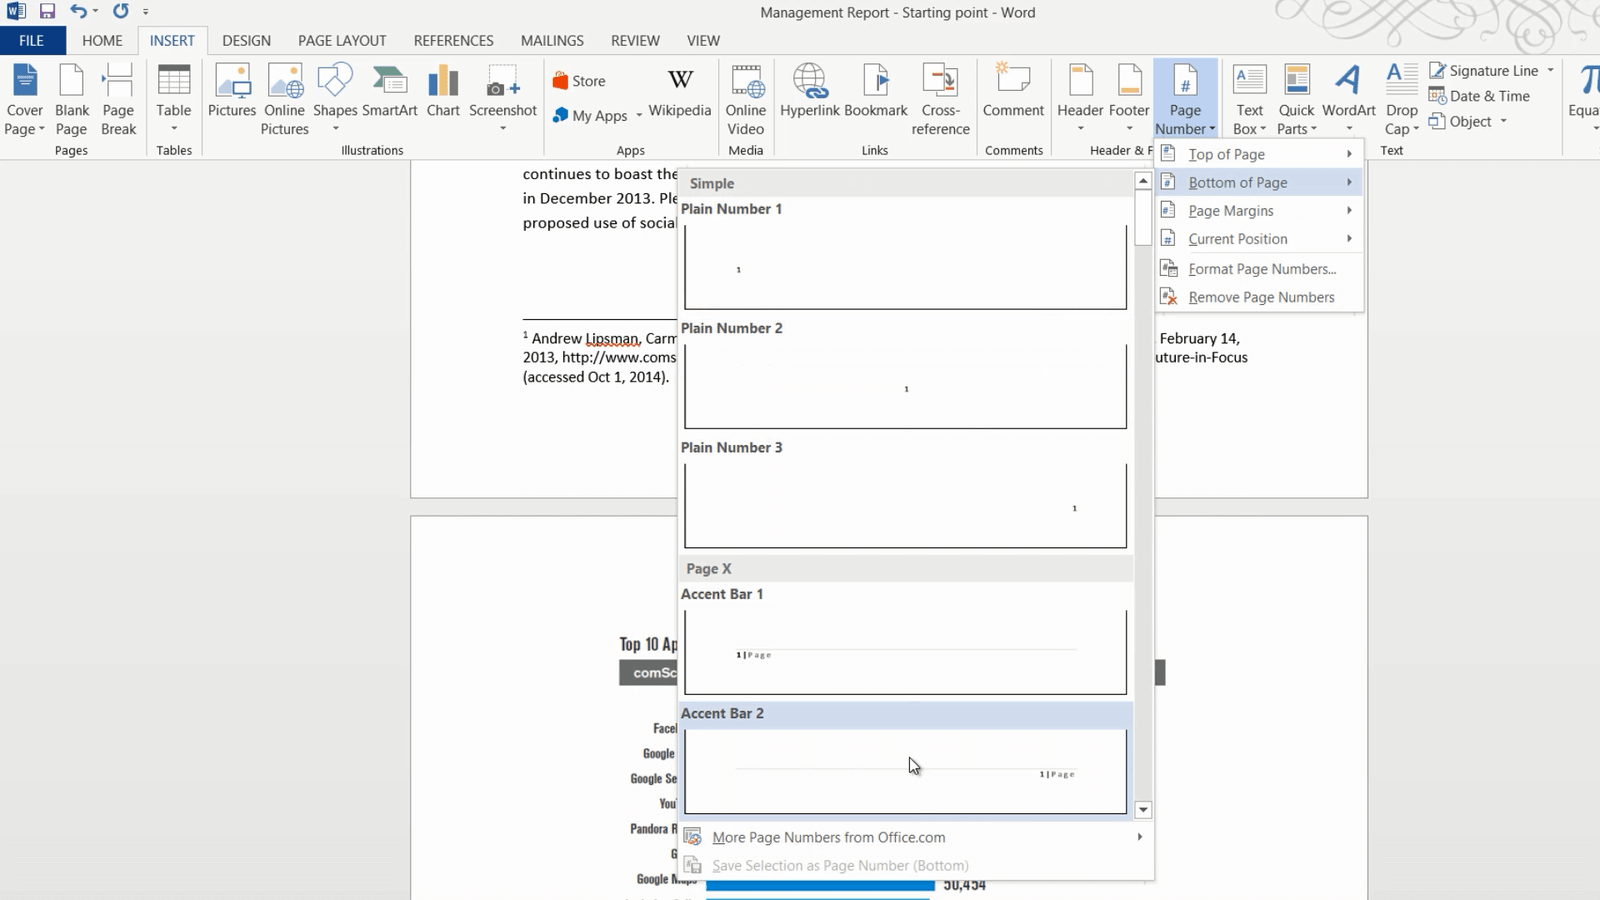
How to add page numbers in Word 2013?
Now that we’ve added page numbers in the cross-reference I better add them to the report as well. The easiest way to add page numbers to your document is simply to go to the “INSERT” tab and in the “Header & Footer” section select “Page Number”. Here you can select a nice position and formatting for your page numbers. I’ll select to put the page number at the bottom of the page and I’ll select a design with an accent bar and the page number in the right-hand corner.
How to add document properties to the footer in Word?
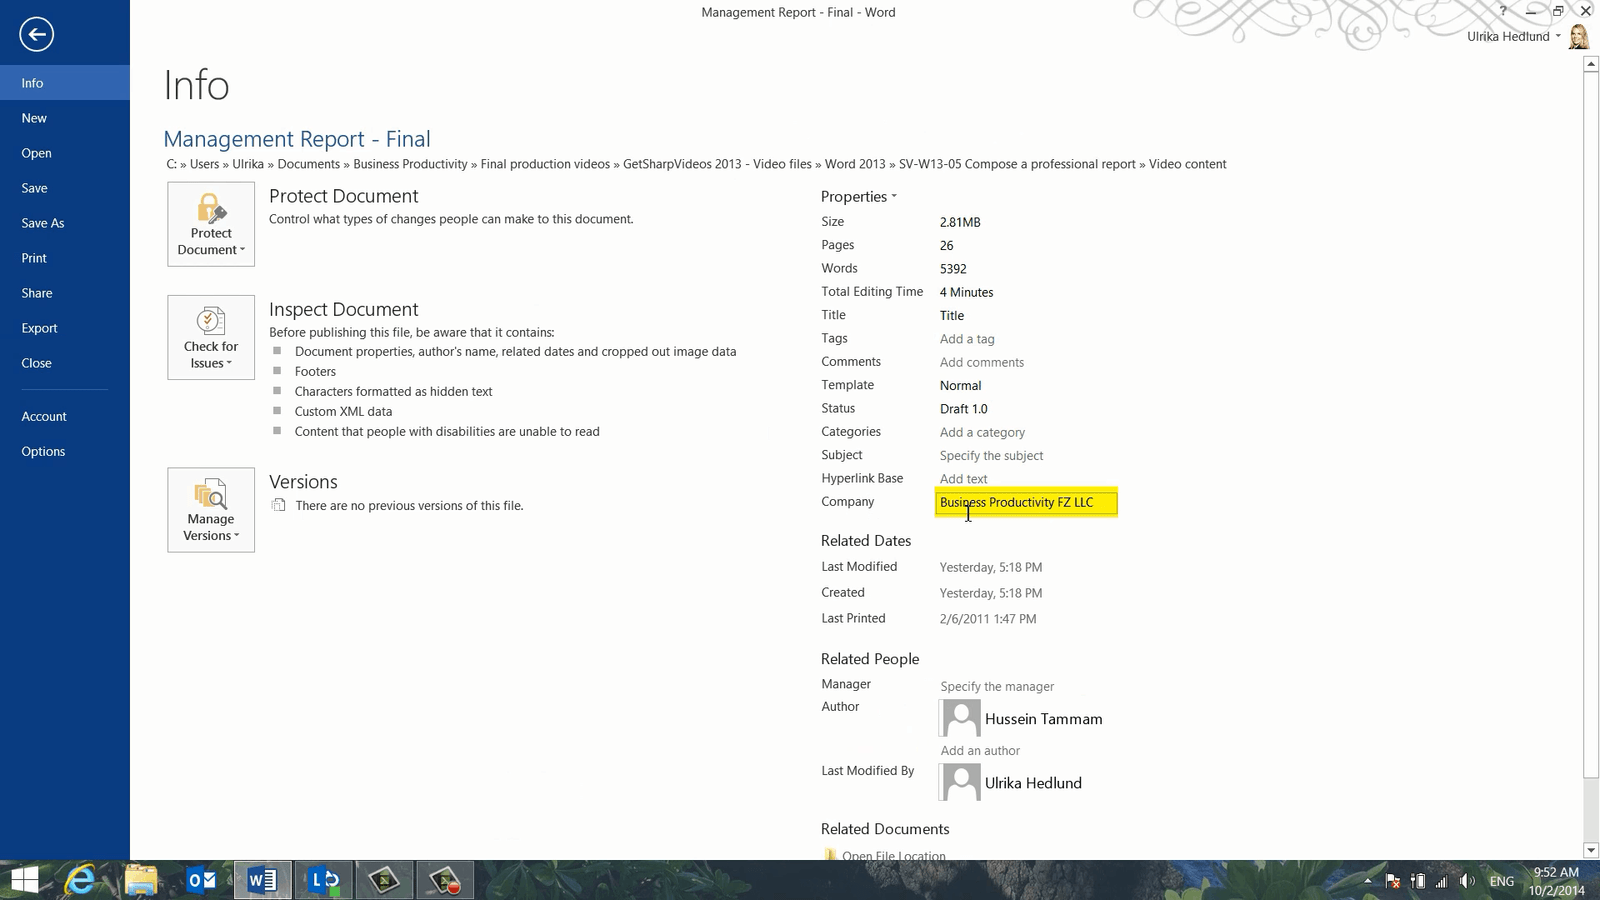
Now I’d like to add some document information to the footer. First I’ll open up the footer by just double-clicking it. Instead of just writing the name of our company I’ll use a document field, that way our company name is added to the properties of the document. To insert a document field click “Document Info” and then “Document Property”. Here I’ll select “Company”.
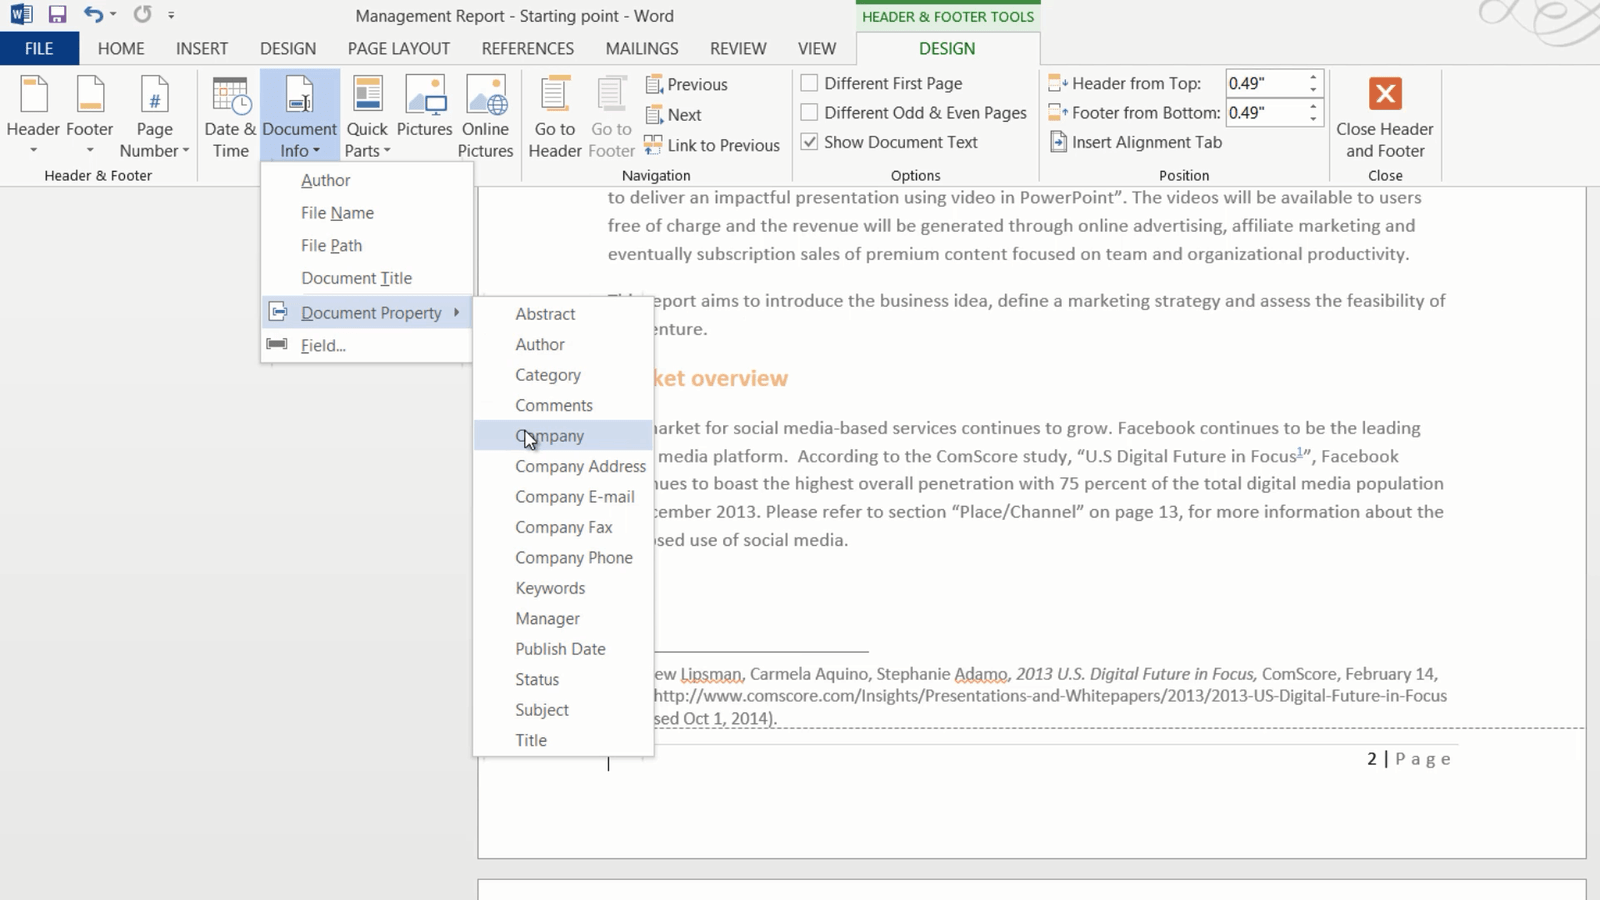
I’ll type in the name of our company, Business Productivity FZ LLC. If you click the “FILE” menu and expand the Document Properties you can see that our company name has been added to the document information.
Next, I want to insert the title of the document. I’ll click “Document Info” and then “Document Title”. As you can see, it doesn’t actually contain the title of the report. Instead of typing in the title here I want to link it to the title on the first page of the report to make sure it gets updated if someone changes the report title. I’ll mark the title, right-click and select “Copy”. Next, I’ll click “INSERT”, “Quick Parts”, “Document Property” and then I’ll select the “Title” property.

I’ll mark the text in the field holder, right-click and paste in the title again. As you can see if I scroll down, the document title field in the footer has been automatically updated.
How to insert a caption for an image in Word?
If your report includes tables or images, it’s recommended that you insert captions. To insert a caption, mark the image, go to the “REFERENCES” tab again, and click “Insert Caption”.
Here I can choose the label, whether it’s a Table, Figure or Equation, here I’ll just keep “Figure”. I’ll type in a description of the figure; “Top 10 SmartPhone Apps in US 2013” and then click “OK”.

I’ll do the same for all the images in the report.
How to insert a table of figures in Word 2013?
Now that I have all of my figures and images in the report marked I can easily add a list of them. To insert a Table of Figures, click the “REFERENCES” tab and select “Insert Table of Figures” and then click “OK”.
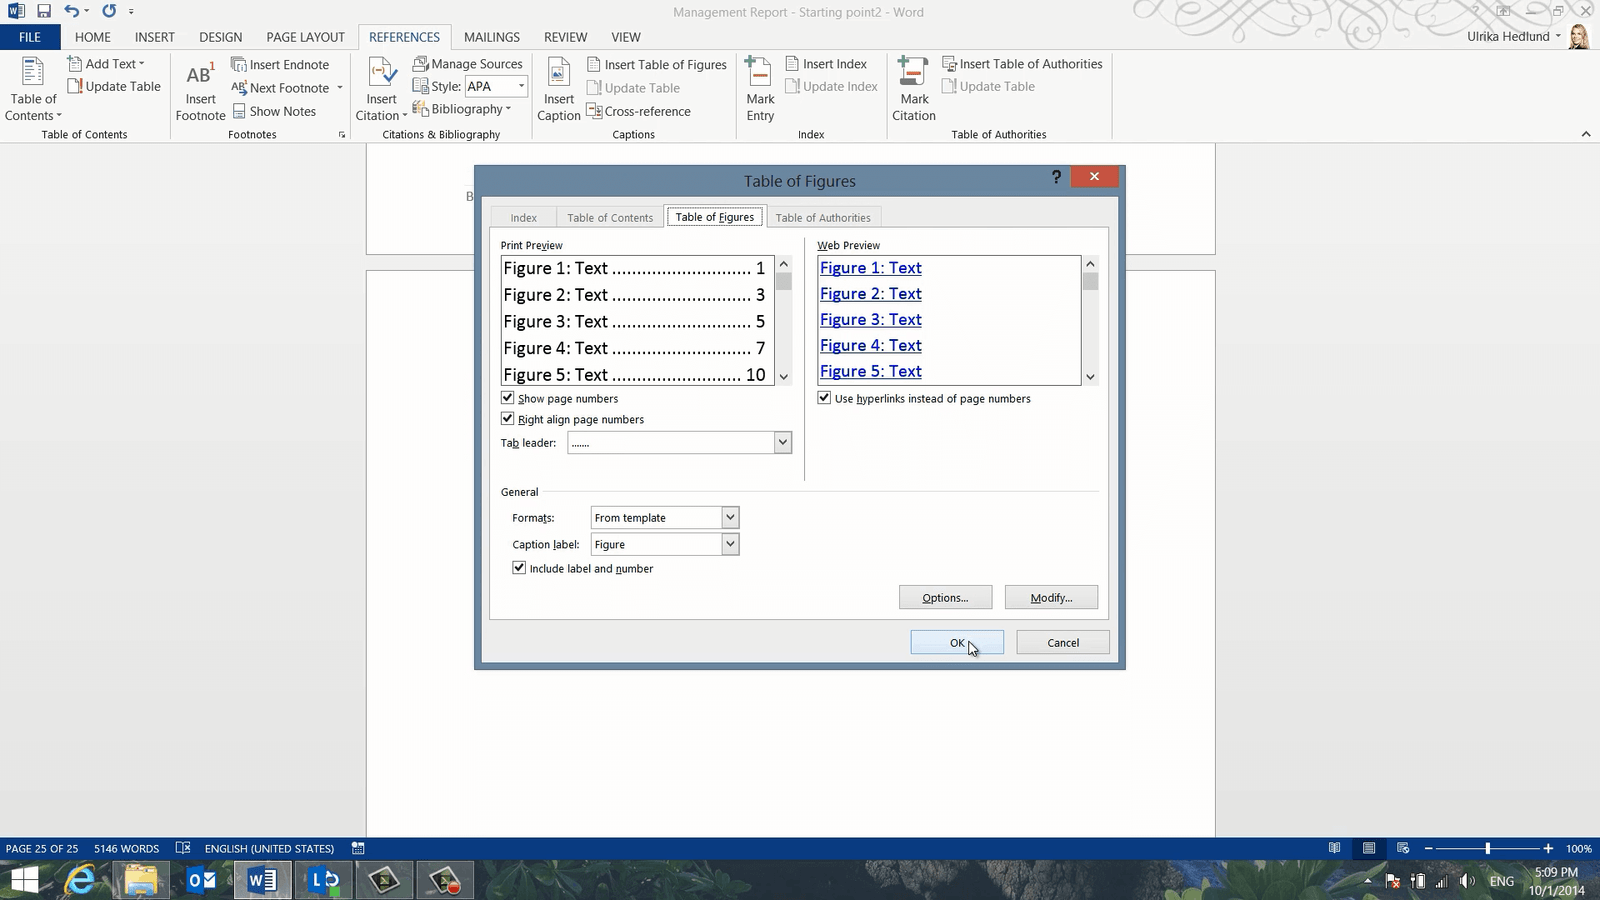
A list consisting of links to all your figures in the document will be inserted into your report.
How to create a table of contents in Word 2013?
Now for the final step, I want to insert a table of contents. To insert a table of contents, go to the page where you want it located, click the “REFERENCES” tab and then “Table of Contents”.
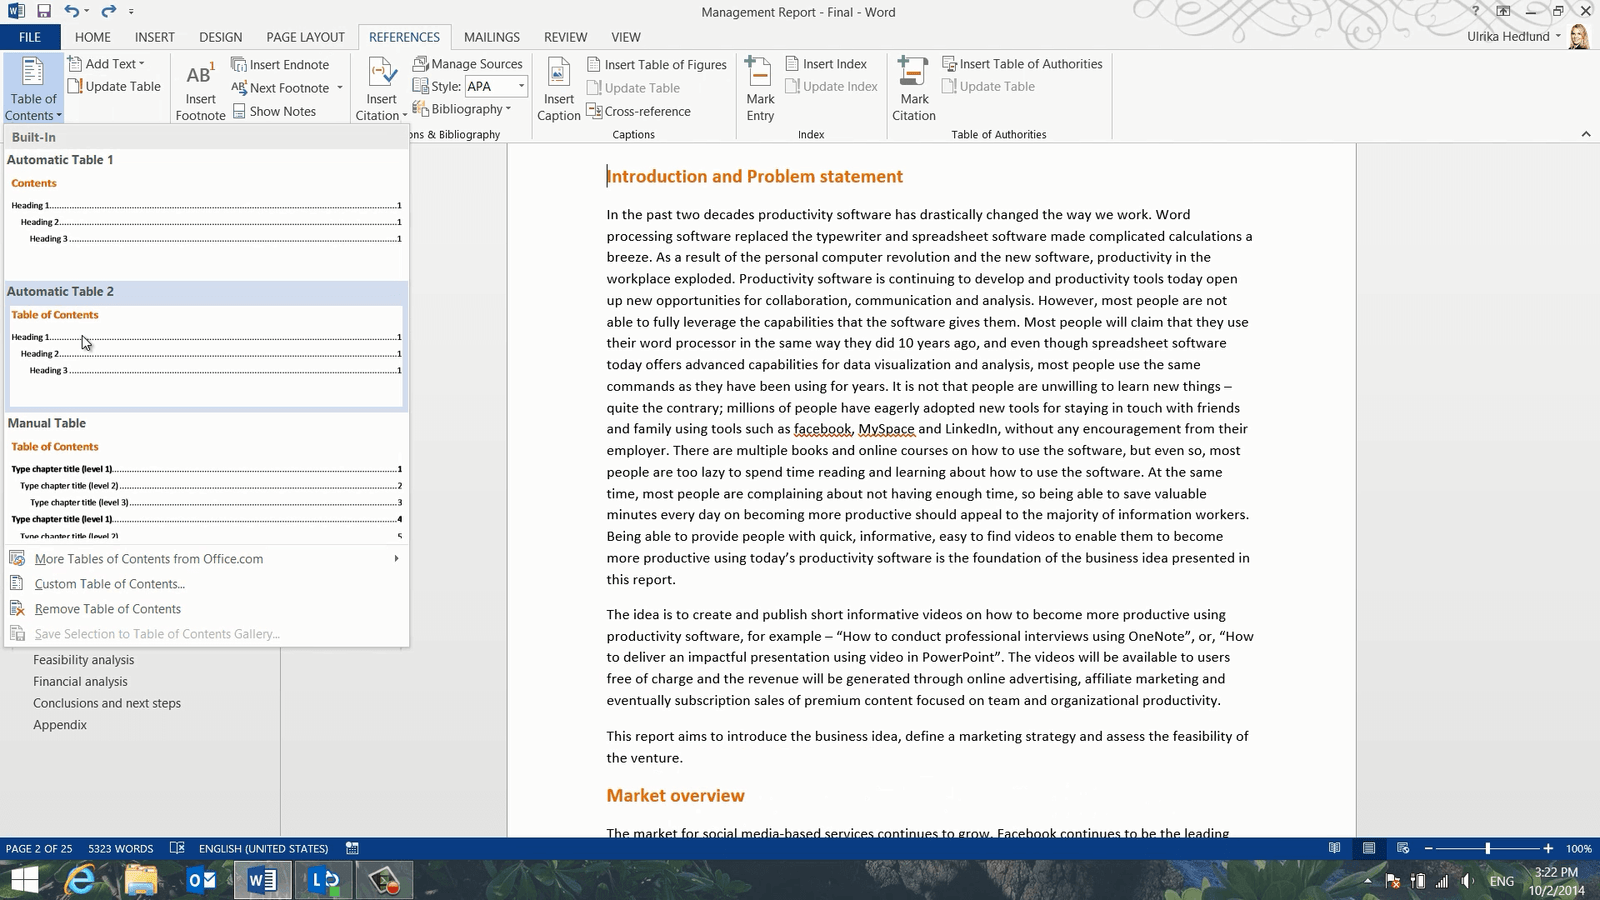
Here I’ll select the second design. As long as you are using heading styles the table of contents is automatically populated for you. I want the first paragraph to start on its own page, so I’ll go to the “INSERT” tab and click “Page Break”. Now I have to update the table of contents since everything has shifted. I’ll right-click the table of contents, click “Update Field” and then “Update entire table”.
There, now the report is done! Now it looks much more like a professional report which will definitely reflect positively on the reader’s overall experience of the document.
How to co-author a document in Word 2013?
Introduction
Quite often you need to work on a document with others. In Word 2013 you can be much more efficient collaborating, by co-authoring documents in real-time. You can also access your documents from anywhere and edit them from any device using the Word Web App. Let me show you.
Here is a document that I’m working on with two of my colleagues. Ideally, we would all sit down in the same room and work on it together, but since we are not all physically in the same place we are going to co-author this document remotely online.
How to save a document online and share it?
To co-author a document with others you need to save the document to a OneDrive or a SharePoint folder. Click “FILE”, “Save” and then select the location.
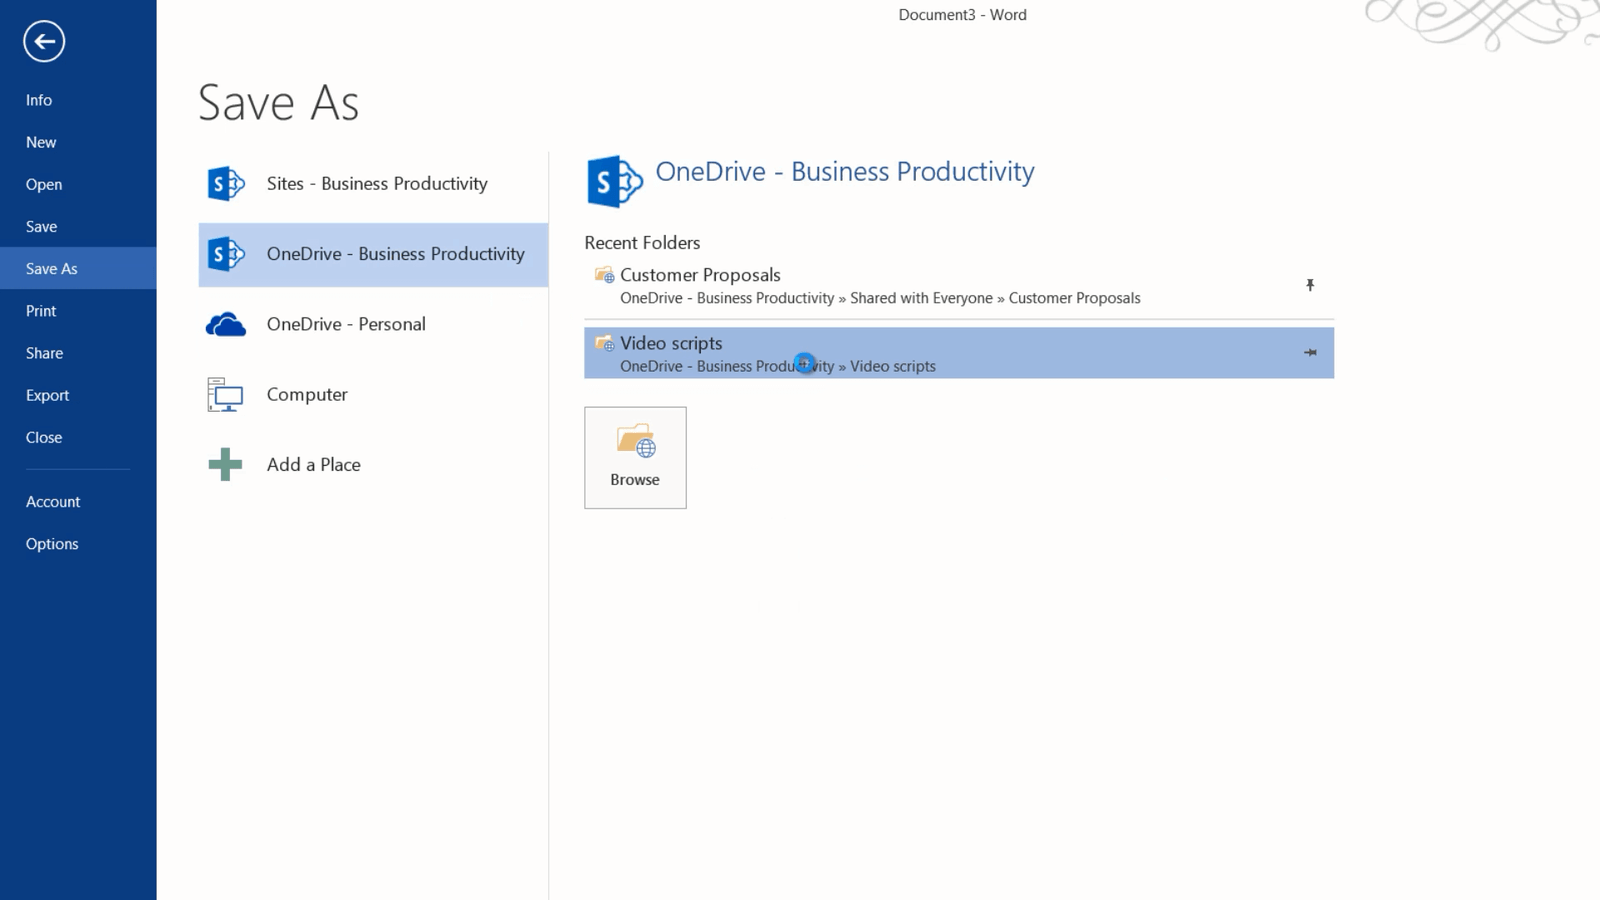
Here, I’ll select my OneDrive business folder, this way the document is saved to the cloud, but I also have a local copy of the document synchronized on my laptop so that I can work on it even if I’m offline. Next, you need to share the document with the people you want to co-author the document with. Click “Share” and then “Invite People”. Here I’ll add Nourah and Jacob whom I’m working on the document with. You can decide if they should have read-only access or editing access. To co-author the document they need to have editing rights, so leave the default which is “Can edit”. Here I’ll write a personalized message that will be included in the email.
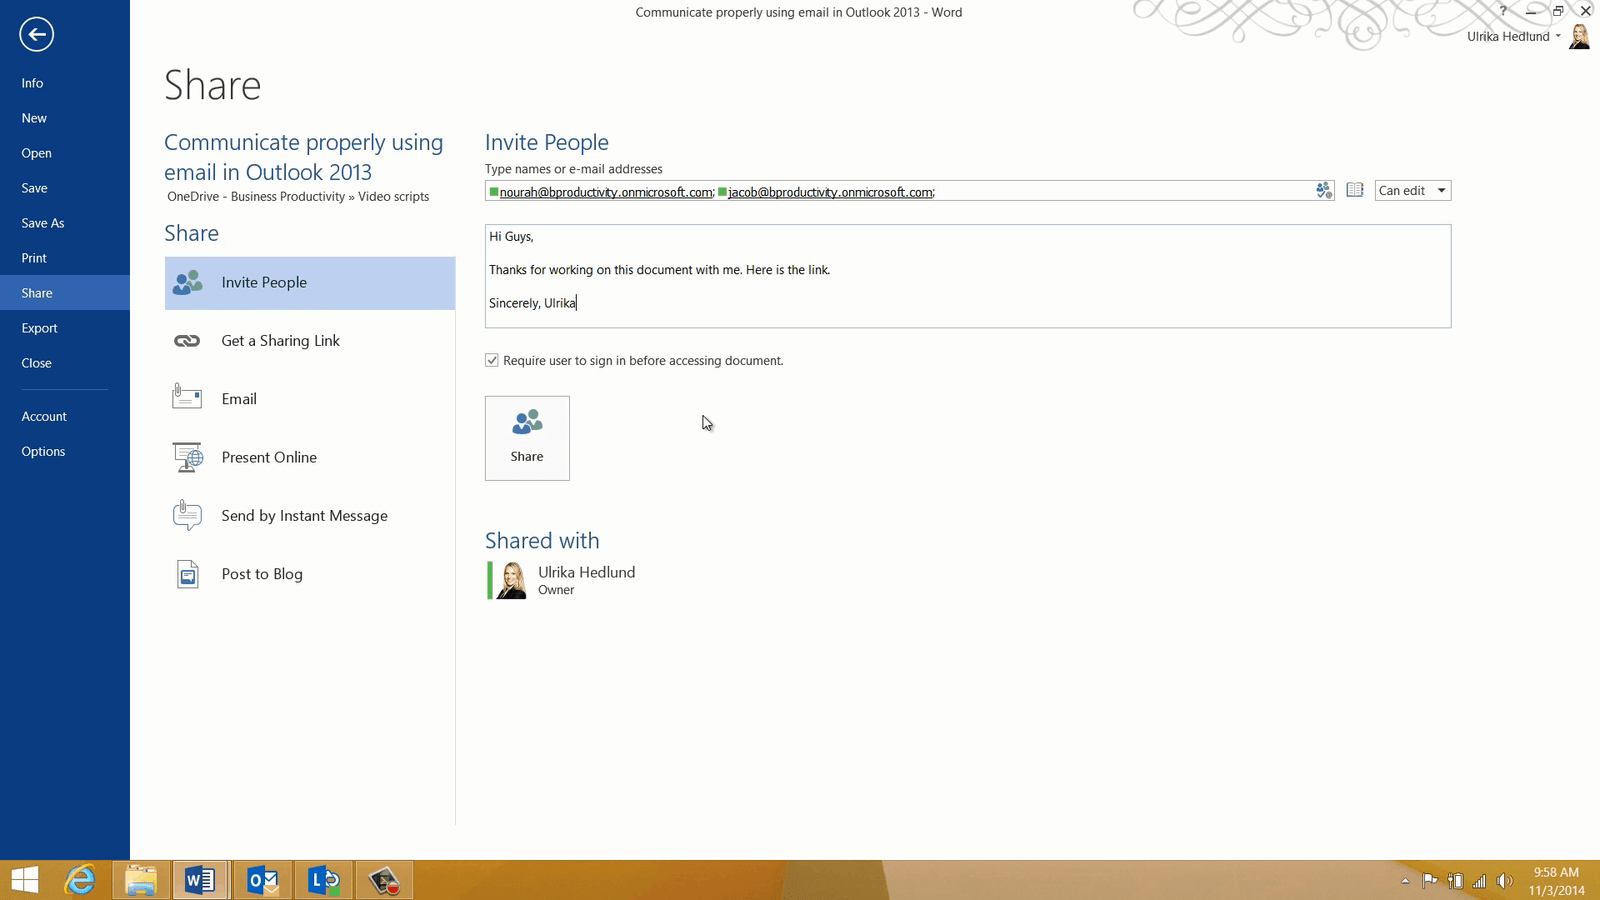
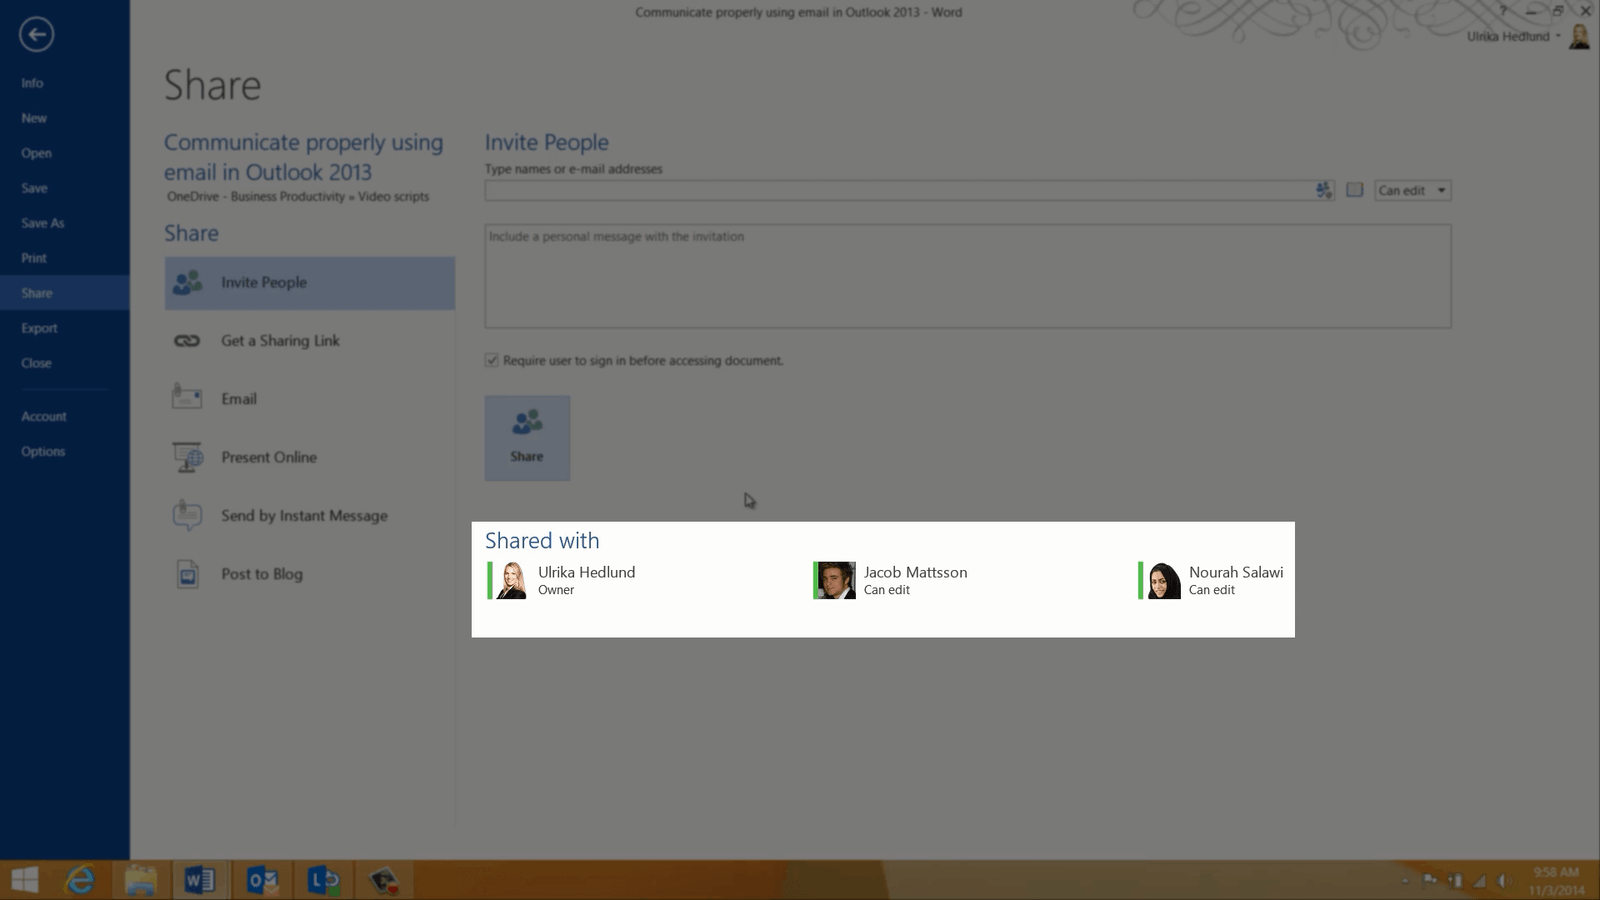
To start sharing click “Share”. An email is sent out with a link to the document. Here you can see that the document has been successfully shared with Jacob and Nourah.
I’ll click back to go back to my document.
How to update changes to your document
When you’ve saved a document to a shared location you can see that the save icon looks a bit different. By clicking the save button not only do you save your own changes, but you also refresh the document and synchronize any changes that other authors might have done to the document.

How to do version control in SharePoint?
When multiple people are working on the same document it’s very useful to use version control so that you can roll back to an earlier version of the document if you want to. Version control is turned on by default on this SharePoint document library. To check the version settings in SharePoint, click the “FILE” tab, at the bottom right corner of the “Info” section click “Open File Location”. Now the SharePoint document library opens up in my browser. To check the Versioning settings, Click “LIBRARY”, “Library Settings” and then “Versioning settings”.
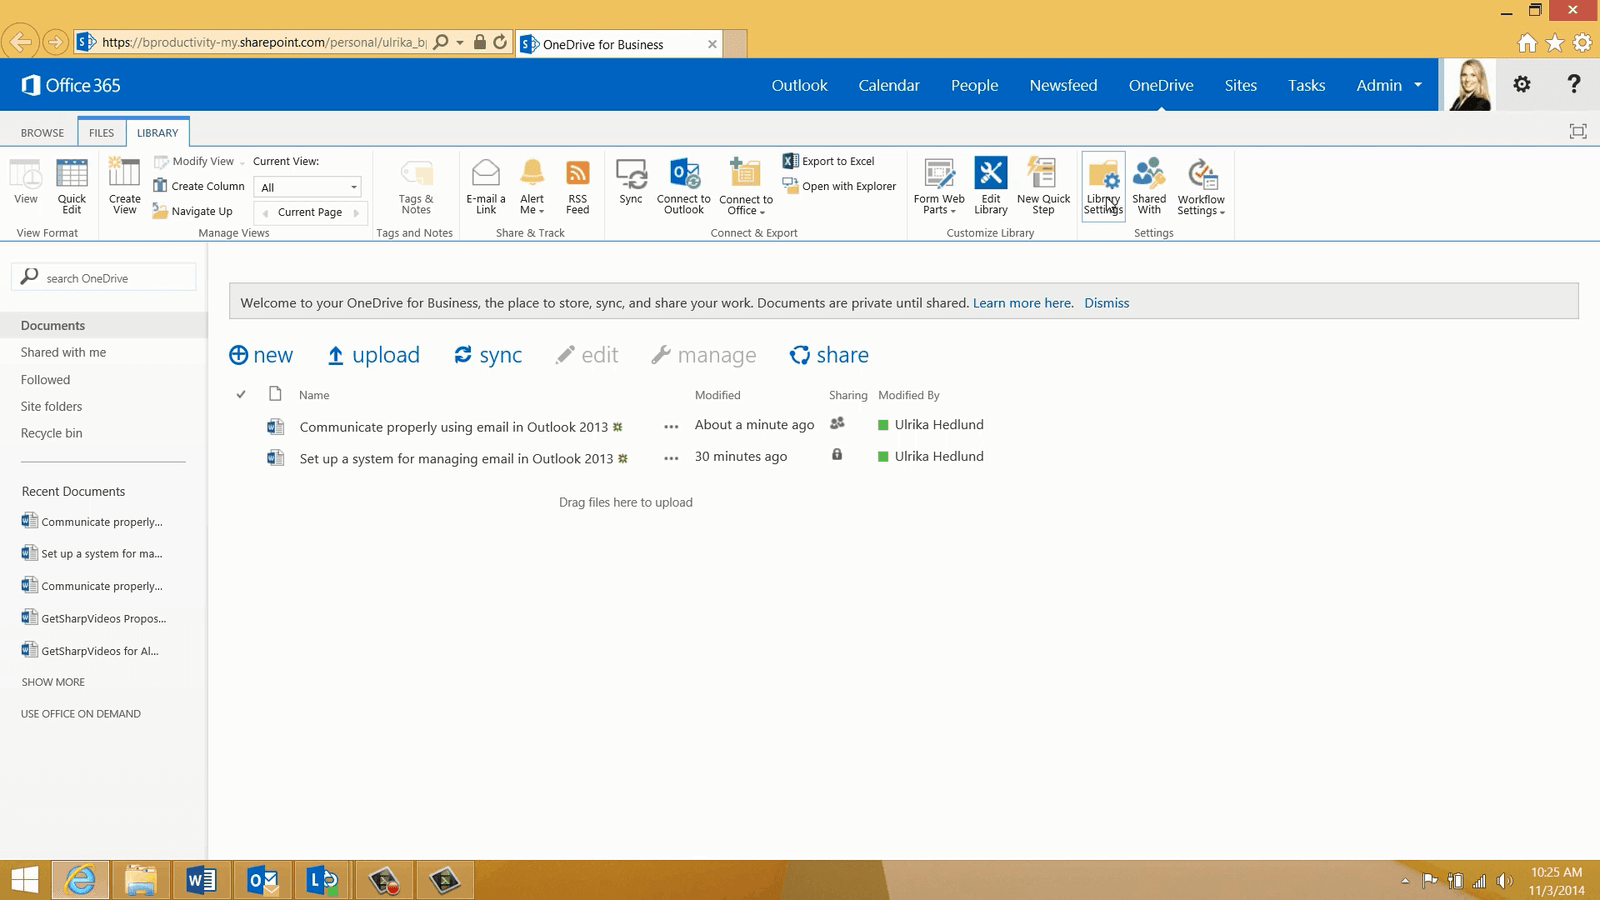
Here you can see that version control is turned on and that major versions are being saved automatically for this document library. You can also see that check-out is not required since we want multiple people to be able to edit the document at the same time. I’ll click “Cancel” here and close down the library settings and go back to the document.
How to edit a Word document online?
Let’s switch over to Nourah to see what this looks like for her. Nourah is traveling, she has logged into Office 365 via the browser on a temporary computer. Here she sees the email with the link to the document, she clicks the link to open up the document.

The document opens up in the browser using the web app Word Online. To edit the document she clicks “EDIT DOCUMENT” and selects to “Edit in Word Online”. The document opens up with the editing tools activated in the browser. She gets a notification that I’m currently editing the document.
Editing a Word document in iPad
At the same time, Jacob opens up the link to the document in the browser on his iPad. He selects to Edit the document using Word. The document opens up and now he can edit the document on his iPad using the Word app for iPad.
Co-authoring documents in Word
When I refresh the document in Word, I get a notification that two other authors are editing the document. If I click the little people icon in the Status Bar I can see that both Nourah and Jacob are editing the document. I can see from their green color status that they are online and available using the real-time communication platform Lync.

How to communicate with each other using Skype or Lync 2013?
Using a real-time communication platform like Lync or Skype you can easily communicate with your co-authors. When I hover over Nourah’ s name the Lync Quick Bar opens up and here I can easily select different ways to communicate with her.

Here I’ll click the instant message icon and send a message to Nourah, asking her to write a 100-word introduction. I can immediately see from Nourah’s reply that she is ok with that. Now I want to send a message to Jacob as well, so to include him in the conversation I’ll click the participant icon and then “Invite More People”. I’ll write Jacob’s name, and select to add him to the conversation as well. Now I can send a message to both of them asking if they can make the deadline by 12 pm. I’m happy to see from their responses that they are both ok with the deadline. I’ll thank them and then minimize the Lync communication window.
Co-authoring the Word document
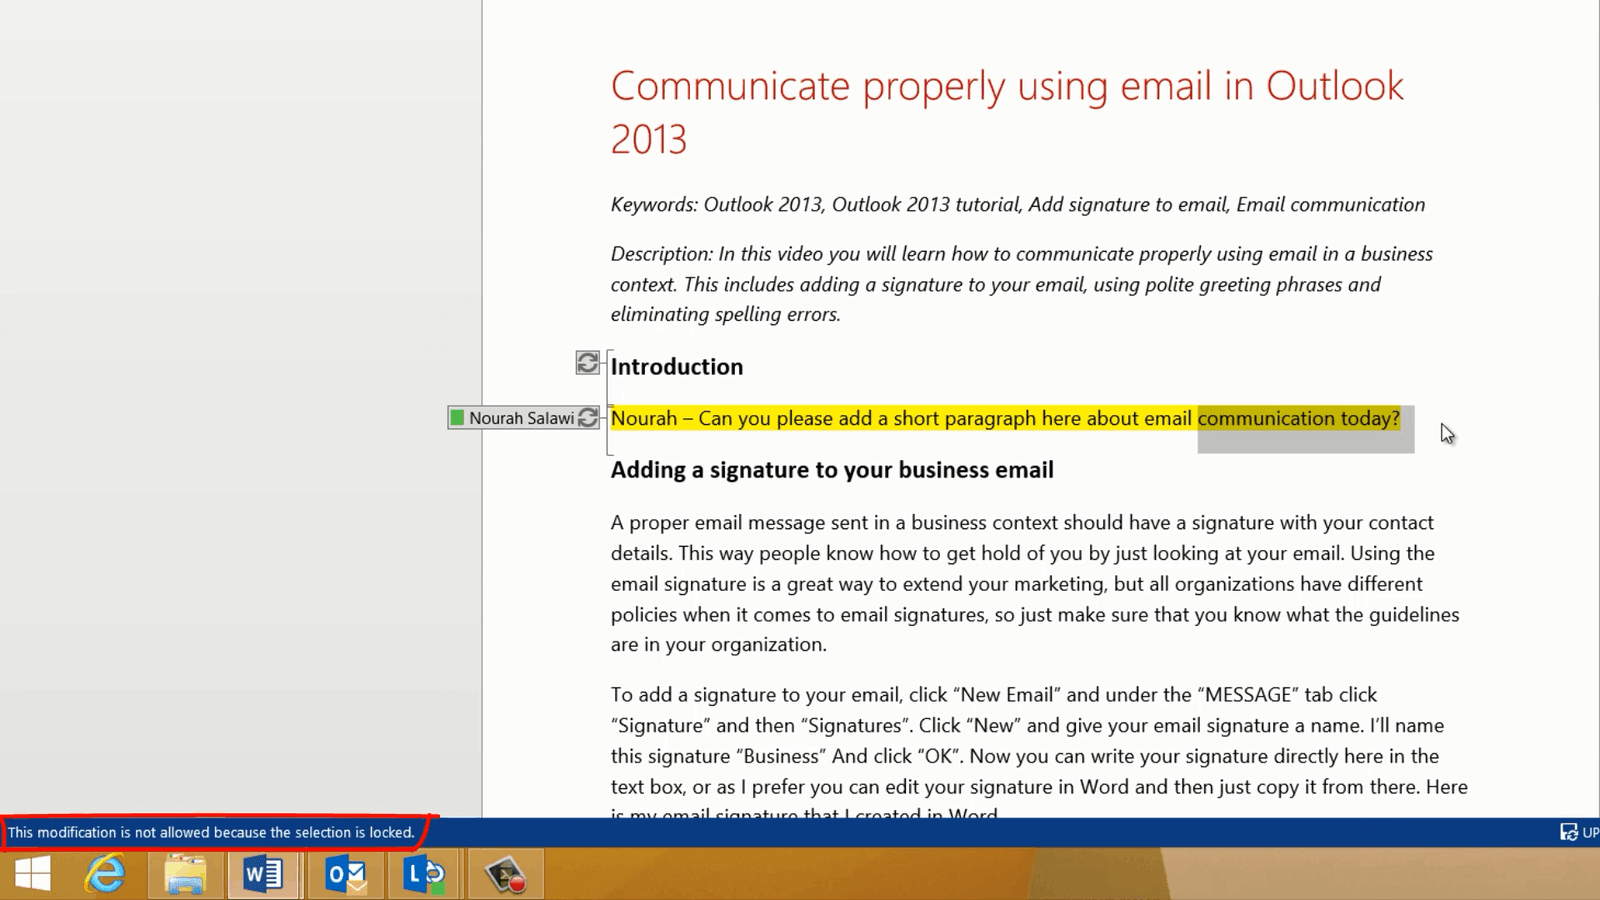
Let’s see what happens when Nourah starts writing text into the document. You can see Nourah’s screen in the top right corner. As soon as Nourah starts editing the text I can see in my document that the paragraph is marked with a grey line and her name.
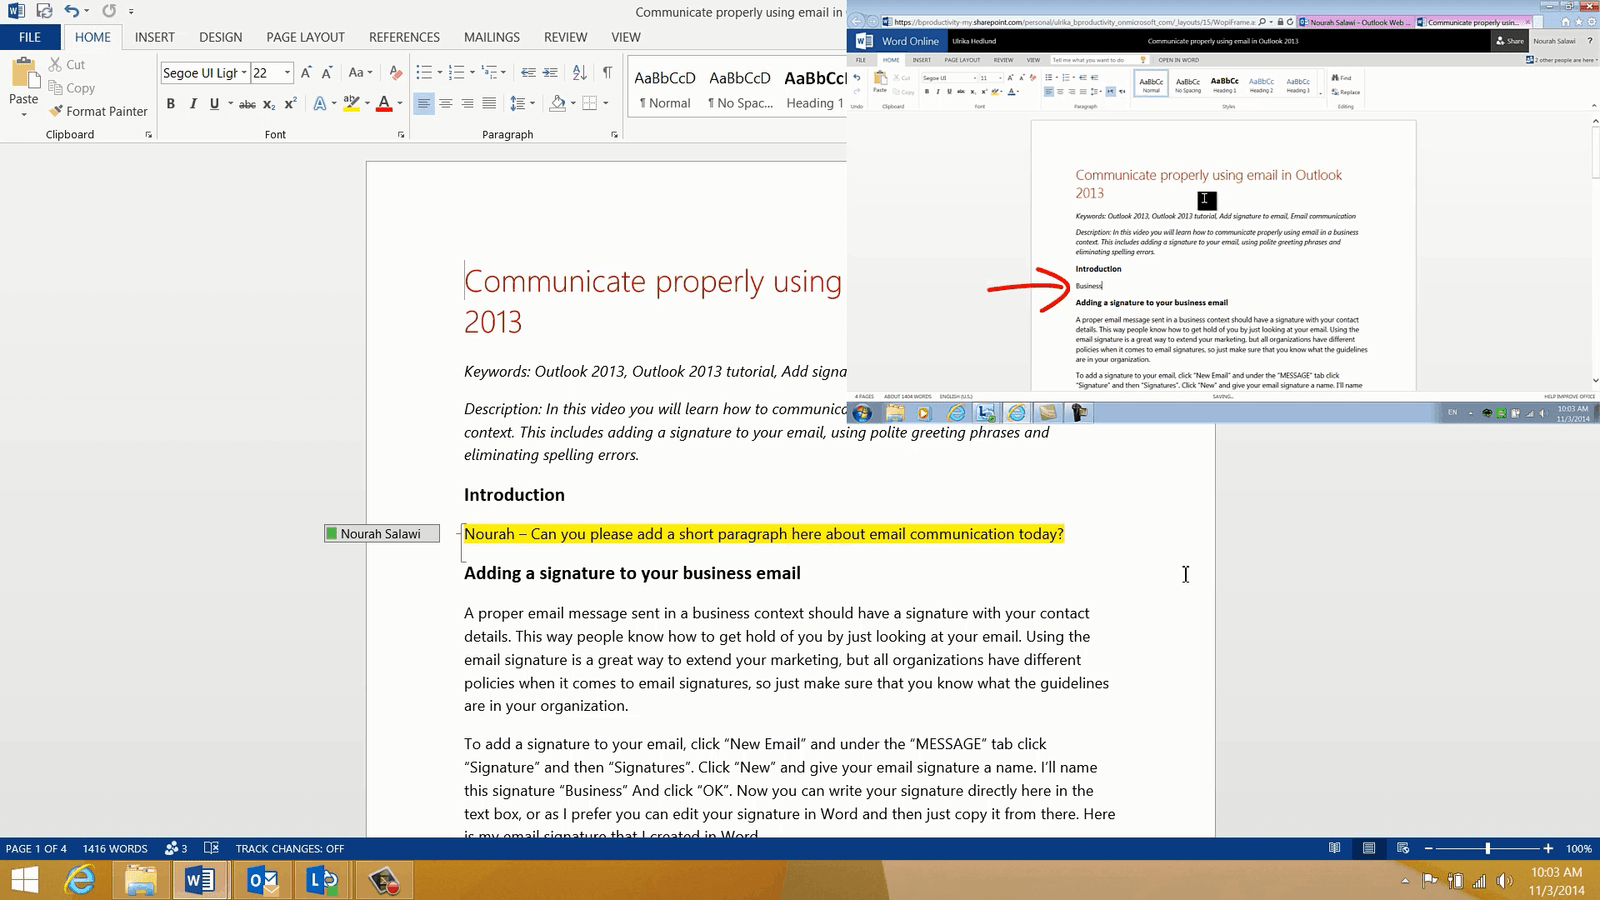
The section is locked for editing, so when I try to change something I get a message that modifications are not allowed since the section is locked.
To the right in the Status Bar, I can see that updates are available, I’m also notified that updates are available if I hover over the locked section.
If I scroll down a bit I can see that Jacob is editing another section of the paragraph, but there are no updates available yet.
To update the document click the save button. I get a message telling me that changes are marked with a green overlay. The green color is only shown momentarily to highlight the changes made by other authors. It does not appear when you print the document and the next time the document is saved it disappears.

Here I can clearly see the changes that Nourah has made to the document. After a while, I can see in the Status bar that more updates are available so I’ll click the save button again to refresh the document. Here I’ll mark the option not to show the information window again and click “OK”. The green color from Nourah’s section disappears, while the section Jacob has been editing is highlighted.
How to resolve editing conflicts in a Word document?
Even though it is unlikely, multiple people might start editing the same section at the exact same time, or someone might work on the section while they’re offline. Let’s see how Word manages these situations. I’ll go to the very end of the document by pressing “CTRL + End” on my keyboard. Now I’ll start adding some text to the Closing paragraph. In the top right corner, you can see Nourah’s screen. At the exact same time as I’m editing the Closing text, Nourah is making changes to the same section. Since Nourah is using Word Online her changes are made to the server document immediately.
When I save the document I get a notification that my changes conflict with updates made by someone else. As you can see, my document has been updated with the changes Nourah has made to the document, but her text has mixed with mine. I’ll click “Resolve” to manage this conflict.
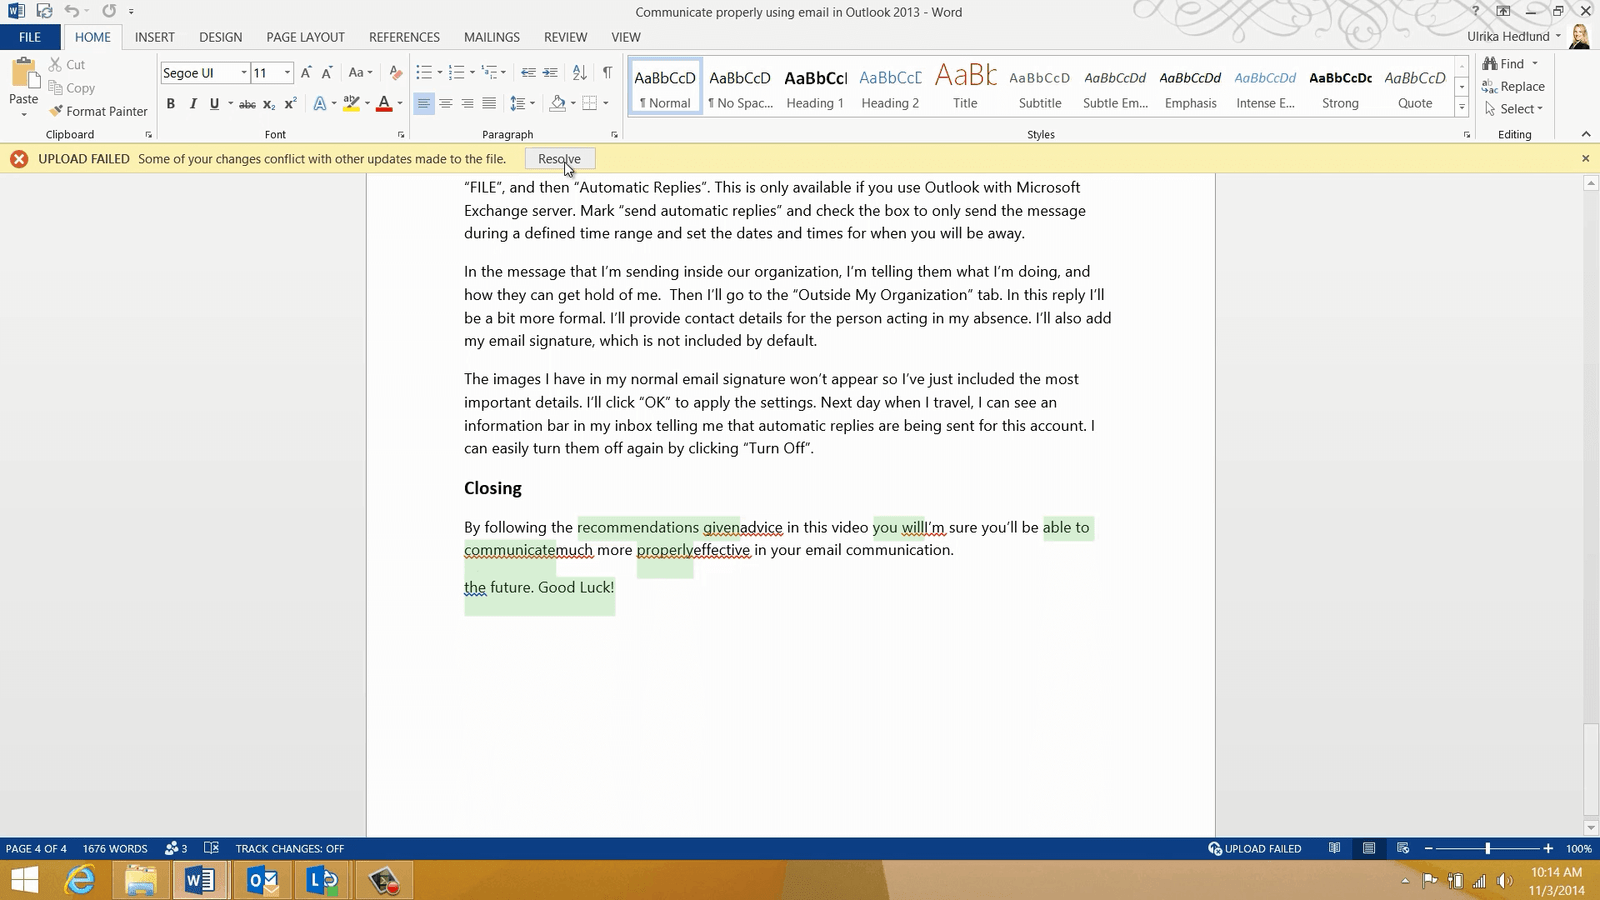
When you click “Resolve” the “CONFLICTS” tab opens up, here Word tracks the changes and I can select to accept or reject the changes I have made. In some instances, I prefer the wording Nourah has used so I’ll reject what I wrote and keep her text. In other places, I want to keep my text so I’ll walk through the paragraph resolving the conflicting text. When I’m happy with the changes I’ll click “Save and Close View” and then close the “CONFLICTS” tab. I’ll click Save again, and this time my changes are saved to server copy without any warnings.
How to check document versions in SharePoint?
Now I’ve gone through the entire document and I’m happy about the changes we’ve made together as a team. If however, I need to go back to a previous version of this document I can always do that thanks to the version control. To see earlier versions of the document, Click “FILE”, “Manage Versions” and then “Refresh Server Versions List” to make sure you have all the latest versions.

Mark the version you want to open, here I’ll open the very first document I first uploaded to the server. To restore this version click “Restore”. But in this case, I’m very happy with the current version so I’ll just close down this earlier version and go back to the current version of the document.
By working on this document together as a team and co-authoring it from various locations and devices, we were able to successfully meet our deadline.
How to format and structure your documents in Word 2013?
Introduction
There are a number of built-in capabilities in Word that can help you add structure to your document. By using styles you can more easily navigate your document and move things around. For years you have been able to save Word documents as PDF, and in Word 2013 you can now also edit PDF documents. Let me show you.
How to apply styles to Word documents?
I’m going to write a new script for one of our videos. I’ll open up a blank document and start with the title, “Keep your contacts up to date”. To make it easier to format and navigate the document I’m going to apply styles. To apply a style to the title I’ll mark the title and click on the “Title” style.
I’m not thrilled about the formatting applied, but I’m going to leave it for now and change the look and feel of the entire document when I’ve finished writing all the text.
Next, I’ll write the outline for the script. The outline will also work as the headings for each paragraph. When I’ve written all the headings I’ll mark them and apply the “Heading 1” style. Now I’ll just write the text for each section and finally, I’ll add information about the video at the top. I’ll mark the informative text at the top and select to apply the “Subtle Emphasis” style.

How to manage paragraphs in Word?
By applying heading styles it is much easier to navigate and work with the document. In Word 2013 I can get a good overview of the contents by collapsing and expanding the paragraphs. To collapse a paragraph place your cursor on the heading, right-click and select Expand/Collapse – Collapse Heading.
This option will only be available if you have applied a heading style. Another, quicker way to collapse the paragraph is to click the little grey triangle to the left of the heading. If you want to collapse all paragraphs right-click any heading and select Expand/Collapse – “Collapse all headings”.

Now you can focus your attention better by only expanding a single paragraph. To go back to the original layout right-click and select Expand/Collapse – “Expand all headings” and the full document will show.
How to arrange paragraphs in Word?
To quickly re-arrange paragraphs in your document, click the “VIEW” tab and then mark the “Navigation Pane”.

Here you can see all the paragraphs in your document if you have applied styles. You can easily navigate your document by just marking a heading to go to that paragraph. To change the order of a paragraph just grab it by holding down the left mouse button and then drag and drop it, and the whole paragraph is moved. To go to the beginning of the document click the little arrow which takes you back to the first page.

How to change styles in Word?
I’ll close down the “Navigation Pane”, and now I want to work on the look and feel of the document. To make it easier to change formatting, Word has a number of built-in style sets that you can use. To apply a style set to your document, click the “DESIGN” tab and select a style from the style set gallery.
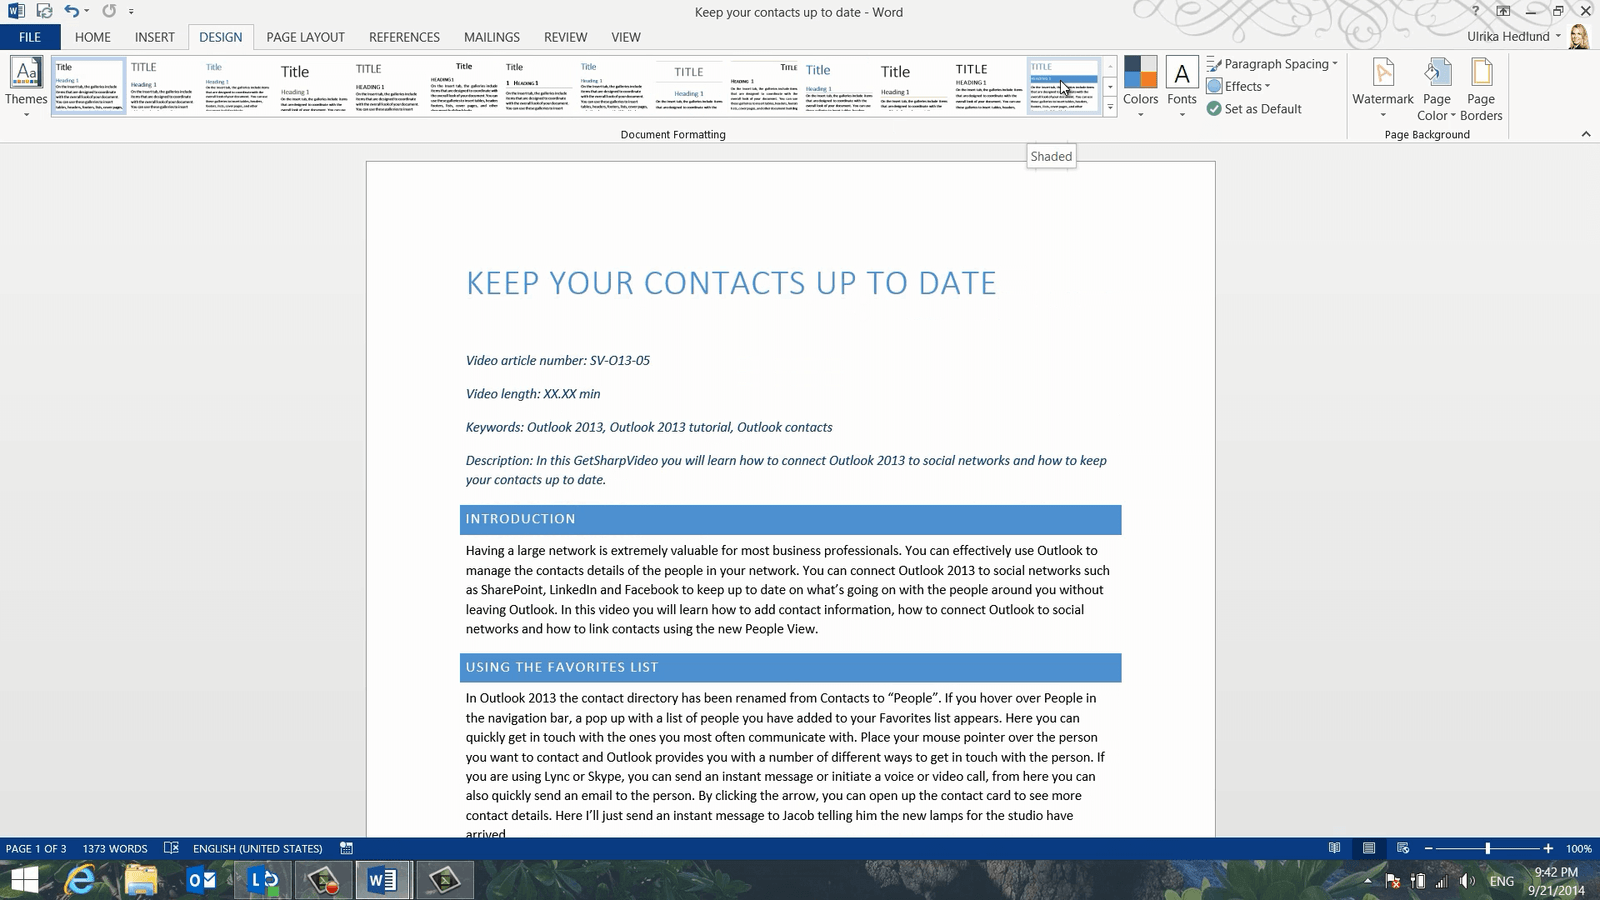
A style set is a combination of fonts, colors, and layouts. You get a live preview of what your document will look like using different style sets. I’ll select this “Shaded” style set. This is a good start but I want to make some changes. To change the colors used in the style, click “Colors”, and see which color combination you prefer.
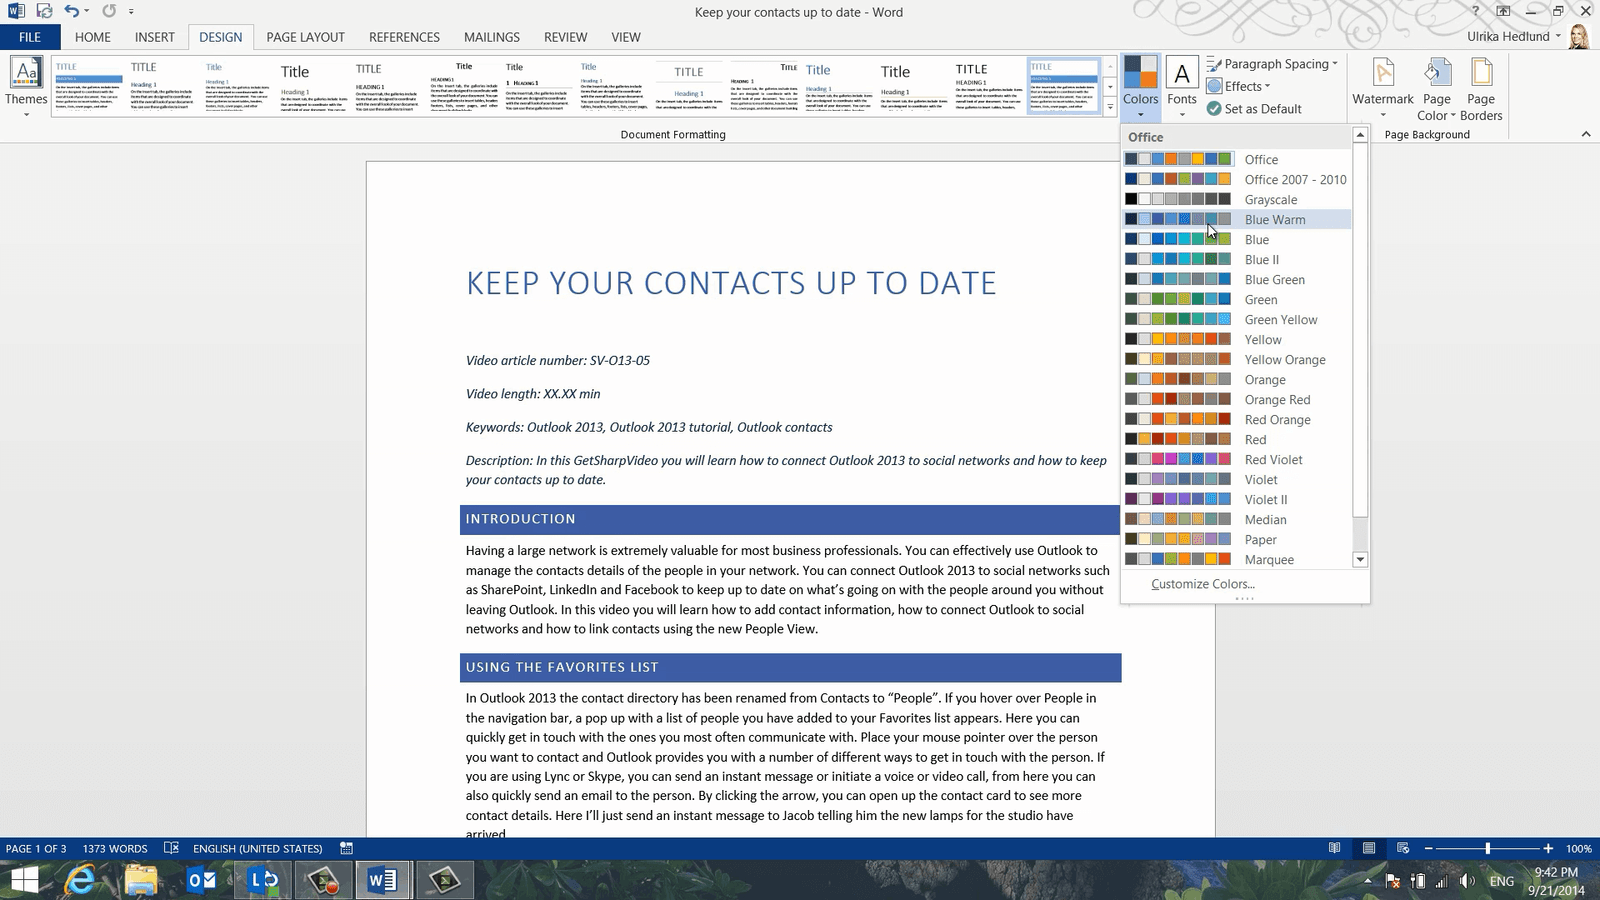
How to create numbered headings in Word?
I can continue to tweak the formatting until it’s exactly the way I want it. For example, I want to add some more space between the lines of the text. I’ll mark the first paragraph by double-clicking in the margin next to the paragraph. I’ll go to the “HOME” tab and click the Line and Paragraph Spacing” button and change the line spacing to 1.5.
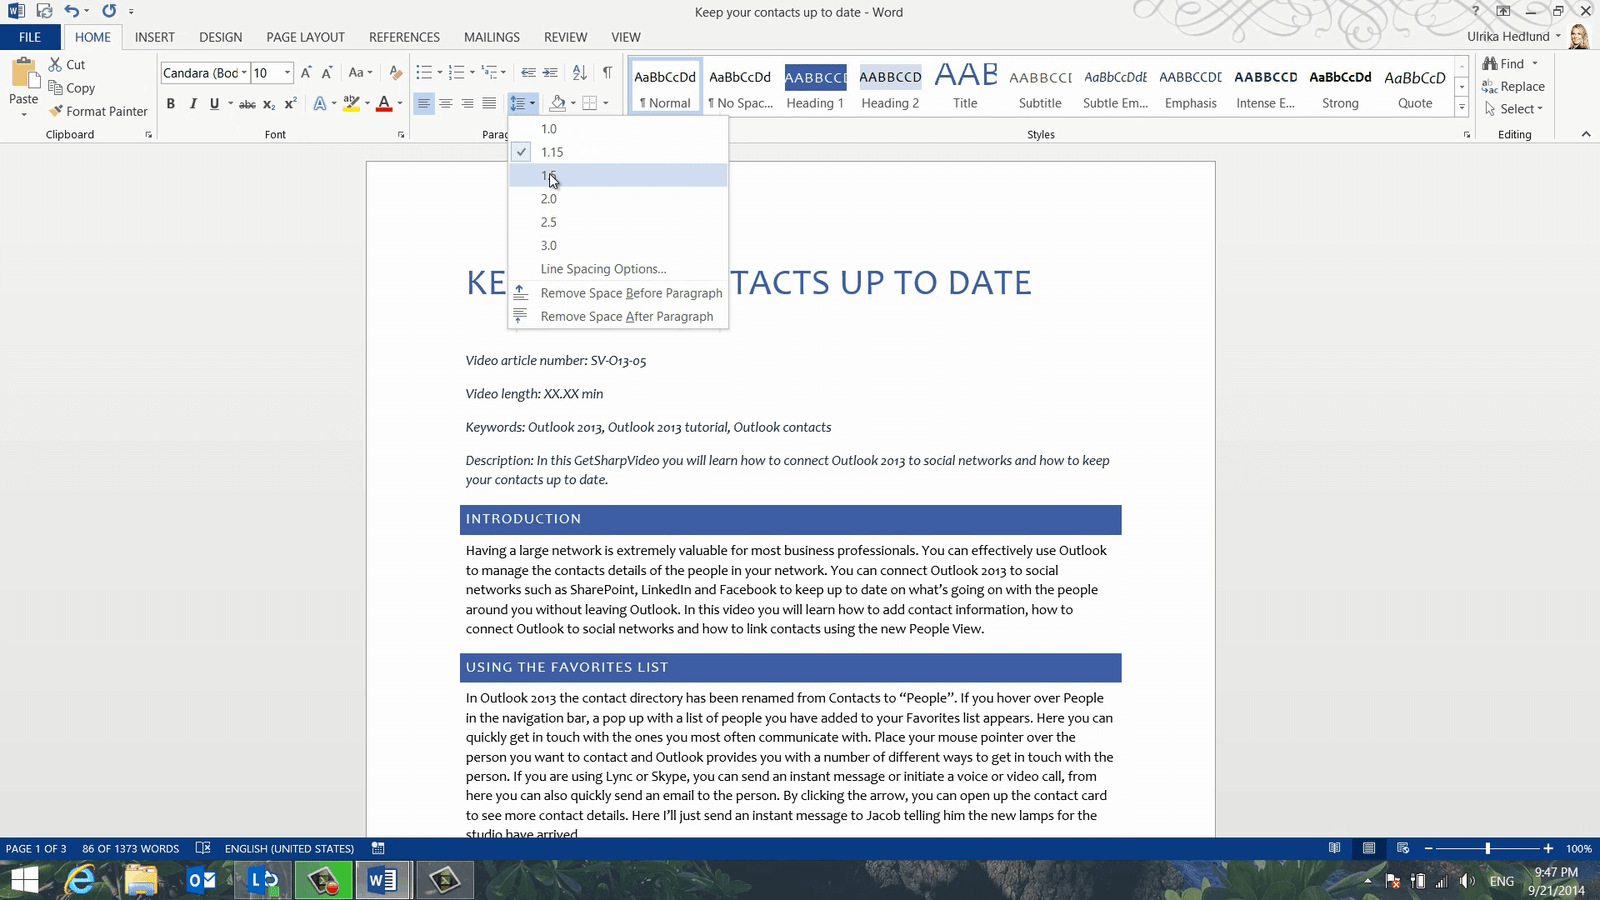
To apply this change to the entire document, I’ll right-click the “Normal” style used for the text and select “Update Normal to Match Selection”.
There, now more space is added to the entire document. This looks fine, however, I want the video information at the top to be more compressed. Click the Show/Hide paragraph button on the “HOME” tab to see all paragraph ending marks.
I’ll remove the one at the very top by just pressing delete on my keyboard. To remove the space after the paragraphs and make the text more compressed mark the text, click on the “Line and Paragraph spacing” button and click “Remove Space After Paragraph”.
To make it even more compact I’ll click again and select “Remove Space Before Paragraph”. If I want it even tighter I can decrease the line spacing, but I prefer to have a bit more space so I’ll click undo twice. To save these changes to the style I’ll right-click the “Subtle emphasis” style and select to “Update Subtle Emphasis to Match Selection”.

To hide the paragraph marks again click the “Show/Hide” paragraph button.
How to create numbered headings in Word?
Next, I want to add heading numbers. To add numbers to your heading style, mark a heading and click “Numbering” in the Paragraph section of the “HOME” tab. Select a number format of your choice.
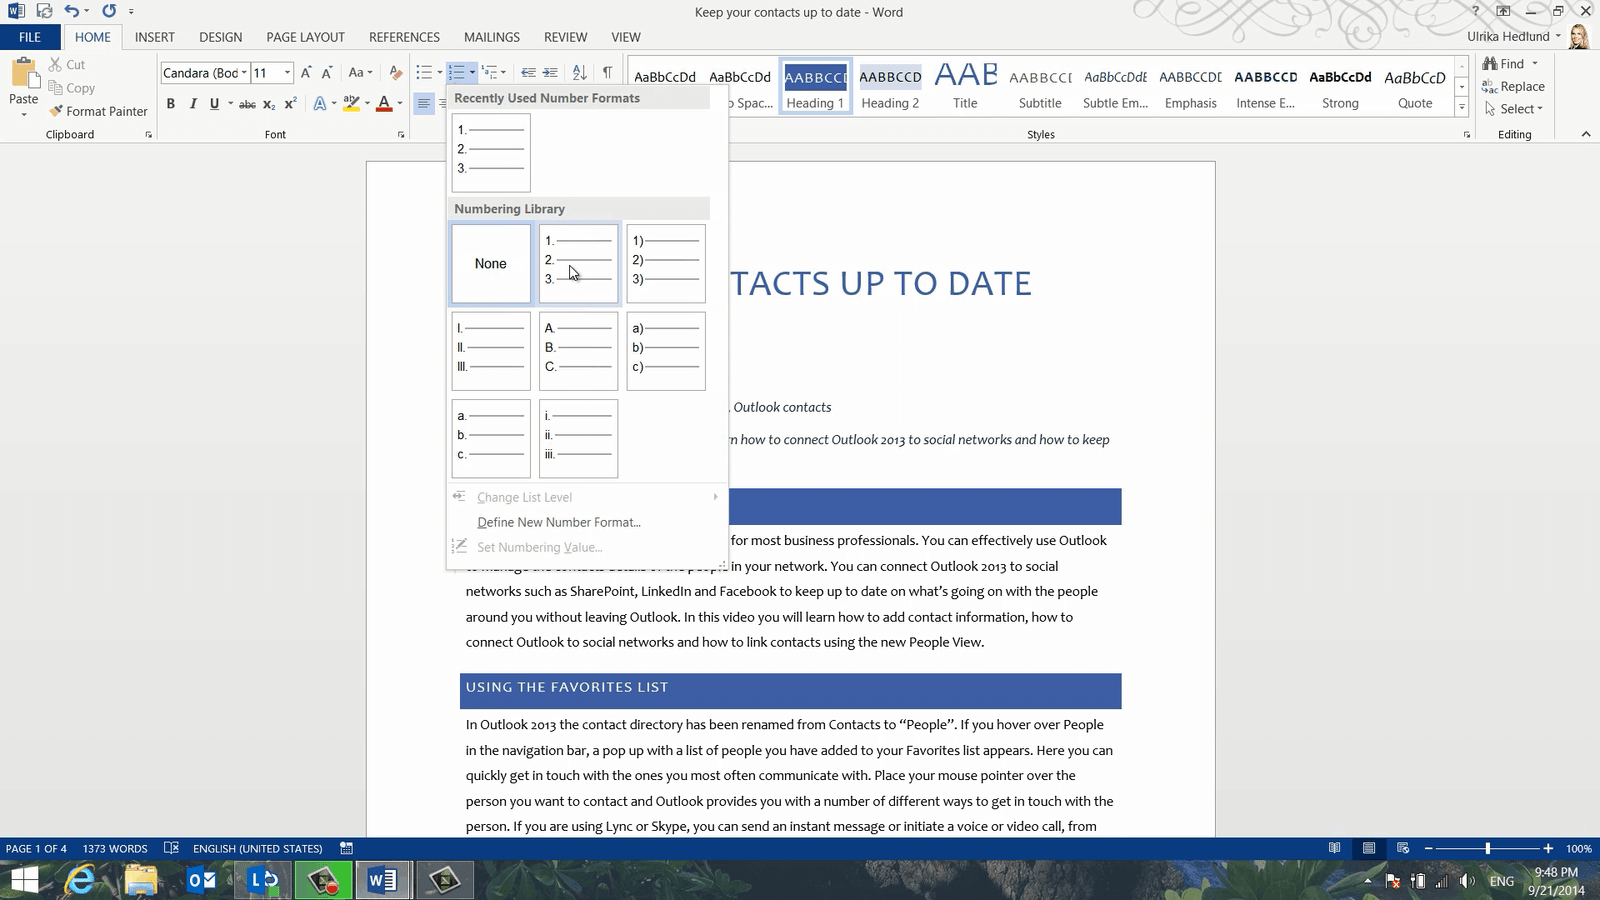
By default, Word indents numbered lists. To remove the indent click the “Decrease Indent” button. To apply this change to the heading style, right-click the “Heading 1” style and select “Update Heading 1 to Match Selection”.
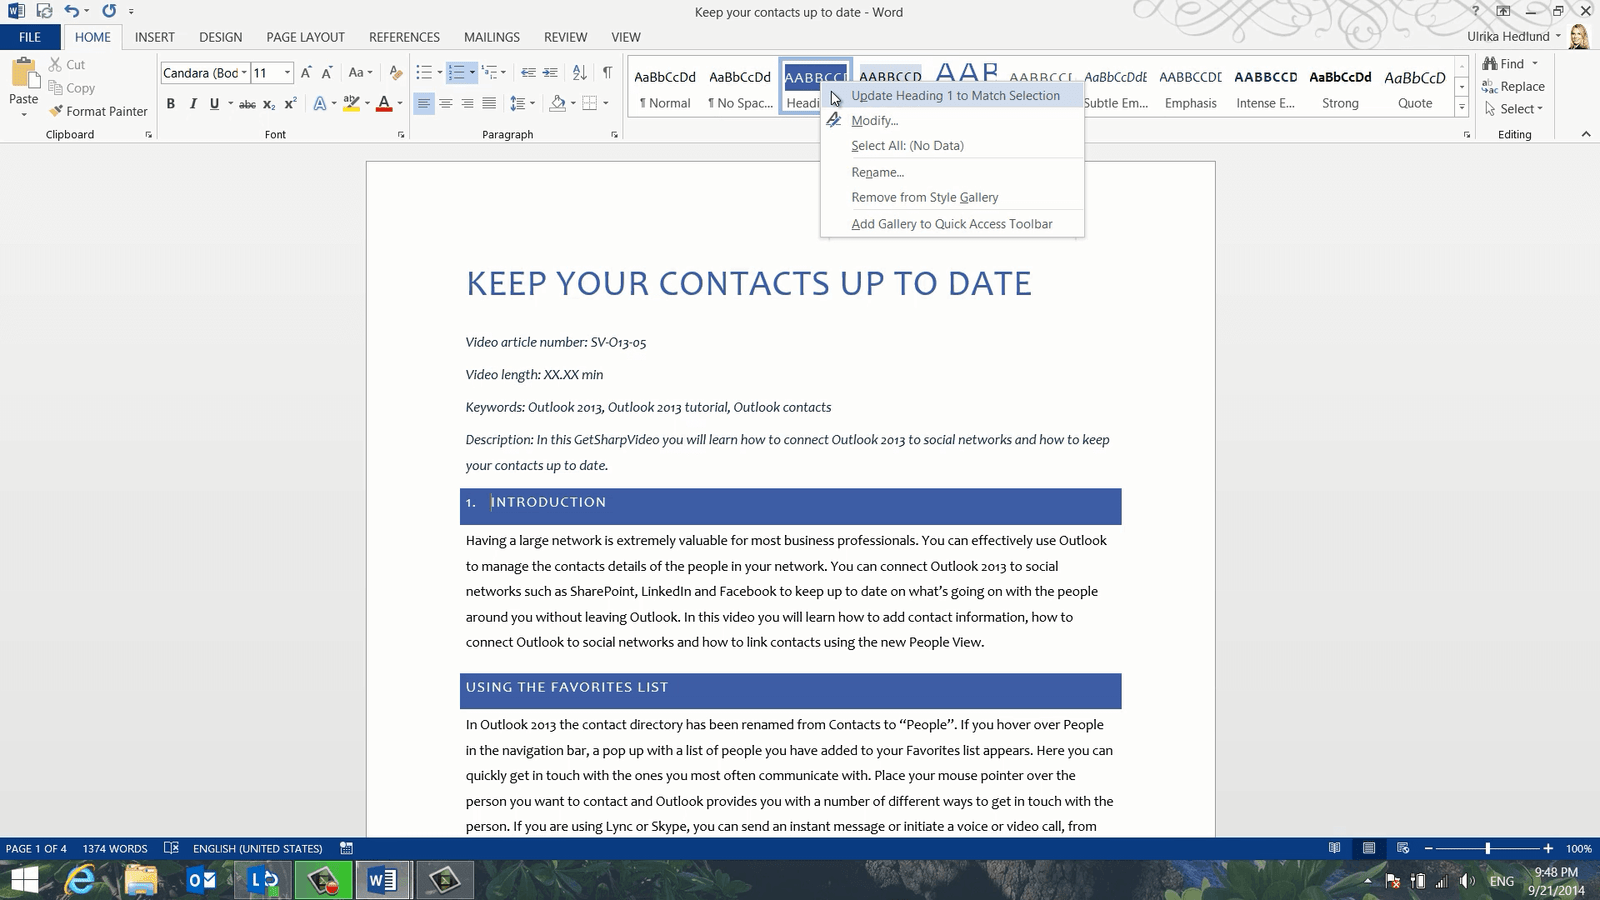
As you can see all the headings are automatically numbered.
How to save a new style set in Word 2013?
Now that I’m happy with all the formatting I want to save this style for future video scripts so that I don’t have to make the changes all over again. To save a style set go to the “DESIGN” tab, open up the Style Set Gallery and click “Save as a New Style Set”.
Give it a name, I’ll name this “Video Script Design”. If you open up the Style Set Gallery, you will see the newly created Video Script Design style in the “Custom” section. By saving your style sets you don’t have to waste time formatting your documents over and over again.
How to create a template in Word?
In addition to the formatting, this video script follows a certain text pattern. It has the article number at the top followed by the video length, keywords a description and then the actual script starts off with an introduction. A Style Set only saves the design, not the contents of the document. If you want to keep some of the text in your document it’s better to save it as a document template. To make sure I don’t overwrite my script by mistake I’ll close down the document. I’ll open up Word again and in the “Recent document” section I’ll right-click and select “Open a copy”.

Now I’ll remove all the specific text and make it more generic. To save it as a template I’ll click “FILE”, “Save As” and then I’ll select “Word Template” in the file type drop down. I’ll give it a name, “Video Script Template”.

Next time I open up Word, my template is available under the “PERSONAL” section on the start page.
How to save Word documents as PDF
Let’s go back to my initial video script again. I’ll open it up from my “Recent documents”. When I’m done with the final script I want to save it as a PDF document. To save a document as a PDF click “FILE” and then “Export”, “Create PDF/XPS” and then click ”Publish”.

Your document is exported into a PDF document that you can easily share with others.
Edit PDF documents in Word 2013
Sometimes you need to make changes to PDF documents. Here I have some other scripts I have written that I would like to apply my newly created style too. The problem is I only have them as PDF documents. In Word 2013 you can open up and edit PDF documents. To open up a PDF document in Word, right-click the PDF document and select to “Open with” Word.

You’ll get a warning that the document might not look the same in Word as in Adobe. Click “OK” to open up the document. The PDF document opens up and as you can see in this case the formatting looks quite alright. So now I can continue to work on this script and apply my newly created style set in Word.
Closing
By knowing how to add structure to your documents using styles you’ll be able to save a lot of time when it comes to navigating and formatting documents.